| Back to Back Issues Page |
 |
|
Digital SLR Guide Newsletter - 5 Quick Photo Tips May 29, 2011 |
Having trouble viewing this newsletter? Read the latest issue online at
https://www.digital-slr-guide.com/dslr-news.html or read back issues If someone you know has forwarded you this newsletter and you've enjoyed it, subscribe now to receive the next issue when it's published.
DSLR News - May 2011
Special Note: The format of the newsletter has changed a bit this month, thanks to Google. After the last issue, people reported display problems in Gmail. After investigating the issue, I found that this new format was the only one that displayed well in Gmail. If your email reader has issues displaying this, please let me know.
In This Issue
Find a Lens You Love
Attach a new lens to your digital SLR, and suddenly you see the world in a whole new way.
But there's a big decision that you're going to have to make before you can attach your new lens to your camera: first or third party?
 No, I'm not talking about any kind of lens festival here - first party lenses are those made by the same manufacturer of your camera, while third party lenses are made by companies whose primary business is building lenses.
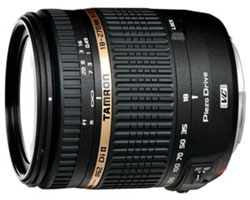
For example, if you own a Nikon camera, then you can either pick a Nikon lens, or you can get a lens from Tamron, Sigma or Tokina (these are the three main third party lens manufacturers).
The third party companies make the exact same lens for a variety of different camera manufacturers. For example, you can get a Tamron 18-270mm lens that is compatible with Canon, Nikon and Sony cameras.
The most noticeable difference between first and third party lenses is price: third party lenses are often cheaper than equivalent first party options.
You might draw the conclusion from this that third party lenses aren't built as well, resulting in reduced image quality. Surprisingly, this is not the case.
Many third party lenses are equivalent to their first party alternatives in terms of optical quality, and some are even superior. After all, the ONLY business for third party companies is to make lenses, while the main manufacturers are making cameras, lenses, batteries, etc.
So, which one to get?
When looking for a new lens, start with the basics: figure out first what focal length you want (wide angle, normal, telephoto) and then make some decisions about the maximum aperture of the lens (variable vs. fixed).
As you work through your lens options, you'll find lots of first party options to choose from.
Once you have a short list of 2 to 4 options, go looking for similar lenses made by third party companies. You may not be able to find EXACT matches for the lenses that you've selected, but at least you can find some third party options with considerable overlap.
The final step is to assess how the optical quality of the third party lenses compares to that of the first party lenses.
I don't suggest that you try to do this yourself. Instead, rely on the expertise of others who have done such comparisons. If you read lens reviews at Amazon.com or at Fredmiranda.com, you'll find plenty of people comparing the optical output of third party lenses with their first party equivalents.
Once you feel comfortable that the third party lens has the same optical quality as the first party - and costs several hundred USD less - then your final decision should be pretty easy to make.
Happy lens-hunting!
Stay Updated!Take Advantage of ISO
If you'd like to see an instant improvement in the quality of your photos, become an expert on ISO.
The ISO setting is one of the most powerful features available on your digital SLR, providing you with the ability - if you so choose - to shoot pictures in near-dark conditions without a flash.
What does it do? The ISO setting controls how quickly your camera's sensor absorbs light.
Higher ISO settings (1600 to 12800) mean the sensor is absorbing light quickly while low ISO settings (100 to 800) mean the sensor is absorbing light slower.
 ISO 1600, Natural Window Light The technical description above does not do justice to the power and potential of the ISO setting. The real reason that ISO is so special is that it provides you with direct control over your camera's shutter speed which makes the difference between images that are blurry and those that are crystal clear.
Here's the example: you're taking pictures in a low-light environment (indoors, cloudy day, late afternoon, deep shade, etc.). You are photographing a moving subject and even with your lens aperture open as wide as it will go, every shot you take is a blurry mess.
Simple solution: increase the ISO. If it is set to 100, bump it up to 400. If you are already at 400, try 1600.
When you increase the ISO you increase the speed that the sensor absorbs light — this in turn increases your shutter speed. Faster shutter speeds freeze subject motion, providing you with sharp photos.
Now, there is a drawback to using extremely high ISO settings (anything above 6400): the higher the ISO, the greater the amount of "grain", "speckling" or "digital noise". When you look closely at your high ISO images, you'll see patterns of tiny dots instead of a smooth image.
Essentially, very high ISO settings degrade the quality of the image.
This means that you want to stay within the ISO 100 to 800 range as much as possible. However, if you're trying to capture a spectacular photo opportunity and ISO 1600 isn't giving you a shutter speed that's fast enough, then boost that ISO higher just for that moment to get a blur-free photo.
Fill the Frame
Before I launch into this tip, some clarification is required: namely, what I mean by the word "frame".
The frame is defined in two ways:
Now, what you see through the viewfinder is NOT a 100% match with what you get in your final images, due to something called "viewfinder coverage". In many DSLRs, the viewfinder is only able to show 95% of what you'll get in your photos, but this is pretty close for most people's needs.
If you require more precision from your viewfinder, then you'll have to spend more money on a DSLR with 100% viewfinder coverage.
Back to the tip at hand: one great way to improve the impact of the pictures that you take is to fill the frame (viewfinder or final image) with your primary subject. This tip is more important for portrait photographers, but it can be applied to landscapes as well.
In a landscape image, you have to pick SOMETHING as the subject of your photo - maybe it's the clouds in the sky, some interesting rock or a reflective lake.
Rather than making this subject only a portion of your image, zoom your lens or move the camera closer so that the subject really takes up all the available space in your viewfinder.
The same approach can be applied to portrait subjects. Unless you are trying to provide some background context, your portraits will look much better when the subject takes up most of the available space.
If your subject is too small in the frame, people will have a harder time seeing the focal point - the most important subject - in your photos.
 Fun With Filters
A filter is really an artifact of the film SLR.
In its most basic form, a filter is a piece of glass that screws on to the front of your lens.
There are many different kinds of filters, and they serve different purposes.
The most common is a clear piece of glass called a UV filter. This filter doesn't really change your photos in any way - its main use is to protect the front of your lens from scratches. If you should accidentally drag the front of your lens across a rock, only the filter gets scratched and you don't permanently damage your expensive lens.
The second most common filter is called a polarizer.
Polarizers are typically used for landscape photography since they are able to neutralize glare and reflections. They are also often used to make skies an intense blue color, but this effect can be over-done.
Warming filters add a rose-colored tint to your images and are best used for portrait photography, especially if you're taking pictures on overcast days. These filters come in a variety of different intensities depending on the amount of warming you'd like to see.
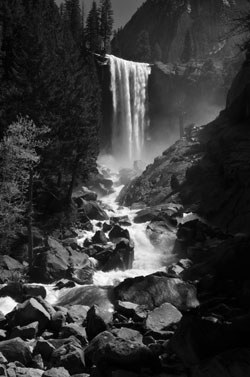
Finally, neutral density filters are used to reduce the volume of light entering the lens. The most common use of these filters is in landscape photography for flowing water: in order to get a slow shutter speed to create a smooth water effect when it is daytime, the amount of light entering the lens must be reduced.
The reason that I called filters "artifacts" at the beginning of this section is because just about any filter effect - with the exception of neutral density - can today be replicated with software.
However, if you're not keen on sitting in front of your computer for long periods of time and prefer to get images looking "right" at the moment of capture, then a filter may be just what you need.
 Beginner Digital SLR Lessons
Get Creative Without Color
In last month's newsletter, I provided information on your camera's metering mode and color control.
This month, we're going to put the two of these together to talk about how you can create more "artistic" images right in the camera, no software required.
 The color mode that you're going to use is a special one since "true" colors are lacking: monochrome.
Just about every DSLR released after 2010 has some type of monochrome image mode, allowing you to take black and white photos with your digital SLR.
The more advanced models provide you with some additional monochromatic image controls: filters and color tones.
Like the filters that I have described above, there are three types of traditional filters used for black and white photography: red, yellow and green. If you were using a film camera loaded with black and white film, you could use one of these colored filters to enhance the look of your photo.
With a DSLR, you no longer need the colored lens filter - you can just select the effect you want from your camera's menu.
In addition to filter effects you can also select toning effects. These add a color tint to your black and white image, turning them orange, red, blue or green (and sometimes even other colors).
So - how do you get creative with all these settings?
If you point your spot meter at the brightest object in the scene, everything else will become quite dark. Since you have taken away the color information, you will find yourself working with silhouettes.
This is where the artsy creative aspect comes in. Using these settings, see what variety of images you can create, paying special attention to the elements in the photo that appear pure black.
Use this opportunity to focus on capturing patterns and textures since you don't have to worry about color OR getting the exposure exactly right.
JPG or RAW?
This is a question that I've answered in past newsletters, but it seemed like a good time for a refresher.
There are two main formats that you can use when taking photos with a DSLR:
Based on this brief description, RAW sounds like a pretty good option, providing photographers with a lot more image-editing flexibility. It explains why RAW is the preferred image format of many professional photographers.
However, the RAW format comes with some pretty substantial drawbacks for the amateur snapshot photographer:
If you don't want to spend hours in front of your computer then RAW files are definitely NOT for you - stick with JPGs and live with the fact that an imperfect image cannot be easily fixed. If you mess up a great shot, it's just a lost photo opportunity.
However, if you don't mind spending time developing each photo you take and want complete control over how the final image appears, then you should definitely give the RAW format a try if you aren't already doing so.
 Intermediate Digital SLR Lessons
Photo Links
Photo Contests
Other Photography Sites
Great Photo Blogs
Recommended Digital SLR Retailers
(These are the three online stores that I use to purchase all of my digital SLR photography gear)
In Conclusion
I recently got my hands on a Nikon D7000 and am putting together a guide for it - keep an eye out, as that should be available on the site soon.
Right after I get done with that, I'll be moving on to the Canon Rebel T3i 600D.
All right, enough chit-chat. I have to get back to work!
Until next time, happy picture-taking!
--Chris Roberts, Your Digital SLR Guide
|
| Back to Back Issues Page |
