
December 31, 2009
DSLR News - December 2009 Happy Holidays everyone! Here's hoping that this holiday season finds you happy, healthy and having a lot of fun taking pictures with your digital SLR camera (especially if you've recently acquired a new camera, lens, or other photo-related gift). As for me, I'd like to take a quick moment here to say thank you to all the loyal readers of this newsletter. Many of you have sent in your feedback over the course of the year and it's great to hear what you're learning from the site and the newsletter. The positive energy that you generate helps a lot when I feel that I've reached the limit of my ability to write about digital SLR cameras. The sheer volume of comments, questions and feedback - while sometimes overwhelming - provides me with new ideas and new material to write about. The camera manufacturers also help out since they are relentlessly adding new features to their respective camera lines. New innovations - like video capture - require a whole new take on the digital SLR. With a lot of talent and plenty of time you can now shoot your own indie movies in addition to capturing stills. The door has been opened to a whole new world of image-making possibilities. So what's in store for digital SLR cameras in 2010? Expect video capture to become pretty common. Many new cameras in 2009 included this feature and I think that pretty soon it's going to be tough to get a DSLR without it. Also expect more manufacturers to dabble in High Dynamic Range (HDR) technology. Sony and Pentax already started this trend in 2009, introducing cameras with built-in HDR capture modes. The ability to capture a greater dynamic range can only improve the images captured by DSLRs - and higher image quality IS one of their main selling points. As for the manufacturers, Sony will probably continue to churn out cameras, Panasonic and Olympus will release more Micro 4/3rds cameras, Pentax will continue to come up with cost-effective DSLRs and Nikon and Canon will continue their ongoing battle for the top spot. |
In This Issue
Latest SLR Guides
Canon Rebel T1i
Nikon D5000
Nikon D90
Nikon D60
Canon Rebel XSi
Pentax K20D
Canon 40D
Olympus E-510
Nikon D80
Canon Rebel xTi
Nikon D40
Digital SLR Terms
Megapixels
Stabilization
ISO / Image Noise
Sensor Dust
Crop Factor
RAW vs. JPG
Continuous Photos
Autofocus Points
Aspect Ratio
Lens Terms
Focal Length
Prime vs. Zoom
Maximum Aperture
First vs. Third Party
SLR Lens Features
Canon Lens Glossary
Nikon Lens Glossary
|
Stay Updated!
Minimalist Flash
Now that the holidays are upon us, you're probably taking a lot more pictures with very dim available light.Unless you'd like all of your family members to appear as blurs of color in your photos, you're going to have to add some artificial light to the scene.
The simple solution here is to pop up the flash that sits atop your digital SLR camera. The built-in flash on a DSLR is not only convenient, it's also quite easy to use: just activate it and fire away.

Unfortunately, the pop-up flash comes with a rather serious drawback: it makes most portrait subjects look pretty terrible. The light that comes out of your built-in flash is harsh and direct, which is why so many people get that deer-in-the-headlights look.
The unflattering light comes with another problem that everyone is all too familiar with: red eye. Gleaming red eyes are the result of a flash that is located too close to the camera lens. The light from the flash bounces off the back of your subject's eyeballs and reflects right back into the lens.
The good news for all you family holiday photographers is that if you're able to address the first problem - harsh light - you'll never see red eyes again.
So, what is the solution to harsh light? You have to make the light source bigger.
Increasing the size of a light source softens the light on your subject and creates a more appealing portrait, since you're not blasting the poor person with direct light.
There are two ways to increase the size of the built-in flash that's sitting atop your digital SLR:
- Place semi-transparent material (called a diffuser) in front of the flash
- Bounce the light from your flash off a large reflective surface

A flash diffuser can be something as simple as a piece of typing paper. Just hold the typing paper in front of your camera's built-in flash. It may look ridiculous to your subjects, but the net result is a more flattering portrait.
The reason is that the light from the flash is not hitting your subject directly anymore. Instead, it's illuminating the paper, which in turn is throwing light onto your subject.
If you don't have any typing paper handy (or think that it will make you appear totally cheap to friends and family) then a mere $24.95 USD buys you a device called a Lightscoop.

The Lightscoop is pretty simple: it's just a mirror that sits in front of your built-in flash. When your flash goes off, the light from the flash is reflected straight up from the top of the camera.
This helps to diffuse the flash, but you need a bit more: you also need a reflective surface so that the light from the flash can bounce onto your subject. As reflective surfaces go, there's nothing better than a good old ceiling or wall.
Now every time you take a picture, the light from your flash shoots away from your camera and strikes the nearest large surface. This surface reflects the light back, evenly illuminating the subject - in fact, anyone viewing your photos should have a hard time telling that you used flash at all.
I mentioned it before, but it's worth noting again: only direct light causes red eye. If you are able to either diffuse OR reflect the light from your flash, you won't have any more photos where your party guests look possessed.
Beginner Digital SLR Lessons
- Master the controls of any digital SLR
- Dramatically improve the photos you take
- Learn at your own pace
- Download each lesson as a PDF
- Ask me questions
What's New
There aren't too many updated pages to announce this month - and there's a good reason for that.I am currently hard at work on a new series of digital SLR lessons. Several visitors to the site (and those who have gone through the beginner set of lessons) have requested lessons that offer more advanced techniques.
Others are also asking about how to get the most out of their flash units. The lessons that I am currently writing will provide this information, plus a whole lot more.
Since it takes me a great deal of time to put together a set of lessons that I feel is complete, I can't update the pages of the site as often as I'd like. Please be patient over the next couple of months as I work to finish the lessons.
I'm aiming to have them published and available around March of 2010 (but hopefully sooner if I can).
Quick Photo Tip
This new section of the Digital SLR Guide newsletter will focus on one specific photographic tip.Each month, I'll send out a request on the Digital SLR Guide's Facebook page for tip ideas - one suggestion will be selected for inclusion in the newsletter.
This month's tip - thanks to everyone who suggested ideas - is relevant: you've just torn away the wrapping paper and have a brand new shiny digital SLR sitting in your lap.
Where do you begin?
First things first: open the box and find the rechargeable battery and charger (provided this is how your camera is powered). Pop the battery into the charger and go plug it in somewhere right now.
It's best to get the battery up to a full charge before you start using your new camera. Since charging a Lithium Ion battery can take several hours, the sooner you get the battery charged the sooner you can take some shots.
With that out of the way, here's my next piece of advice: take the camera out of AUTO mode and switch over to P (Program) mode instead.
Program mode really is AUTO mode (the camera picks all the right settings for you) with one KEY difference: in Program mode, you can change the ISO setting and in AUTO mode you can't.
The ability to set the ISO number on the fly is one of the most powerful features on a digital SLR camera - but you won't ever get to play with it if the camera's always in AUTO mode.
Take a look at your camera's manual to see how to change the ISO setting and practice a bit changing this setting.
Why is the ISO setting so powerful? It lets your camera see in the dark - sort of. Essentially, increasing the ISO number (from a value of 100 to 1600 or higher) makes your camera's sensor absorb light faster.
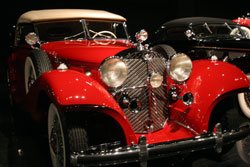
This allows you to shoot in dim available light without ever having to use your flash. This shot of a vintage car inside a museum - captured at ISO 3200 - is a good example of this (the only light in this image comes from the overhead museum lights).
While most useful when you're taking pictures indoors, high ISO settings also come in handy when you take photos outside on very overcast days, especially if you're taking pictures of fast-moving subjects.
If you want to capture a shot of your kids playing in the snow when there's not a bit of sun in sight, you're going to need to boost the ISO to 400 or 800 if you want to ensure that your shots don't all turn out blurry.
But remember - you can't change ISO in AUTO. So set your camera to P, and then have some fun taking photos!
For more information on the ISO setting, read the following:
Picture Stories

Believe it or not, this picture of my son was taken in my garage.
I've been experimenting with artificial light lately and this is one of a series of test shots that I took to evaluate my lighting setup.
The backdrop is quite fancy - a white painter's drop cloth, the cheap kind that you can buy from just about any hardware store.
The reason that it appears pure white in this image is because there is one flash behind the drop cloth pointing in the direction of the camera. Since the drop cloth is not thick and lets some light through, this part of the photo is so over-exposed that it appears white.
To set up this shot, I tacked up the drop cloth up in our garage, then set up the lights around it (I used 3 for this image). There is one flash to the left of the camera, one to the right, and the one positioned behind the drop cloth.
My son was patient enough as I re-arranged the lights and adjusted their placement, but eventually he told me that he was bored and was going to "take a nap".
Thankfully, the lights were all set up at that moment and I was able to grab this one shot before he really decided he was done and ran off to play.
Photo Links
Other Photography Sites
- Betterphoto - a wealth of photography learning opportunities
- Flickr - share your photos with friends and others
- Photo.net - plenty of learning resources and examples of exceptional photography
- Borrowlenses - rent lenses to use on your digital SLR before you spend tons of money on one
- Photojojo - tons of photography do-it-yourself (DIY) projects
- Viewpoints.com - read product reviews from other consumers like yourself
Great Photo Blogs
- Digital Photography School - hundreds of photo tips and techniques
- Strobist - everything you ever wanted to know about lighting with external flash
- Joe McNally - get the "behind-the-scenes" thought process from a professional photographer
Recommended Digital SLR Retailers
(These are the three online stores that I use to purchase all of my digital SLR photography gear)In Conclusion
2009 was a very busy year here at the Digital SLR Guide, with the release of 15 new digital SLR cameras and the introduction of a brand new breed of camera: the micro 4/3rds (offered by Olympus and Panasonic).Staying on top of it all was challenging, and I'll admit that even I am starting to feel rather overwhelmed by the sheer number of different camera options available today.
So - if you're looking for a new camera and are getting a headache trying to compare them all - you're not alone.
In 2010, the Digital SLR Guide will continue to provide the latest information about these unique cameras and I'll continue to post photography tips to help you get the most out of your DSLR.
Until then, happy picture taking!
--Chris Roberts, Your Digital SLR Guide
Subscribe to This Newsletter
If you've enjoyed reading this newsletter, subscribe now to receive the next issue when it's published.