
June 29, 2010
https://www.digital-slr-guide.com/dslr-news.html or read back issues
DSLR News - June 2010This is what I call the calm before the storm.As I mentioned in the introduction to last month's newsletter, not many new DSLR cameras have been announced recently (although Sony did break the silence with two new entry-level models). A lot of this silence can be attributed to the big photo show of the Fall - Photokina. Photokina is always the place where manufacturers roll out what they've been working on all year long in the form of shiny new camera models. Both working cameras and prototypes are shown at this event - so even if you can't buy a camera shown that very day, you will be able to within a couple of months. This is why you can expect the last three months of this year to be a veritable tidal wave of new DSLR information. I suspect that I will have my hands full trying to stay up to date on each new camera as it comes out. The good news for new camera buyers who aren't in desperate need of a new DSLR is that - in just a few months - you're going to have plenty of new options to choose from. I also hope that the manufacturers will find some way to reduce costs on these cameras so that you can pick up a DSLR without having to spend two to three times more what you'd spend on a compact camera. Something in the $400 to $500 USD range would be nice. In terms of technical innovations, I'm waiting to see if any manufacturer puts out a camera with a touch-screen LCD. With the exceptional popularity of "smart" phones with touch screens, it seems like a natural progression to include a touch screen on a DSLR. Rather than having to push a lot of buttons and spin dials, you could just dial in your camera settings with a few swipes of your finger. For now, it's a waiting game. No manufacturer is going to tip off the others about what they're planning, which explains the deafening silence and complete lack of press releases. As for me, I'm just getting plenty of rest so that I'm ready for the rush when it comes. |
In This Issue
Latest SLR Guides
Canon Rebel T1i
Nikon D5000
Nikon D90
Nikon D60
Canon Rebel XSi
Pentax K20D
Canon 40D
Olympus E-510
Nikon D80
Canon Rebel xTi
Nikon D40
Digital SLR Terms
Megapixels
Stabilization
ISO / Image Noise
Sensor Dust
Crop Factor
RAW vs. JPG
Continuous Photos
Autofocus Points
Aspect Ratio
Lens Terms
Focal Length
Prime vs. Zoom
Maximum Aperture
First vs. Third Party
SLR Lens Features
Canon Lens Glossary
Nikon Lens Glossary
|
Stay Updated!
Beginner Photo Tip: Manual Metering
Have you become bored with AUTO mode?
If you've decided that it's time to branch out and explore new horizons with your digital SLR camera, then the first thing to learn about is how your camera's light meter works. The light meter will become a constant companion if you want to use the manual controls of your DSLR.
Before we talk about the meter itself, it's important to review the three different types of photos you can take: normally exposed, over exposed (too bright) and under exposed (too dark).
| UNDER | NORMAL | OVER |
|---|---|---|
 |
 |
 |
A note for all you people who only use AUTO mode: even though your camera is trying to get a normally exposed image every time, it doesn't always get it right. Certain lighting conditions can "trick" a camera into thinking an image is properly exposed when it really isn't.
With the three types of exposures firmly in mind - normal, over, under - let's talk about how your camera even is able to figure out what a "normal" exposure should be.
As light passes through the lens and enters the camera, a device called a light meter determines how much light is coming in. Once it has determined how much available light there is, the camera adjusts its setting accordingly so that your photos look natural - neither too bright nor too dark.
If you use your camera in AUTO mode, you'll never see the light meter. It's there, but it just does its work in the background without putting in a personal appearance.
However, if you switch to one of the manual modes: Program (P), Aperture Priority (A or Av), Shutter Priority (T or Tv) or full Manual (M) then the light meter will display. The easiest way to see it is by looking through the camera's viewfinder, but many cameras today also display the meter on the LCD screen.
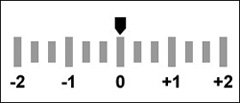
Press down halfway on the shutter release button, and the light meter will "read" the amount of available light. The light meter display looks like a scale, with zero in the center, plus to one side and minus on the other. Some cameras don't include the scale at all and just display a number for the meter.
The default setting for the light meter is at zero: a normal exposure. Zero is where the meter stays every time you use AUTO mode.
However, if you're feeling ambitious you can intentionally over or under expose your photos and the light meter will show you exactly what you're doing.
The easiest way to play with the light meter is to use a camera feature called exposure compensation. The exposure compensation setting lets you intentionally over or under expose the photos you take without having to manually control the two main settings that affect exposure: aperture and shutter speed.
Here's how it works:
- Set your camera to program mode
- Press down halfway on the shutter release button to see the meter
- Find out how to make changes to your exposure compensation setting
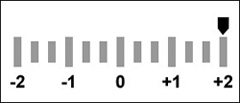
- Using exposure compensation, set your camera to over expose - press down halfway on the shutter release, and your meter will now show you that your photos will be over exposed either with a marker on the positive end of the scale or a number like +1
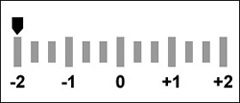
- Use exposure compensation to under expose - now the meter will show this by a marker on the negative end of the scale or a number like -1
Not only does the meter show you whether your images are over or under exposed, it also tells you by how much. For example, -2 under exposure is much darker than -1 under exposure.
 |
 |
 |
|
 |
 |

Beginner Digital SLR Lessons
- Dramatically improve the photos you take
- Take manual control of aperture, shutters speed and ISO
- Get exposure right, even in challenging light
- Learn at your own pace
- Download lessons as PDF files
- Ask me questions
Intermediate Photo Tip: TTL Flash
In the May issue of this newsletter, I provided some information about the gear that you need to get your flash up and away from your camera.Now that we've covered some of the gear involved in off-camera flash, I'll dig deeper into some of the details.
This month, I'll talk about what you'll need to do to take off-camera flash pictures without having to stress a lot about all of your camera settings.
When a flash and a camera are made by the same company, the two can chat with each other about a variety of different variables:
- The flash-to-subject distance
- The amount of ambient light
- The aperture of the lens
The reason that camera and flash need to communicate about these things is that each one can affect your exposure when you take a picture using flash.
Let's take a look at each one in turn:
- Flash-to-subject distance: if you're right up close to your subject, the flash does not have to put out a lot of light to illuminate your subject. If you're standing far away, it does.
- Ambient light: if there is a lot of ambient light then the flash doesn't need to provide a lot of additional light for a good exposure. If flash is the ONLY light source the it needs to put out a LOT of light.
- Aperture: a wide aperture only requires a small amount of light from flash while narrow apertures require a lot.
When you use a flash and a camera made by the same company, you don't need to worry about ANY of these factors when you take pictures with flash. All you have to do is turn on the flash and fire away.
The information communicated from camera to flash ensures that the flash only puts out the amount of light that it needs to so that your primary subject is correctly exposed.
The term often used for this type of "intelligent" flash is TTL Flash.
In order to use TTL Flash, you've got three options:
- Connect your flash to your camera's hot shoe
- Connect your external flash to your camera's hot shoe with an extension cord
- Connect your camera and flash to a wireless triggering system that transmits TTL information
I'm not going to discuss the first option, since this really is ON-camera flash, and the main topic here is OFF-camera flash.

Option #2 is very much like option #1, the only difference is that you've removed the flash from the camera body thanks to an extension cord. As far as the flash is concerned, it's still attached to the camera's hot shoe.
Option #3 is the most sophisticated, since the data that would normally be transmitted from camera to flash via the contacts in the hot shoe now needs to be passed through the air from a wireless transmitter to a receiver.
There are several ways that you can get option #3 up and running if you own a Canon or Nikon DSLR. One approach is to get a special wireless flash trigger (the Canon STE2 or the Nikon SU-800) that you place on your camera's hot shoe. The wireless trigger sends a firing signal with TTL information to remote off-camera flash units.
A second approach is to get a third-party transmitter that also sends TTL data. Some alternatives here include radiopopper PX transmitter and receivers and PocketWizard ControlTL (only available for Canon).
Regardless of the system that you choose, you can start taking pictures immediately with your DSLR camera set to full auto mode. In full auto mode, the camera "tells" the flash exactly how much light it needs to emit so that your subject isn't too dark or too bright.
All you have to do is point and shoot.
But what if - like me - you find that plain old AUTO mode doesn't provide you with the level of control that you'd like? What if you'd like to intentionally over or under expose a photo with flash rather than having it come out "just right" every time?
I'll tell you more about how to do this in the next issue of the newsletter.
NEW Intermediate Digital SLR Lessons: Playing With Light

- What types of light are best for photography
- How to see and manipulate natural light
- What all the settings on your flash mean
- How to improve the quality of light from flash
- When to blend natural light with flash
- How to use off-camera flash
Back To Basics: Aperture
Now that you understand more about the different focal lengths a lens can have and how it focuses, let's talk about its most important feature: how wide it opens.
The width of the opening in your camera's lens is called the aperture, and it's one essential ingredient in every photo that you take.
The reason that it's important is because all the light that enters your camera must pass through the lens aperture first.
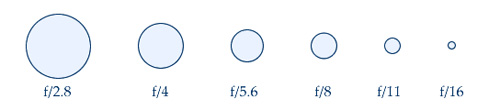
Aperture provides the photographer with the ability to control the volume of light passing through the lens. Wide apertures let in lots of light while narrow apertures limit the light.
Think of aperture like the curtains on a window: if the curtains are only slightly open, just a small sliver of light enters the room. If the curtains are open wide then the outside light fills the room.
How can you tell what your lens aperture is set to?
Press down halfway on the shutter release of your camera and look through the viewfinder or look at your camera's LCD screen. In the cluster of numbers that you see, one should be preceded with the letter "f". This is the aperture.
Apertures are measured in f-stops which is what the leading f is for:
- A small f number represents a wide aperture (f/4)
- A large f number represents a narrow aperture (f/22)
F-stops aren't just any number that pops into your head: there are a specific set of numbers that every lens made by every manufacturer uses: 2.8, 4, 5.6, 8, 11, 16, 22. Each one of these numbers represents a change of one full f-stop.
You don't always have to change aperture by full stops: many digital SLR cameras let you make half and third-stop adjustments. For third-stop changes there will just be two additional f numbers between the two main f-stops. Example: between f/2.8 and f/4 you can also choose f/3.2 and f/3.5.
If you've played around with aperture at all you may have discovered that your lens can be set to narrow apertures like f/22 (maybe even f/36). But when you try to select a wide aperture like f/2.8 the camera won't let you: it only goes to f/3.5 and then it stops.
This is because of a limit on all lenses called the maximum aperture.
Max aperture is NOT the same from lens to lens: some lenses will open as wide as f/1.8 while others will only open as wide as f/4. You can always tell the max aperture of a lens because it is often written on the side of the lens or in the name of the lens (if you're trying to buy a new one).
The most common kit lens is an 18-55mm f/3.5-5.6. Hold on a sec...there are TWO aperture numbers there, not just one. What's up?
On some lenses, the maximum aperture CHANGES depending on the focal length you have selected. For the 18-55mm example just mentioned, the maximum aperture at 18mm (wide angle) is f/3.5, but the max aperture NARROWS to f/5.6 when you zoom to 55mm (telephoto).
If a lens only lists one aperture - like the Tamron 28-75mm f/2.8 - then this means that the lens has a CONSTANT maximum aperture that does not change when you zoom. Constant max aperture lenses are great for people who control exposure manually, but are less neccessary if you only use AUTO mode.
So: aperture is the width of the opening in the lens, it has an upper limit and it is sometimes dependent on the focal length. Aperture is also one of THREE camera settings that you use to control how bright or dark your photos look.
I'll explain more about the other two settings in future Back to Basics articles.
Exercise
- Using the main mode dial of your camera, set it to Aperture Priority mode (A or Av) - this will let you change aperture while keeping all other camera settings automatic
- Press down halfway on the shutter button and look at either the LCD or through the viewfinder to see what aperture you have selected
- Spin the main camera control dial to change the aperture number
- First, spin the dial so that a large f number is selected - this represents a NARROW aperture
- Notice how the shutter speed slows down as the aperture gets narrower
- Now, spin the dial so that a small f number is selected - this represents a WIDE aperture
- Notice how the shutter speed increases as the aperture gets wider
- Look at your lens and see if you can see the maximum aperture numbers written on it (if there are two, then the lens has a variable max aperture)
- If your lens has variable max aperture, set it to its wide angle focal length and open the aperture as wide as it will go
- Press down halfway on the shutter release to see which shutter speed the camera has selected to go with the wide aperture
- Without changing any camera settings, zoom the lens to its telephoto setting - press down halfway on the shutter release
- Notice how the max aperture changes automatically and how shutter speed also changes to compensate
Photo Links
Photo Contests
Other Photography Sites
- Betterphoto - a wealth of photography learning opportunities
- Flickr - share your photos with friends and others
- Photo.net - plenty of learning resources and examples of exceptional photography
- Borrowlenses - rent lenses to use on your digital SLR before you spend tons of money on one
- Photojojo - tons of photography do-it-yourself (DIY) projects
- Viewpoints.com - read product reviews from other consumers like yourself
Great Photo Blogs
- Digital Photography School - hundreds of photo tips and techniques
- Strobist - everything you ever wanted to know about lighting with external flash
- Joe McNally - get the "behind-the-scenes" thought process from a professional photographer
Recommended Digital SLR Retailers
(These are the three online stores that I use to purchase all of my digital SLR photography gear)In Conclusion
I'd like to take a moment here to thank all the people who contribute ideas for this newsletter on the Digital SLR Guide's Facebook page.At the same time, I'd like to apologize to all those people who've asked great questions that I don't get the opportunity to answer. I often select the ideas that seem to be the most popular...or the ones where I can provide a knowledgeable answer!
One thing's for sure when I read the suggestions - there are SO many different unique ways that people want to use their cameras. While one person might be interested in low-light hand-held photography another will be concerned with the proper settings to photograph birds in flight.
Everyone has their passion and photography is a great way to explore one's interests.
While I would love to be able to provide answers to the hundreds of questions that come up, I simply don't have the time. To those whose questions I don't answer, rest assured: I do READ every question and tip request and sometimes an idea for a new article will spring from that.
So my thanks go out to you for providing your requests even if I'm not able to address all of your questions.
--Chris Roberts, Your Digital SLR Guide