| Back to Back Issues Page |
 |
|
Digital SLR Guide Newsletter - Nikon Cameras Compared September 05, 2011 |
Having trouble viewing this newsletter? Read the latest issue online at
https://www.digital-slr-guide.com/dslr-news.html or read back issues If someone you know has forwarded you this newsletter and you've enjoyed it, subscribe now to receive the next issue when it's published.
DSLR News - August 2011
In This Issue
Stay Updated!Coming Soon From Sony
As promised in the last issue of the newsletter, the new digital SLRs of fall are on their way.
Nothing from Canon or Nikon just yet (there should be pretty soon) — instead, the first announcement goes to Sony for two new cameras set for release in October.
The first is the Sony SLT-A65 and the second is the higher-quality (and therefore more expensive) Sony SLT-A77.
Both cameras include Sony's translucent mirror system, which allows for ultra-fast autofocus whether you're shooting stills or video.
This same system also allows for very fast consecutive shot speeds: the A65 can capture 10 photos per second while the A77 can grab 12 per second. Now you have even more of a chance of capturing the peak moment at your favorite sporting event.
Nikon SLRs Compared
For those of you considering a new Nikon digital SLR, there are many options to choose from.
The right camera for you should strike a good balance between the features that it offers and the price. While not always possible, a good rule of thumb is to try not to purchase tons of features that you're never going to use.
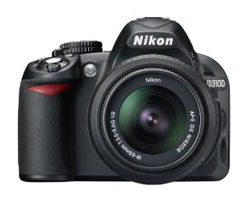 Let's start with the most basic Nikon DSLR: the D3100.
The D3100 is right for you if one of the two following statements is true:
Let me put it like this: if you've never used a DSLR before, the D3100 will be a HUGE leap forward for you in terms of speed and performance.
All of a sudden, you'll be able to capture all those shots that you once missed because your compact camera was too slow.
Don't be at all concerned about the fact that the D3100 "only" captures 14.2 megapixel photos. This is more than enough, especially if you don't print your photos all that often.
A higher number of megapixels in the camera will only allow you to make larger prints — it won't have ANY effect on image quality.
You also should not fret about the fact that the high ISO setting on the D3100 is 12800 while other cameras go higher. The truth is that once you get higher than ISO 6400 image noise will start to degrade the image quality significantly.
The camera's 3 photo-per-second speed will only be a limiting factor for action photographers who want to use continuous drive mode. For landscapes, portraits and wildlife, this speed setting is less important.
Simply put: the D3100 is a very capable digital SLR camera, it just doesn't have the same speed, ISO and number of custom settings as the more advanced models.
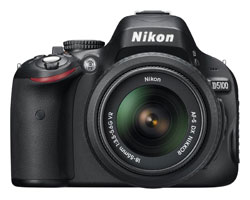 Speaking of "more advanced", let's talk about the next level up: the Nikon D5100.
The main thing that sets this camera apart from its peers is its flexible LCD screen that flips out from the camera body and rotates.
Flexible LCDs let you view the screen from all angles, allowing you to hold the camera any way you want (you don't always have to hold it up to your face to see through the viewfinder).
While you can use these LCDs to capture still images, they are most useful when shooting video, since you can hold the camera at waist level or even above your head for unique points of view.
Besides this notable feature, the D5100 provides minor upgrades over the D3100: slightly more megapixels (16.2), slightly faster (4 photos per second) and with a greather ISO range (100 to 25600).
Special Note: neither the D3100 nor the D5100 have built-in autofocus motors. This means that the cameras will only autofocus when using lenses with their own focus motors.
Nikon's label for lenses with autofocus motors is AF-S. Some third party lens companies are also now making lenses with focus motors.
If this is your fist DSLR camera, then this won't make a huge difference — just get AF-S lenses and you'll be fine. However, if you are upgrading from a film Nikon camera or have a collection of older Nikon lenses, they will be manual focus only when used with the D3100 and D5100.
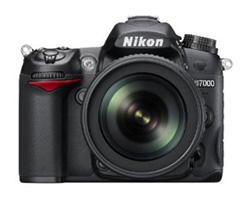 If you'd like to have the freedom to choose lenses, then look no further than the Nikon D7000.
The main difference between the D7000 and D3100/D5100 is the inclusion of an autofocus motor in the camera. This means you can use just about any Nikon lens you want (even old ones) and a slew of lenses made by other companies like Sigma, Tamron and Tokina.
The D7000 is a feature-rich camera for serious photographers. Yes, you can use it as a beginner in full AUTO mode but this won't leverage the full potential of this camera.
To really get the most out of the D7000, you should have some experience manually controlling a digital SLR camera — or a strong willingness to learn.
The sheer number of settings on this camera can be baffling and overwhelming if you're not used to them.
Once you master the features, the D7000 is capable of all kinds of photography — portraits, landscape, wildlife and action. Oh yes, video too...if that's what you want to use it for.
 Beginner Digital SLR Lessons
Landscape Photography Tips
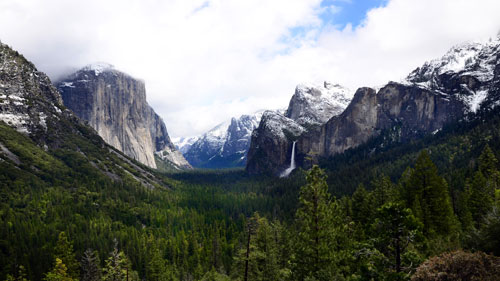
In last month's issue of the newsletter I wrote about portrait photography, so I figured that I'd tackle landscape photography this time around.
If you want to capture a spectacular jaw-dropping landscape image, here's where to start: it's all about the light.
When you're taking portraits, there are many ways for you to control light: place your subject by a large open window indoors or the shade outdoors, add some light with your flash, etc.
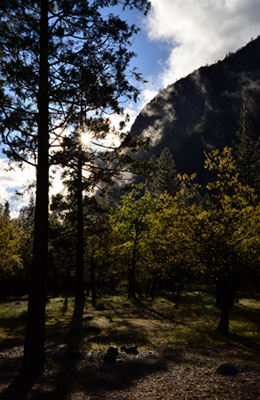 When you're capturing landscape images, there's only ONE way to improve the quality of light: you have to sit and wait.
Since there is no way to "tweak" the natural light in your scene you either have to acknowledge that the light isn't perfect and take pictures anyway, or wait for that moment when the light IS perfect.
Great landscape photographers seem to have a limitless supply of patience.
They will return to exact same scenic vista day after day, year after year until the one moment when everything comes together for that "perfect" image.
Now, many people who don't make their living taking pictures don't have this kind of time. If the clouds roll in right when you arrive at the perfect location you just have to make the best of a poor lighting situation.
While you can't control the weather, you CAN have some say about the time of day you take your pictures.
Your landscape photos will look significantly better if you take them very early in the morning and right before sunset. These times of day are a natural light "sweet spot" and tend to make the colors in your photos more vibrant.
Once you have the light as good as it's going to get, then take some time to think about your composition.
When taking portraits and action shots, I advise that you take plenty of photos first and edit them later. With landscapes, it's a different story. You have to really pay attention to all the elements in the scene.
For maximum impact, you should have some object in the immediate foreground, something in the middleground and some place for your eye to land in the background.
This foreground, middleground, background approach will give your landscape photos a lot more depth, since viewers of the image will have multiple reference points to determine where you were standing when you took the shot.
If you just take a snapshot of a mountain range, it will be very hard for your viewers to determine the scale of the scenery. A recognizeable foreground or middleground element - people work well - provides a reference scale for the surrounding landscape.
Camera Settings
I suppose the good news is that once you've found the perfect composition and have waited around for the perfect natural light, the camera settings are pretty straightforward.
It's best to use a tripod or other means of camera stabilization (large rock) when taking landscapes. Since you are using narrow lens apertures, your camera's shutter speed will slow down to compensate.
If your shutter speed gets TOO slow (within the 1/30th to 1/10th of a second range) you're likely to get some image blur due to camera motion — if the camera is in your hands.
If the camera is stable, then shutter speed can be any value and you don't have to worry about it.
Maximizing Color
I mentioned above that you can set your camera's color mode to "Landscape" to capture more intense colors.
However, if you want to control how your landscape photos looks AFTER you take it, then change your file setting from JPG to RAW.
 A RAW file is an unprocessed digital image — while it does have color, there is nothing within the file that specifies the tone and the intensity of those colors.
If you open a RAW file in a photo editing program like Adobe Elements, then you can finesse the look of the colors....hours, days, even years after you first took the photo.
The fine-tuning of color you can achieve with a RAW file far exceeds what is possible with JPG, and is a better choice if you ultimately want to make enlarged prints of your landscape photos.
 Intermediate Digital SLR Lessons
Photo Links
Photo Contests
Other Photography Sites
Great Photo Blogs
In Conclusion
Summer is coming to a close for us so it's time for some cooler weather as the kids head back to school.
A summer project took me away from my work on the Digital SLR Guide for a couple of months but I am back to the site now and updating content as quickly as my typing fingers will allow.
This will continue throughout the holiday season so that you're well aware of all the new DSLRs released. And who knows? Maybe one will be the "perfect fit" for you.
Until next month, happy picture-taking!
--Chris Roberts, Your Digital SLR Guide
|
| Back to Back Issues Page |
