
October 31, 2006
How Fear Can Improve Your Photos
Table of Contents
Intro - Photography and FearDigital SLR Questionnaire
SLR Q and A - What Does f/3.5-5.6 Mean?
Photo Recipe - Playing With Color
The Gear - Break out the 10 megapixels
Recent Updates - What's new at the Guide
SLR E-course - 5 online SLR lessons
Learn More - Digital SLR Resources
If someone you know has forwarded you this newsletter and you enjoy it, subscribe here for future issues.
Introduction
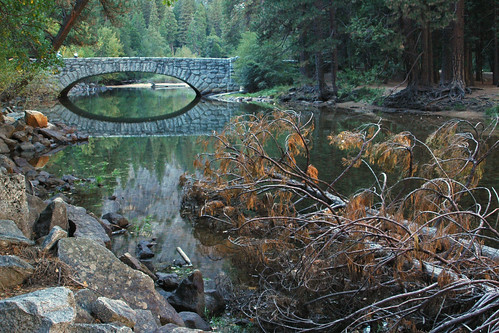
I spent three wonderful days up in Yosemite last week, and learned yet another valuable lesson about how to improve the photos that I take.I can sum it up in one word: fear.
Yes, you wouldn't think that fear and photography would go hand-in-hand, but apparently they do. Let me elaborate a bit.
When you're in your photography comfort zone, you don't tend to take as many photos that are really interesting to look at. I'm not saying that all these photos will be awful, I'm just pointing out that they'll tend to look like a lot of other photos that you've taken and hence won't stand out from the crowd.
It makes perfect sense why you want to stay in your comfort zone: at least this way you can be sure that you'll get SOME kind of picture.
Here's an example: you're standing on the white sand beach of some tropical island watching the sun set as the palms sway gently in an offshore breeze. You decide that you'd like to capture this moment with your digital SLR.
You now have two options:
- Stay in your comfort zone, use normal camera settings and make sure you get the shot
- Fiddle around with the camera settings, with the possibility that NO photo you take will turn out
That second option doesn't sound as appealing does it? It becomes even less so when you realize that you have found a moment where the quality of light is fantastic, but you know for sure that you don't have long to take the photo (that sun is setting pretty fast).
Faced with these circumstances, many of us choose option number one.
But on my recent trip to Yosemite, I decided that I would try out number 2 for a change. Guess what? This is where the fear comes in.
The moment that I started making adjustments to my camera settings I immediately began to worry that some of the photos I was taking would not turn out. What if the color was way off? What if the photo was wildly over-exposed? What if I missed a key opportunity to photograph a deer since I was busy making adjustments to my camera settings?
Worry, doubt and the fear of making a really bad mistake - they don't seem like qualities that make for good pictures.
But here's the trick: if I hadn't have pushed the envelope a bit and experimented outside of my comfort zone, there is NO WAY that I would have gotten some of the photos that I wound up with. In many cases, I was adjusting no less than three different camera settings like ISO, white balance and color saturation.
As the light and my subject changed, I had to figure out how to change these settings accordingly each time to get the photo that I was hoping for.
The bad news is that I completely butchered several shots that probably would have turned out fairly nice. The good news is that as time went on I became more and more comfortable with the settings I was adjusting and my fear went away. The even better news is that I captured some photos during that time that I really enjoy and are a cut above the photos that I typically take.
The moral of this tale? Sometimes it's important to get outside your comfort zone when taking photos with your digital SLR and see where the fear leads you.
Digital SLR Questionnaire
I would love to know more about the readers of this newsletter: what you're interested in, what you'd like to know more about, and whether or not the information I present is too simplified or just the way you like it.In the spirit of learning more about you and your digital SLR needs, I've put together a BRIEF questionnaire.
Let me answer some questions for you:
- No, it won't take long - just 5 minutes of your time - max - unless you really get carried away with the comments section
- Yes, it's anonymous - I won't ask for anything that will allow me or anyone else to personally identify you
- No, I won't share results - I will pool the answers together and use them to improve this newsletter
The answers that you provide to the questions will help me immensly. I am trying to get a better idea of the population of people who read this newsletter and the type of information you are trying to learn. The more people that respond, the more I will know, and the more I can tailor the newsletter toward the needs of the majority.
Example: if I find out that 90% of you don't own a digital SLR yet, I will spend more of this newsletter on topics that will help digital SLR buyers rather than owners (I try to split it about 50-50 right now).
I encourage you to take the 5 minutes (or less) that it will take to fill this out - thanks in advance!
Help me out - answer the Digital SLR Questionnaire
Digital SLR Q&A
Question: Why Do Lenses Have Numbers Like f/3.5-5.6?
Answer:
The numbers that are marked on every lens tell you how wide the lens can open up and how much light it will let in. This opening in the lens is called the aperture, and it is measured in f-stops (hence the preceeding letter f).
The SMALLER the number, the WIDER the aperture. For example, f/1.8 is wider than f/2.8 which is wider than f/5.6. At the opposite end of the spectrum, the lens aperture can be narrowed down to f/16 or f/22.
This brings us to sub-question number one: why are only small numbers marked on the lens, rather the entire aperture range?
The markings that you see on any digital SLR lens describe a limit: the MAXIMUM aperture of the lens. Lenses are limited by how WIDE they can open up - some open wider than others. Lenses are not limited by how narrow they can become: virtually every lens out there can be set to a narrow aperture of f/22 (some even go to f/32). Since the limit only exists on how WIDE the lens can open, these are the f-stop numbers that appear on the lens.
In this case, if you're comparing a 50mm f/1.4 lens to a 50mm f/1.8 lens, the only difference between the two is that the f/1.4 lens opens wider and lets in more light.
Lenses with wider maximum apertures are better for hand-held low-light photography (indoors, for example) because you need plenty of light to ensure that all your photos don't turn out blurry.
Key Point #1: Apertures marked on lenses indicate the WIDEST the lens can open.
Now we come to a second sub-question: why do some lenses have different maximum apertures like f/3.5-5.6?
The reason for this is because with many zoom lenses the aperture NARROWS as the lens gets longer (when you zoom in closer to your subject). In this case, a zoom lens does not have a CONSTANT maximum aperture, which is why there are two different numbers.
Let's say you have an 18-55mm zoom lens with two maximum aperture numbers: f/3.5-5.6. This means that at 18mm (wide angle) the maximum aperture of the lens is f/3.5, but when you zoom in to 55mm (increasing the length of the lens) the maximum aperture narrows to f/5.6. Somewhere in the middle of this range (say 30mm) the maximum aperture will be somwhere around f/4.5.
Key Point #2: Zoom lenses have different maximum apertures at different lengths.
Not all zooms are created equal, and there are a select few where the maximum aperture does NOT change as you zoom. These lenses are described as having "constant maxium aperture". You can immediately tell these zoom lenses apart from the others because they only have one aperture number. If you see a zoom lens that looks like this - 28-135mm f/4 - it means that the lens has a constant maximum aperture of f/4 no matter how much you zoom.
Photo Recipe
A photo recipe is a simple way of breaking down a photography technique.Please send in your ideas for photo recipes! I'll include your requests in a future issue of the newsletter.
October Photo Recipe - Playing With Color
I mentioned at the beginning of this newsletter that I pushed out of my comfort zone taking photos last week in Yosemite. One of the key elements that I was toying with that I rarely adjust on a digital SLR camera was the white balance and the color control.
Every digital SLR out there lets you make adjustments to the white balance. In a nutshell, white balance allows you to correct the colors in your photo under different lighting conditions: for example, a standard household lightbulb does not emit the same color light as the sun (you can't tell this with your eyes easily because they adjust). If you've ever seen photos that look sickly green that's a white balance problem due to fluorescent light and any photo that looks orange is the result of incorrect white balance with tungsten light (the every-day light bulb).
Cameras typically have the following white balance settings: AUTO, Daylight, Tungsten, Fluorescent, Shade, Cloudy, Flash and Custom.
Many digital SLRs also have advanced color modes where you can select how the camera captures color based on the scene you are photographing. Some standard color modes include: Natural, Vivid, Portrait, Landscape, Night and Soft.
The goal of this photo recipe is to fiddle around with these two settings to see what types of results you can get.
INGREDIENTS
1 digital SLR camera with white balance and color control
STEP 1 - Shoot in AUTO mode
First, make sure that your white balance is set to AUTO and that your color mode is set to Natural (or neutral or whatever the default is). This is the standard setting for your digital SLR camera, where the camera is making choices about how to set the white balance and color for you.
Take a variety of photos under different lighting conditions.
The easiest experiment is to find two different subjects close to each other where one is in sunlight and one is in shadow.
Example One (auto mode) - this photo in the shade is how the camera wanted to take it without me adjusting a thing.
Example Two (auto mode) - when I took this shot, the scene was much more warm and vibrant than what the camera originally captured here.
STEP 2 - Play with color
Now that you've let the camera decide for you, it's time to take some control over how the camera is capturing color.
Start with your subject in the shade. Review some of the shade photos that you just took in AUTO mode on the camera's LCD (instant feedback - one of the principal benefits of digital cameras). Notice how the camera reproduced the colors in AUTO mode.
First, adjust your white balance setting so that it is set to "Shade" and take a picture like this.
Next, adjust your color mode (if applicable - not all digital SLRs let you change this) to something that will give the colors in your photo a little more pop: a good setting for this is called "Vibrant". Take another photo with both this color setting and the "Shade" white balance.
Example One (adjusted color) - I set my white balance to "shade" and set the color mode to "vibrant". Ah ha! Now the green plants really come to life.
Example Two (adjusted color) - In this case, I just played around with the white balance until I got a shot with the warm colors I wanted to capture.
STEP 3 - Compare the Results
You should notice a fairly significant color difference in between the settings that the camera chose for you and the ones that you deliberately set. If you are following the exact steps outlined in this recipe, the third photo that you take should exhibit warmer more vibrant colors than the first.
Why didn't the camera adjust the color settings correctly on its own? Digital SLRs are advanced electronic devices, but that doesn't mean that they always make the best aesthetic choices. That is why it is sometimes important for you to adjust camera settings on your own to get the best results.
Not sure how to adjust your camera settings for maximum gain? Take a look at my 5 online digital SLR lessons.
Digital SLR Gear
6 megapixels? Fuggetaboutit.The 10 megapixel race is well under way, and camera makers (with a few notable exceptions) do not appear to be looking back.
Technology moves on, and I suppose that the manufacturers just expect that as time goes on the price of storage media will go down (it typically does) so that even if you have to buy a 4GB card for your digital SLR it won't put a huge dent in your budget.
For anyone new to this newsletter, I am not a huge fan of the prevailing need to keep upping the number of megapixels on every camera that is released. After a certain point, having more megapixels does nothing for the image - it just lets you make larger prints. I won't go into the details here - if you'd like, read the September newsletter which is chock-full of reasons you may not really want a 10 megapixel digital SLR.
Now that I've gotten the editorializing out of the way, here's a roundup of all of the latest 10 megapixel digital SLR cameras. Some of these cameras have just been released, and some you'll have to wait for. Click the linked camera names for more in-depth guides.
- Canon Rebel xTi - the successor to the digital Rebel XT, the xTi also includes a dust-repellent sensor
- Nikon D80 - the D80 is a real jump over either the entry-level D50 or the more advanced D70s. It includes better color control, a more advanced autofocus system and (for the first time in Nikon's line of consumer digital SLRs) the ability to take black and white photos
- Nikon D200 - the D200 is a cut above these other cameras, falling into the semi-pro category (while the rest of these are geared more toward beginners). The D200 is the right choice if you need blazing fast speed from your camera
- Olympus E-400 - this camera includes the Olympus sensor cleaning system (called SuperSonic Wave) and is being touted as the lightest digital SLR you can buy..with one catch: it won't be released in the U.S.
- Pentax K10D - the K10 is one of three cameras in this list that includes built-in anti-shake. Another innovation of the K10D is that it is designed to work with every Pentax lens ever made (with varying loss of functionality)
- Samsung GX-10 - the Samsung/Pentax partnership continues, so it's no surprise that this is the other camera with built-in anti-shake.
- Sony DSLR-A100 - the first digital SLR from Sony not only includes built-in anti-shake, but it also has a wealth of other features that should make it tempting to the first-time digital SLR owner
Recent Updates to The Guide
Life at the guide has been a scramble to keep up as of late. After all, there are over 5 manufacturers cranking out new camera models as fast as they can (all but one of the 10 megapixel digital SLR cameras were released this year) and just one of me!RECENT UPDATES:
- Sony DSLR-A100 Guide - Find out more about the first digital SLR from this electronics giant.
- Top Rated Digital SLR - It was time for me to go back and re-evaluate which camera gets the highest rating from independent users.
- Inexpensive Digital SLR - this one is for all of you price-conscious shoppers out there. In this article you can find the least expensive camera of them all plus the least expensive 10 megapixel digital slr.
- Nikon SLR Lenses - A complete introduction to all of Nikon's cryptic lens terminology. Now you can find out what all those acronyms really mean!
The Canon Rebel xTi and the Pentax K100D are running neck and neck at the moment in terms of popularity and interest, so I'm not entirely sure which one will get a complete guide first. Regardless, it is my goal to take a closer look at both of these cameras by the end of the year.
If that seems like a terribly long time to you, realize that it takes me about a month to produce a complete digital SLR guide. Since I really only have two months left this year one will be devoted to the Canon and the other to the Pentax - we'll see how it goes!
I am also busily updating the pages of the site that allow you to compare cameras and am doing plenty of research on your behalf to find cameras that are small, light, inexpensive, fast and highly rated. The good news is that by the time the serious holiday shopping season rolls around, you should have plenty of information to work with when it comes to evaluating and comparing the latest digital SLR cameras.
COMING SOON:
- Digital SLR Holiday Buyer's Guide - check the site soon for this one, since I hope to have it completed shortly after you receive this newsletter (but long before the next one comes out)
- Canon Rebel xTi Guide
- Pentax K100D Guide
- The Fastest Consumer Digital SLR (updated)
- Sony SLR Lenses
- Pentax SLR Lenses
- Olympus SLR Lenses
Want instant updates about what I'm working on? Keep an eye on the Digital SLR Weblog.
SLR Guide E-Course
Don't miss great photo opportunties!My 5 easy online lessons will teach you how to adjust your camera settings to get the most out of every shot you take. It's a lot easier to leverage all the features of your digital SLR than you might think.
Digital SLR Learning Resources
Each month I will present a new photography book or online resource that will take your photos to the next level, and help you continue to learn about photography (if that's your desire).
September Resource: Fred Larson
This month's resource is a link to the photoblog of a photographer who works for a newspaper in the San Francisco Bay Area. For those not completely up on all of the latest tech jargon, a photoblog is a weblog that instead presents one photo per day.
Often the photo is presented without commentary, but in this case there are a lot of notes and additional information associated with each photo.
What insight does the commentary provide? It makes you realize that photos like the ones presented in this photoblog the result of A) Planning, B) Preparation and C) Persistence. For example, if you're not willing to stand around in a biting wind for 30 minutes waiting for the perfect shot, then you're probably not going to get it.
Fred Larson's Mystical Photography is definitely worth a look if you really want to know more about how pros get some of their amazing shots.
In Conclusion
Well, we've just reached the one year anniversary of the Digital SLR newsletter!For all of you who've been with it for a long time I'd like to say thanks for taking the time to read over the newsletter each month. I'm sure that you're quite busy (I know I am!) and that it's not always easy to find the time to read over someone's ramblings about digital SLR technology.
For all the newcomers to this newsletter - welcome!
I hope that you find it a valuable resource when it comes to learning about digital SLR cameras, lenses and accessories, and that you find it a useful and enjoyable read for many months to come.
If you have learned some valuable information from this newsletter, I encourage you to forward it to friends who are also trying to get a handle on the current state of digital SLR technology. I pack a lot of information into each newsletter, and there may be a tidbit there that saves them time, money, or both!
As always, thanks for reading - Happy Halloween - and happy picture taking!
--Chris Roberts, Your Digital SLR Guide
Ask a Question
Give Feedback
Digital SLR Weblog
5 SLR Lessons