| Back to Back Issues Page | ||||||||||||
 |
||||||||||||
|
Digital SLR Guide Newsletter - The 4 Causes of Blurry Photos January 29, 2012 |
||||||||||||
Having trouble viewing this newsletter? Read the latest issue online at
https://www.digital-slr-guide.com/dslr-news.html or read back issues If someone you know has forwarded you this newsletter and you've enjoyed it, subscribe now to receive the next issue when it's published.
DSLR News - January 2012
In This Issue
Happy New Year everyone!
Last year was an interesting one for the digital SLR: few new cameras were released, innovations decreased and prices - the one thing we'd all like to go down - held pretty steady.
2012 should see the release of some new cameras, simply because the current models are getting old (in terms of DSLR age) and need an upgrade.
But the possibility also exists that we'll see some new cameras emerge in the mirrorless SLR category that behave a lot like SLRs but without all the size and weight associated with them.
Since there aren't any new camera announcements just yet (it's a bit early in the year for that) let's focus instead on a common problem that plagues a lot of photographers, regardless of the camera they're using: blurry photos.
There are four main reasons you can get blurry photos, and I'll cover each one in the sections below.
Latest SLR Guide - the Canon Rebel T3i 600D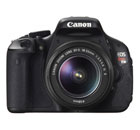 If you're looking for a camera that has a flexible LCD, is good for beginner and intermediate photographers and takes exceptional photos in low light without flash, then take a closer look at the Canon Rebel T3i 600D.
Videographers will need to get used to manual focus, but this is true of many SLRs that shoot video.
Read the Canon Rebel T3i 600D Guide >>
Subject Motion Blur
By far, the most common cause of unsharp photos is motion blur.
Motion blur occurs when your camera's shutter speed slows isn't fast enough to freeze the motion of either the subject or the camera. This typically happens in low-light situations, and is most troublesome when you're trying to take photos in dim light without using a flash.
The first type of motion blur is due to subject motion.
 Freezing Time (1/2500) Your camera is capable of capturing an event that takes 1/4000th of a second (this is the fastest shutter speed on many DSLRs). At 1/4000th of a second, you can clearly capture even the fastest-moving subject.
However, to get 1/4000th of a second, you need a LOT of light — either from the sun or from an artificial source (flash).
Since you can't always take photos under a blazing sun, you can't use 1/4000th of a second all the time. More typical shutter speeds range between 1/60th of a second and 1/500th of a second.
Now, at 1/500th you can still clearly capture most subjects — but you will start to see blur in some that move really fast: airplanes, cars, flapping birds, running cheetah, etc.
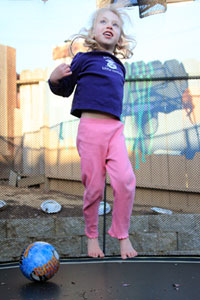
Once your shutter drops down to 1/250, you'll see blur in slower subjects: kids playing, dogs running, ball bouncing.
Drop the shutter speed even further to 1/60 and you'll have to be careful about what you photograph: only subjects that are fairly still will look sharp. Any subject moving about will start to look blurry at this shutter speed.
So — how can you tell when you're having a subject motion blur problem? Check the background.
If the background of your photo is clear, but you subject is not, then the cause of the blur is subject motion.
In this case, you shutter speed is simply too slow to freeze the motion of your subject.
 Blurry Subject With a Shutter Speed of 1/8th of a Second SOLUTIONSTo get your subject to look clear, you need to increase your shutter speed.
There are three ways to do this:
 Beginner Digital SLR Lessons
Camera Motion Blur
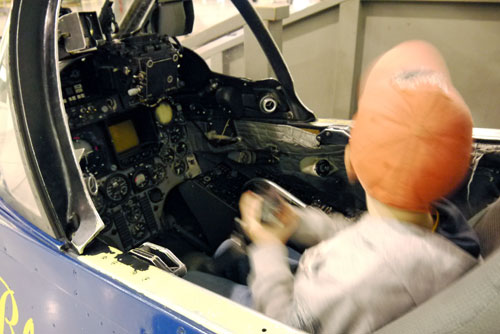
Now that you know about slow shutter speeds and motion blur, it's pretty easy to tell the difference between subject motion blur and camera motion blur.
Again, the background is the key.
If both your subject AND the background are blurry, then you're dealing with camera motion blur.
The problem here is still the same as it was with subject motion blur - your shutter speed is SO slow that even the slightest twitch of the camera when you take a photo results in blur.
Camera motion blur typically happens right around shutter speeds of 1/30th of a second, although this depends on the lens you're using.
Telephoto lenses magnify camera motion blur: the longer the lens, the greater the chance of camera motion blur.
This table shows the shutter speeds when camera motion blur becomes apparent based on the lens:
At 18mm you can avoid camera motion blur with shutter speeds that are 1/20th of a second or faster. But by the time you're using a 300mm lens, any shutter speed under 1/350 might cause motion blur.
 Camera Motion Blur With a Shutter Speed of 1 Second SOLUTIONSThe simplest solution to eliminating camera motion blur is this: put the camera on a tripod.
When your camera is attached to a stable surface like a tripod, you don't have to worry as much about camera motion causing blurry photos.
If you don't have a tripod, then any flat stable surface will do: tables, nearby rocks, benches, etc.
A second option for people who don't want to lug around a tripod everywhere is to leverage an image stabilization system.
Image stabilization helps reduce the effects of camera motion blur (note that it won't help at all with subject motion blur).
If you own a Canon or Nikon DSLR, then look for lenses with stabilization (Canon calls them IS lenses and Nikon's label is VR). Olympus, Pentax and Sony camera owners can take advantage of the stabilization built in to these camera bodies.
 Intermediate Digital SLR Lessons
Inaccurate Autofocus
The third reason that your photos may look blurry is because the camera has not focused on your intended subject.
Every digital SLR has a multi-point autofocus system: anywhere from 3 to 11 points (and some high-end models have even more than this).
While the cameras are quite smart about focusing on your main subject, they sometimes make mistakes and focus elsewhere.
Imagine that you're taking a portrait and your subject is off to the right of the frame. If the camera chooses to use the right focus point, then your subject will be sharp. But if it decides to use the left focus point, then your background will be sharp but your subject will be out of focus.
This happens most frequently when you take a quick spontaneous shot, without waiting for the autofocus to fully lock your subject. It also happens when you're trying to track a fast-moving subject with autofocus.
 Autofocus on Background Instead of Subject SOLUTIONSThere are ways to solve this type of image blur:
The first solution is straightforward. Provided your camera has this feature - and many do - manually select the focus point you want your camera to use.
For example, if your camera has nine focus points and your main subject is to the far left of the frame, then manually select the left-most focus point, rather than letting the camera choose between nine different options.
The second solution is also simple, but it takes a LOT of practice to become as accurate with manual focus as modern-day autofocus systems. I'd suggest going with manual focus ONLY if you've tried autofocus repeatedly and it's still not focusing correctly.
Stay Updated!Shallow Depth of Field
This is not a common cause of blurry images, which is why I've left it for last.
I'm also not going to dive into a discussion of depth of field here - that's a topic for an entire issue of this newsletter. Suffice to say that depth of field is what makes your backgrounds either clear or blurry.
Shallow depth of field results in blurry backgrounds while deep depth of field makes your entire image clear.
One camera setting that has an impact on depth of field is the aperture setting of your lens: the wider the aperture, the shallower the depth of field.
Most kit lenses have a maximum aperture of f/3.5, so you should not run across very shallow depth of field with them. However, if you have another lens that opens to f/2.8 or even f/1.8 shallow depth of field can become a problem.
Imagine that you're taking a portrait of a friend with only natural light and in order to eliminate motion blur you open your lens aperture to f/2.0.
With a lens aperture this wide it is quite possible for the tip of your friend's nose to be sharp and in focus, while the eyes appear blurry and out of focus. This has nothing to do with your camera's autofocus nor is it due to any kind of motion blur.
Instead, the depth of field is SO shallow that it only includes the nose of your friend. If you want both nose and eyes to appear sharp, you're going to have to increase your depth of field.
 Narrow Depth of Field With Aperture f/2.8 SOLUTIONSThere are three ways you can increase depth of field:
Photo Links
Photo Contests
Other Photography Sites
Great Photo Blogs
In Conclusion
I hope that your 2012 is getting off to a great start and - if you've just acquired a new camera - that you're having fun experimenting with all the settings.
If you're still perplexed by what all those little buttons do, take a look at some of the back issues of this newsletter.
I've covered all sorts of topics in the past and you might just find information in one of those newsletters that answers your questions.
If not, stay tuned: hopefully I'll cover it in an upcoming issue.
Until then, happy picture-taking!
--Chris Roberts, Your Digital SLR Guide
|
||||||||||||
| Back to Back Issues Page |