
June 30, 2008
Having trouble viewing this newsletter? Read the latest issue online at
/dslr-news.html or read back issues
If someone you know has forwarded you this newsletter and you've enjoyed it, subscribe now to receive the next issue when it's published.
DSLR News - June 2008There are two big announcements to make this month.The first is that I'm putting the finishing touches on my Canon EOS Rebel XSi Guide (I had hoped to complete it before sending this newsletter but events and time conspired against me). Overall impression: the Canon XSi is an extremely portable and responsive digital SLR camera, which works very well for travel and spontaneous photography. Image quality is exceptional - to be expected from Canon - and the kit lens on the XSi is a substantial improvement over the one that was available with the Rebel xTi. The camera that I used for this guide will be up for auction this week so if you've been waiting for a Canon XSi for a good price, this might just be your opportunity (I'll announce when the auction starts on the weblog at http://digitalslrguide.typepad.com) The second big announcement is that my guide to digital SLR flashes is finally complete and published to the site. This guide to digital SLR flash will answer questions like:
It's all still a bit rough around the edges, but the bulk of the information is there. Over the next couple of months, I'll be adding more information about specific flash units offered by the different manufacturers so that you can make an objective decision about which one to get. |
In This Issue
Latest SLR Guides
Pentax K20D
Canon 40D
Olympus E-510
Digital SLR Terms
Megapixels
Anti-Shake
ISO / Image Noise
Sensor Dust
Crop Factor
RAW vs. JPG
Continuous Photos
Autofocus Points
Aspect Ratio
Lens Terms
Focal Length
Prime vs. Zoom
Maximum Aperture
First vs. Third Party
SLR Lens Features
Canon Lens Glossary
Nikon Lens Glossary
|
New Content
- Digital SLR Flash Introduction
- Flash Guide Numbers
- Flash Recycle Rate
- Flash Sync Speed
- Slow Sync Flash
- External Flash
- Studio Strobes
- Flash Triggers
- Flash Modifiers (Diffusers and Reflectors)
- SLR Flash Packages
Updated Content
Digital SLR Q & A
Question: What's a RAW file and do I ever need to use it?
Answer
Unlike their compact cousins, digital SLR cameras can save photos in TWO formats: JPG (the standard) and RAW.The reason that JPG is the image format of choice for many digital photographers is because JPG files are compressed to save space. When you're taking 10 megapixel photos, you're capturing 10 million individual points (or pixels) of information in each image.
If each different pixel is unique, then you're going to need a LOT of computer memory to keep track of them all.
The JPG format gets around this problem by making pixels that are almost alike identical to each other (in terms of color and tone). Since vast areas of your image might share the same colors and tone (blue sky) there's no reason for all of these pixels to be unique.
The end result of making unique pixels identical is that less computer memory is required to store this information.
By contrast, when you capture photos in the RAW format, no such compression is applied. A RAW image contains all of the information captured by the digital sensor inside your camera.
There are several advantages to working with JPG images, and several disadvantages of RAW:
- JPG images are easy to upload to online galleries and to share via e-mail
- You can fit more JPG images on a memory card and onto your computer's hard drive
- RAW files eat up memory and require high capacity memory cards and hard drives with lots of free space
- RAW files need to be converted to JPG if you want to upload or e-mail them
- RAW files can only be viewed in special editing programs that can "decode" them (like Adobe Elements and Bibble)
With all of the simplicity of JPG and the complexity of RAW, why in the world would anyone ever want to take RAW photos (and why do SLRs capture images in both formats)?
There are two answers to this question: the first is if you aspire to becoming a professional photographer and the second is for amateur snapshooters.
For the professionals (or professional wanna-bees) the reason to use RAW files is that they give you complete control over the way your final images turn out. Professional film photographers spent as much - if not more - time in the darkroom working on their photos as they did taking them.
They knew that taking the image was only HALF of the art of photography - the other half was how the image turned out in print.
When you take a photo in the JPG format, you are leaving a lot of decision-making about how your images look up to the engineers that manufactured your digital SLR camera. JPG files are not only compressed, but they are encoded with image properties like white balance and saturation (which affect the color) and sharpness and contrast (which affect the quality).
These pre-set JPG parameters cannot be changed after the fact without degrading the quality of the image.
Since a RAW file is a "pure" unaltered capture from your digital SLR's sensor (a digital negative), you have complete control over how the final image turns out. Don't like the sharpness in a photo? Change it. Not happy about the intensity of the primary colors? Change them. With a RAW file, no part of your image is set in stone.
The reason to use RAW if you're not determined to go pro with your photography is a pretty simple one: RAW images are much more forgiving when you make mistakes.
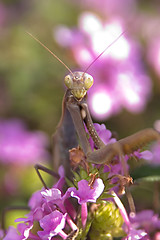
Example: one day my wife called me out into the front yard because there was a giant praying mantis hiding out amongst the plants. I grabbed my camera and - on a whim - switched it so that it would capture photos in RAW instead of JPG.
I had taken about 10 shots of the mantis when I noticed that I had altered one of the camera settings previously and that many of the images that I had just captured were massively overexposed. I quickly adjusted my settings to correct the problem, but there wasn't much I could do about those first 10 frames.
Imagine my surprise when I later opened those files in my RAW editing program and discovered that I could "correct" the exposure in the images that I thought had been lost (since there's absolutely nothing you can do with software to fix an overexposed JPG).
 |
 |
|
| Original exposure | After RAW conversion |
Common Problems
This month's common problem will immediately seem familiar to anyone who's taken portrait photos indoors under artificial lights.The problem can be stated like this: my portrait subjects look orange.

Never had this problem? If you only take photos outside in natural light or with some type of camera flash unit then you probably haven't. Others may have taken photos where subjects look orange, but might not have noticed the slight color tint.
In case you're not sure of what I'm talking about, take a look to the photo on the right. It's a clear example of when a subject's skin tone isn't quite right.
So what's going on here? Why is the subject's skin being rendered with such an orange tint to it?
The feature of your digital SLR camera that's getting confused is something called white balance. The white balance setting is designed to ensure that the colors in your digital images look natural.
Digital SLR cameras try to automatically compensate for different light sources so that the images that they capture appear the way your eyes see them.
The real issue is this: different light sources emit light of a different color. The reason that your eyes don't see this is because they automatically adjust and "neutralize" the color of the light source. This is the exact same thing that your camera tries to do when it automatically sets white balance, it's just not as successful as your eyes.
The auto white balance will most often get confused when there are TWO competing light sources. For example: you're taking photos in the living room in the early evening and have some overhead tungsten lights on. These lights add emit a "warm" light (orange tinted). However, the afternoon sunlight coming through the windows doesn't share the same color as the overhead lights.
If your camera guesses the white balance correctly, then you get a photo where colors look natural.
However, if it guesses WRONG (adjusting for tungsten light when the primary light source is natural) then you get a photo where all the colors look just a wee bit off.
So: what to do?

Don't let your camera decide which white balance setting to use - decide that yourself. Manually change the white balance setting to match the most dominant light source, and check your results on the camera's LCD.
Here's a step-by-step example of how this might work:
- Take a photo with AUTO white balance - image appears too orange on the LCD
- Determine the main source of light striking your subject (tungsten lights)
- Manually set your camera's white balance to tungsten
- Take another photo and check the color on the LCD
This same process would apply to any lighting conditions (or lighting combination). If the dominant light is fluorescent, then set your white balance to fluorescent. If you're using flash, then you can improve the fidelity of your colors by switching to the flash white balance.
Get the Most From Your Digital SLR Camera
- Learn digital SLR camera jargon in 5 online lessons
- Master the controls of your digital SLR
- Dramatically improve the photos you take
- Learn at your own pace - review the lessons any time
- NEW! Download all 5 lessons to read on the go
What Do You Need?
This month we'll answer the question: Do You Need A Large Buffer?To clarify: I'm not talking about the type of buffer here that will improve the quality of your nails or add shine to your floors.
The buffer on a digital SLR camera dictates how many consecutive photos you can take before the camera starts to suffer a loss in performance because it's busy saving images to the memory card.
Every time you take a photo, several things happen:
- The digital sensor captures an image and stores it in a temporary spot
- If you're saving photos as JPG, the camera applies image processing and compression (see the discussion of RAW vs. JPG above)
- The camera stores the image permanently on a memory card
The "temporary spot" that I refer to in step 1 is also called a buffer. It's a holding bin for images since it takes a LOT longer for the camera to save a photo onto the memory card than it does for you to take them.
A camera with no buffer (they don't exist anymore) would have to pause after each photo in order to complete step 3.
Since every modern digital SLR has a buffer, the question now becomes "how much buffer do you need?"
Buffers are measured in the number of rapid-fire consecutive photos they can store before the camera slows down to take some time to store images on the memory card. For example, a camera with a buffer of 25 JPG images will start to slow down long before a camera with a buffer of 70 JPG images.
However, let's be clear about this: for you to notice any kind of performance issue with the first camera, you'd have to take 25 photos in continuous shot mode (which for most digital SLRs is 3 photos per second), never taking your finger off the shutter release button and never giving the camera a chance to catch up.
I don't know about you, but even when I'm trying to capture an image of a decisive moment at a sporting event, the highest number of consecutive photos I will blaze through is about 8 to 10.
Even this poses a real challenge for me later on when I am trying to edit my images down to a manageable number. Think about it: in burst mode, you're capturing photos that are all virtually alike.
Deciding which image out of a burst of 10 to keep can be a chore - and it also means that you'll spend about 10 times longer editing your photos on the computer than you did taking them in the first place. A series that took you 5 minutes to capture can easily take 50 minutes to view and edit.
So getting a camera with a large buffer really boils down to the sheer number of consecutive photos you really expect to take, and whether or not you want to capture images in RAW or JPG.
Since RAW files are so much larger, camera buffers fill up much faster when capturing RAW photos - a buffer that might be capable of handling 25 consecutive JPGs will probably only be able to store 7 to 10 consecutive RAW images at a time before camera performance suffers.
If JPG is your image format of choice, then I doubt that you'll ever discover the difference between a camera with a 25 JPG buffer and one that can handle 50 (since you'd have to hold down the shutter release in continuous drive mode for a full 10 seconds to even reach the buffer limit).
Cameras and Accessories
Latest Canon Digital SLR
The latest Canon digital SLR to be announced is called the Rebel XS and it's simply a reduced-price version of the Rebel XSi.The XS is designed to replace the now ageing xTi, and has similar specifications: a 10 megapixel sensor, dust control system and a variety of color modes called Picture Styles.
The XS also borrows a few features from the XSi, including its image-stabilized kit lens and a live view LCD.
In short, it's a great starter digital SLR for anyone making the transition from compact camera who doesn't need the more advanced functionality available on the Rebel XSi and who doesn't want to pay extra for features they might never use.
The Canon XS release date is August 2008, and the list price has yet to be announced.
Links
- Betterphoto.com - a wealth of photography learning opportunities
- Photojojo - a great site with tons of photography do-it-yourself (DIY) projects
- Flickr - THE social media site for photographers
- Strobist - everything you ever wanted to know about lighting with external flash
- Photo.net - lots of learning resources and plenty of examples of exceptional photography
In Conclusion
It's been an incredibly busy month here but I'm happy to have finally completed the guide to flash.Hopefully there's a lot of information in there that will help inform your purchase of a new flash for your digital SLR camera - and I intend to add a lot more information about specific flash units in the near future.
What's around the corner? Up next I'm going to put together guides for the Nikon D60 and Sony A300 and hope to have both of those published by the end of August.
Until next month...thanks for reading, and happy picture taking!
--Chris Roberts, Your Digital SLR Guide