| Back to Back Issues Page | ||||||||||||||||||||||||||||||||||||||||||||||
 |
||||||||||||||||||||||||||||||||||||||||||||||
|
Digital SLR Guide Newsletter - All About Shutter Speed July 04, 2011 |
||||||||||||||||||||||||||||||||||||||||||||||
Having trouble viewing this newsletter? Read the latest issue online at
/dslr-news.html or read back issues If someone you know has forwarded you this newsletter and you've enjoyed it, subscribe now to receive the next issue when it's published.
DSLR News - June 2011: All About Shutter Speed
In This Issue
Introduction
This issue of the Digital SLR Guide newsletter is going to be all about one of the two most important settings you can learn you use on your DSLR: shutter speed.
The other setting is aperture, but I'll talk about that in another newsletter.
I will mention aperture in this issue, but only because changes in aperture result in changes to shutter speed. Simply put: you can't change one of these settings without having to change the other to compensate.
Stay Updated!Shutter Speed Defined
In its most basic form, the definition of shutter speed is pretty simple: it's the amount of time (measured in fractions of seconds) that the camera's shutter stays open when you take a picture.
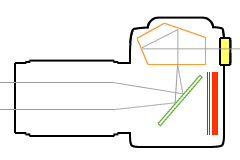 Let's talk about mechanics for a bit: inside your camera, there is a mirror that reflects the image coming through the lens up to the camera's viewfinder. When you put your eye up to the viewfinder you see exactly what the lens sees.
When you take a picture, the mirror flips up out of the way of the shutter that sits directly behind it. The shutter opens for a brief period of time to expose the digital sensor behind it to the light passing through the lens.
Once the picture has been taken, the shutter closes and the mirror flips back down again. This entire sequence of events typically only takes a fraction of a second.
The period of time that the shutter remains open is something you can control.
But before you do, it helps to be aware of how your camera displays the shutter speed. The vast majority of shutter speeds that you will use are fractions of a second (for example: 1/60th of a second).
It would be nice if cameras could display that your shutter speed was "1/250th of a second" but the LCD screens don't have enough room to display sentences like this.
Instead, shutter speeds are displayed as the bottom number of the fraction. Let's take a look at some examples:
This type of notation is all well and good, until you get to shutter speeds that are one second or longer. Granted, most people don't use shutter speeds this slow - the available light has to be pretty dim. More on this later.
For now, it's enough to say that once shutter speeds are one second or longer, DSLR cameras add a quote mark (") to the display. So if your camera is displaying a shutter speed of 4" this means 4 seconds (as compared to 4 without the quote which would be 1/4 of a second).
How to Control Shutter Speed
There are three variables that affect the shutter speed you can use:
Let's talk about available light first, assuming that your lens aperture and ISO are constant values.
If aperture and ISO remain unchanged, the ONLY thing affecting your shutter speed is the amount of available light:
Here's the relationship:
Now let's move on to the next variable, aperture. We'll talk about it in general terms first:
Think of your lens aperture like a faucet. If you turn the faucet on a little bit, only a small stream of water comes out. The opening in the faucet is narrow, which is a lot like a narrow lens aperture. In this case, it will take you a long time (slow shutter speed) to fill up the sink with water.
However, if you turn the faucet on full, it's the same as opening the aperture of your lens to its max: in this case, the sink fills with water much faster (fast shutter speed).
While the relationship above applies regardless of the amount of available light, the actual shutter speed ranges are dependent on the available light.
For example, on a bright day, your shutter speed/aperture might look like this:
Note that the shutter speed does get SLOWER as you NARROW the aperture. Now, let's take the camera inside and use the exact same apertures:
The shutter speed still gets slower as you narrow the aperture, but now - since there is less available light - your starting shutter speed is slower than it would be if there was more available light.
Now that you have a handle on the impact of available light and lens aperture on shutter speed, let's talk about the last variable: ISO.
Here's how it works in a nutshell:
As you increase your ISO setting, the camera sensor absorbs light faster. This means that the shutter does not need to stay open as long for the sensor to collect the appropriate amount of light to form an image.
The impact of changing ISO is the same regardless of the available light and lens aperture, but it's most useful when you are taking pictures in dim light at your widest aperture and still need the shutter speed to be faster. I'll talk about this use of ISO in just a moment.
For now, let's quickly summarize the three variables that affect shutter speed:
 Beginner Digital SLR Lessons
The Purpose of Shutter Speed
All this control over shutter speed would be kind of irrelevant if it didn't actually DO something.
Shutter speed plays a very important role in every picture you take:
As the shutter speed slows down, motion of any kind - either your subject or the camera itself - will make your photo look blurry/soft/out of focus.
As the shutter speed increases, you're able to capture speedy subjects with your camera that you can't even see with your eyes. For example, at 1/2000th of a second, your can take a picture of a hummingbird where you can actually see its wings.
So - the shutter speed you choose depends on your subject AND the results you want to achieve.
If you want your image nice and sharp, then you're going to use faster shutter speeds. If you're looking to add some motion blur (either subject or camera) then you'll use slower shutter speeds.
How to Blur Motion
We'll talk about creating blurry images first because it's honestly much easier to create blur than it is to avoid it.
In fact, you've probably captured PLENTY of blurry images that weren't intentional — you were hoping for a great shot, but your photo looks out of focus.
When you create blur intentionally, you start to get a feel for the shutter speed threshold that creates it. This means that you can keep an eye out for these slow shutter speed when you're trying to PREVENT blur.
First, let's capture an image where the background is clear, but the subject is blurry.
Depending on the amount of available light, a low ISO paired with a narrow aperture should result in pretty slow shutter speeds. Anything within the 1/10 to 1/30 range will do.
Place your camera on a stable surface (table, chair, tripod, etc.). If you don't have an available subject, set your camera to timer mode so you can be the subject.
Take the following three photos:
What you should see here is that the subject gets more blurry the faster he/she/it moves. The non-moving background, however, is nice and sharp.
Now, pick up the camera in your hands and hold it. Gently move the camera as you take a picture of your background.
If your shutter speed is slow enough, you should now see that your ENTIRE PHOTO is blurry, thanks to the motion of the CAMERA.
 Intermediate Digital SLR Lessons
How to Freeze Motion - Bright Light
Having just created blur, we're now going to try to eliminate it entirely.
For this exercise, make sure that you're working with plenty of available light since this will help you use a variety of super-fast shutter speeds.
Alternatively, you can also set the camera to Shutter Priority mode and then select a nice fast shutter speed like 1/500 or 1/1000.
If you have a willing subject, have him/her stand still at first, and then proceed to be increasingly energetic. Snap pictures throughout.
When you're able to use very fast shutter speeds, you'll see that even swift motion can be frozen in time, creating very unique photo opportunities.
You can use this high-speed technique on a variety of subjects to create interesting images: airplanes, cars, bicycle riders, pets at play, falling water, etc.
Being able to freeze motion in an image that you can't freeze in real life allows you to see details that you can't pick up with your naked eye.
How to Freeze Motion - Dim Light
Once your available light goes away, freezing motion becomes much more difficult.
Remember — when working with shutter speed there are three variables that play a role: the amount of available light, the lens aperture and the ISO.
When you take away one of these variables (light) you are limited by the other two variables in terms of the shutter speeds you can use.
The good news here is that freezing motion in dim light is difficult, but it's certainly not impossible.
Here's how to do it:
Once you've opened your lens up as wide as it will go (also called the maximum aperture of the lens) then the only remaining variable you can use to affect your shutter speed is ISO.
Since increasing the ISO also increases the level of image noise (and reduces overall image quality) you only want to increase ISO enough to get a sufficiently fast shutter speed.
Here's an example of how to increase the ISO only as much as you need:
Now, there will be times where freezing motion in dim light is simply NOT possible.
Let's say that you're taking pictures of a sporting event and that you've opened your lens aperture as wide as it can go AND you've increased your ISO as high as it will go.
At this point, there's nothing else you can do to boost your shutter speed further. If your subjects are still looking blurry, then the easiest solution is to wait until there is more available light.
If you take pictures under these conditions frequently and have the money to do so, then you can also look at buying a second lens with a very wide maximum aperture.
A lens with a maximum aperture of f/2.8 allows you to take pictures in a lot less light than a lens with a max of f/5.6.
The only downside to lenses with wide maximum apertures is that they tend to be very expensive, especially if you'd like a telephoto lens to capture subjects from far away.
This is why most lenses used by professional sports photographers cost thousands instead of hundreds of dollars.
Photo Links
Photo Contests
Other Photography Sites
Great Photo Blogs
Recommended Digital SLR Retailers
In Conclusion
I hope that this in-depth look at shutter speed has provided you with some insight about this important setting and how you can leverage it to either add or eliminate blur from your images.
The best advice that I can provide to really help this information sink in is this: experiment.
Play with all different kinds of shutter speeds in all different kinds of light. See what happens when you use high ISO in sunlight and low ISO in dim light. Adjust your lens aperture and get a feel for how this affects your shutter speed.
Obviously, many of the pictures you take when you're messing around won't turn out great.
But the more you experiment and the more familiar you become with shutter speed, the better your pictures will look.
--Chris Roberts, Your Digital SLR Guide
|
||||||||||||||||||||||||||||||||||||||||||||||
| Back to Back Issues Page |


