
November 30, 2007
Having trouble viewing this newsletter? Read the latest issue online at
/dslr-news.html or read back issues
If someone you know has forwarded you this newsletter and you've enjoyed it, subscribe now to receive the next issue when it's published.
DSLR News - November 2007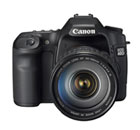 For the few weeks that I've had it, I've put the camera through its paces, especially with regard to action photography which is where the 40D excels. It definitely performed to expectation. For those of you who might not be familiar with this camera, the 40D sits between the Canon consumer digital SLRs (the digital Rebel line) and the Canon professional SLRs (which cost in excess of $3,000 for the camera body alone). This camera is fast - with its hyper-accurate 9-point autofocus system and 6.5 photo per second continuous shooting speed, it's designed for anyone who wants to be able to capture the "decisive moment". Oddly enough, it's also relatively cheap ($1,300 for the body), at least when compared to other competing digital SLRs with similar specifications: the Nikon D300 ($1,800), Sony ALPHA DSLR-A700 ($1,400) and the Olympus E-3 ($1,700). It's no lightweight, measuring 5.8 x 4.3 x 2.9 in. (146 x 108 x 74 mm) and weighing in at a hefty 29 oz (822 g) - not ideal for anyone who wants to travel light or carry the camera around all the time. It features Canon's new dust control system (also available on the consumer-level Rebel xTi) and it sports a 3 inch live view LCD screen (also available on the professional Canon EOS 1D Mark III). That big 3 inch screen makes reviewing photos and changing menu settings a breeze.
Special holiday offer - I'm selling the camera that I used for this review on eBay (auction ends Friday December 7)
If you've figured out that the Canon 40D is the best camera for you and have been waiting for that big sale, here's your opportunity to pick up the camera body for a discount, since the camera has been slightly used. On the plus side: I've tested every single feature and can confirm that the camera is fully functional and that there are no problems with it. The warranty card has not been filled out, which makes you eligible for Canon's coverage on the camera.
|
In This Issue
Latest SLR Guides
Olympus E-510
Nikon D80
Canon Rebel xTi
Nikon D40
Sony ALPHA A100
Digital SLR Terms
Megapixels
Anti-Shake
ISO / Image Noise
Sensor Dust
Crop Factor
RAW vs. JPG
Continuous Photos
Autofocus Points
Aspect Ratio
Lens Terms
Focal Length
Prime vs. Zoom
Maximum Aperture
First vs. Third Party
SLR Lens Features
Canon Lens Glossary
Nikon Lens Glossary
|
Digital SLR Lessons
- Learn digital SLR camera jargon
- Master the controls of your digital SLR
- Dramatically improve the quality of the photos you take
Digital SLR Q & A
Question: What's an SLR-like digital camera?
Answer
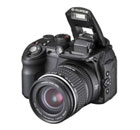
Some examples of these SLR-like cameras include the Canon S5 IS, Panasonic DMC-FZ50S and the FujiFilm Finepix S9000 (pictured to the right).
These are still compact cameras, and they differ from true SLRs in three very fundamental ways:
- You can't change the lens - the lens is permanently attached to the camera body. You can buy "modifiers" for the lens that will make it wide angle or telephoto, but you never can change the ENTIRE lens.
- They're not as fast - even though they look quite similar to SLRs, they don't have the same autofocus systems, nor the same low consecutive photo speed. If slow response is one of the main reasons you're considering an SLR, then only the SLR will have this significant speed advantage.
- They don't perform as well in low light - the sensor in a digital SLR is physically larger than the ones in SLR-like cameras. This means that it produces less digital noise when you're taking photos in dim light without a flash.
Having said this, there are some distinct advantages to buying an SLR-like camera instead of a true SLR:
- You don't have to change lenses - if you'd like to keep life simple, many of these cameras come with 12x zooms. In order to cover the same range with a digital SLR you'd need to buy at least TWO lenses.
- They're more compact - even the smallest digital SLR is bulky relative to SLR-like cameras. If portability is one of your main criteria for owning a camera, then an SLR-like model will weigh you down less.
- They capture video - no digital SLR on the market today can capture video - they just take photos.
So how do you decide which one to get?
Get an SLR if:
- You want to take high-quality photos in ANY type of light (from bright to dim)
- You're going to take photos of fast-moving action (sporting events, children, pets)
- You want the flexibility in the future to completely change the lens on the camera
Get an SLR-like camera if:
- You only want a camera with one do-it-all lens
- You want a camera that you can carry with you at all times
- You want a camera that can capture video as well as photos
Digital SLR Technique
For more digital SLR camera techniques, please browse through the back issues of this newsletter (especially helpful if you find me rambling about something that makes no sense).Over the course of this year, I've talked about a lot of different camera techniques including the use of aperture, shutter speed and ISO (the triad of digital camera controls).
As we wrap up 2007, it only seemed appropriate to talk about how all three work together to help you capture natural light photos (flash photography is a topic for next year's newsletters).
Let's start out with a quick refresher about each one of these settings:
| SETTING | MEASUREMENT | USE |
|---|---|---|
| Aperture | F-Stops | Aperture represents the amount of light that passes through the LENS. A small f number is a WIDE opening and a large f number is a NARROW opening. |
| Shutter Speed | Fractions of Seconds | Shutter speed is a measurement of how long the shutter stays open. A slow shutter speed lets in a LOT of light, while a fast shutter speed lets in a LITTLE light. |
| ISO | ISO Scale | ISO indicates how much light the sensor can absorb. A low ISO number means the sensor absorbs LITTLE light, while a high ISO absorbs a LOT of light. |
Let's talk about some concrete examples, so that you can see how each one of these settings works together to capture an image that's correctly exposed.
SCENARIO 1 - BROAD DAYLIGHT
If you're photographing a static subject (landscape, portrait, macro) set your camera to:
- ISO 100 to 200
- Aperture Priority Mode - set aperture between f/5.6 and f/22
Rationale: since there's plenty of available light, you don't need the sensor to be super-absorbent so ISO 100 will do. In aperture priority mode, you set the aperture, and the camera selects a matching shutter speed. Since your subject isn't moving, you don't need a fast shutter speed to freeze the action.
If you're photographing a subject in motion set your camera to:
- ISO 200
- Shutter Priority Mode - select the fastest shutter speed your camera will allow
SCENARIO 2 - OVERCAST DAYLIGHT

For static subjects:
- ISO 200 to 400
- Shutter Priority Mode
Rationale: as the light gets dimmer, you want to make sure that your shutter speed is fast enough to prevent blur from either subject motion or camera shake. A slight increase in the ISO setting makes the sensor more receptive to light, and will ensure that you can use shutter speeds at 1/125th of a second or faster.

For moving subjects:
- ISO 400 to 1600
- Shutter Priority Mode
Rationale: taking photos of fast-moving subjects on overcast days is one of the easiest ways to capture a bunch of blurry photos. If you don't increase your ISO, here's the problem: even with your lens set to its maximum aperture (as wide as it will open) the shutter speed for a correct exposure will still be TOO SLOW to freeze a subject in motion. For example, let's say that your lens is open to f/3.5 and your shutter speed is 1/125. While this is just fine for a portrait subject, it won't work well for capturing a soccer game. With your lens open to its maximum, there's only one way to coax a faster shutter speed out of the camera: increase the ISO. An increase up to ISO 400 or 800 will make the sensor absorb more light and will boost that shutter speed (with the aperture left open all the way) up to 1/500 or faster.
SCENARIO 3 - INTERIOR LIGHT

For static subjects (without a flash):
- ISO 400 to 800
- Aperture Priority Mode - open as wide as your lens allows
Rationale: since you're not working with a lot of available light, you want to ensure that A) the ISO is increased and B) the lens is open as wide as it can be (maximum aperture). With these settings, keep an eye on your shutter speed. If you have an image stabilized lens or camera, you can get away with shutter speeds as slow as 1/30th of a second, but if your subject moves, there will be blur. If you want a faster shutter speed, simply increase the ISO setting.
For moving subjects (without a flash):
- ISO 800 to 1600
- Aperture Priority Mode - open as wide as your lens allows
Learning Resource
I devote a lot of time on the web site and in this newsletter toward encouraging you to learn your camera's settings to that you can capture photos correctly the moment you take them.However, it's inevitable that there will come a time when in your rush to capture a great shot, all that camera theory goes straight out the window and you wind up with a photo that's poorly exposed or has some nasty color tint.
The great part about digital imaging is that it's quite easy to correct some of these common mistakes with photo editing software AFTER the photo has been taken. Even a shot that seems like a total loss need not be so long as you have the tools and technique to fix it.
This month's learning resource focuses on a specific piece of software that will help you manage and edit your photos: Adobe Elements.
The web site is called www.easyelements.com, and it presents a wealth of tips and tutorials about how you can use the Adobe Elements software to improve and enhance your digital photos.
The site walks you through the steps to add borders to your images, correct red eye, and will also tell you more about the common tools you can use - plus a whole lot more.
It's worth a look if you're just getting started in the world of digital photo editing and your software of choice is Adobe Elements.
How and When
This month I'll be talking about a specialized type of photography: How to Take Photos at Night.
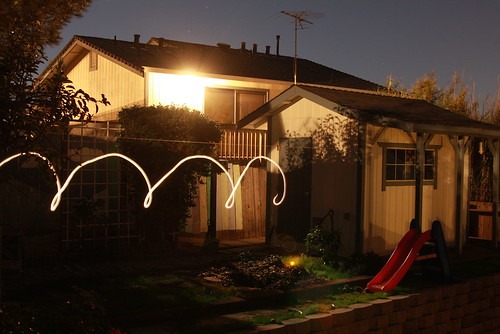
Night photography is challenging on many levels, but can create images that are simply not possible during the daytime.
The very first accessory you're going to need for night photography is a sturdy tripod. And by "sturdy" I don't mean the lightweight plastic tripod that you might have picked up in an eBay auction.
The issue here is one of shutter speed: the limited amount of available light means that the camera's shutter needs to stay open a very long time to capture a good exposure.
Exposure is a balance of two different camera settings: aperture (how wide your lens can open) and shutter speed (how long the sensor is exposed to light). When there's plenty of available light, the shutter only needs to be open a fraction of a second in order to capture an image (regardless of the aperture setting).
At night, you may open the lens aperture as wide as it will go, but you'll still be dealing with shutter speeds measured in seconds, not fractions of seconds.
And here's the problem: very slow shutter speeds also cause image blur.
If you're holding the camera in your hands, you're quite likely to get a completely blurry photo if your shutter speed is slower than 1/15th of a second, EVEN if you have a fancy image stabilized camera or lens.
The only sure-fire way to get completely clear photos at night is to make sure the camera is not moving AT ALL. If the camera twitches even a tiny bit (maybe it's a windy evening) your night photo will wind up as a blur.
This is where the solid base of support comes in, and why a good high-quality tripod is a real necessity if you really are serious about taking photos at night.
The second piece of camera gear you'll need is a remote trigger - it doesn't matter if it's wired or wireless (different cameras have different types of triggers). When using long shutter speeds you don't even want to TOUCH the camera, since pressing your finger onto the shutter release button can cause minute camera vibrations that will blur your photo.
That covers the gear - now you need to adjust your camera settings for night photography.
While you can leave your camera in AUTO mode for night photography, it's often better to use manual mode, because you're dealing with so little available light.
STEP 1: With the camera in manual mode, select a lens aperture first. It really doesn't matter what aperture you use, just realize that the narrower the aperture, the slower the shutter speed you'll have to use to get a good exposure.
In this case, a slow shutter speed isn't a problem, since you've got the camera attached to a tripod and you're using a remote trigger to take the photo.
STEP 2: Once you've selected an aperture, keep slowing down the shutter speed until the camera's light meter tells you the exposure is correct (represented in digital SLR cameras by the number zero or with a graphic indicator that points to zero). You'll find that the shutter has to be open for several seconds in order to let in enough light.
STEP 3: now for the fine tuning. Some digital SLR cameras have a feature called "long exposure noise reduction". Now is the time to activate this feature, which will create cleaner photos when using slow shutter speeds. If you don't have this feature, then just set your camera's image mode to RAW instead of JPG.
RAW files contain unprocessed image data, and capture more information than a JPG. Files in the JPG format are also compressed, which can add grain or "noise" to your night images (hence the long exposure noise reduction).
RAW files can be viewed and edited with a variety of software programs. My personal favorite - mostly because of price to feature ratio - is Adobe Elements.
Cameras and Accessories
The Digital SLRs of 2007
We've just about hit the end of the year here, so now is as good a time as any to quickly summarize the wide range of cameras that were released in 2007.
| CAMERA | RELEASED | NOTES |
|---|---|---|
| Samsung GX-10 | January | This 10 megapixel camera is essentially a Pentax K10D (released in December of 2006) with a Samsung name. |
| Nikon D40x | April | This camera is essentially a 10 megapixel version of the Nikon D40, which was released in December of 2006. |
| Olympus E-410 | June | The E-410 is one of the smallest and lightest digital SLR cameras, and it also includes both a dust control system and a live view LCD. |
| Olympus E-510 | July | One of only two digital SLRs you can buy with dust control, a live view LCD and built-in image stabilization (the other is the more expensive semi-pro Olympus E-3). |
| Pentax K100D Super | August | One of the least expensive digital SLRs you can buy that includes image stabilization, and my pick as the best budget digital SLR camera. |
| Canon 40D | September | This camera offers a fast 6.5 photo-per-second shooting speed, custom color control, dust control and a live view LCD. |
| Sony DSLR-A700 | October | One of only two 12 megapixel SLRs (the other is the D300) the A700 includes built-in stabilization, dynamic range optimization (DRO) and dust control but omits a live view LCD. |
| Nikon D300 | November | Packed with features, the D300 can capture photos at 6 or 8 per second (with the optional battery grip), has a 51-point autofocus, live view LCD, dust control and includes increased dynamic range (called active D-lighting). |
| Olympus E-3 | November | When paired with the new 12-60mm lens, this camera claims the fastest autofocus system in the world along with its dust control, live view LCD and built-in image stabilization. |
| Panasonic DMC-L10 | November | Includes a live view LCD that flips out from the camera body, along with dust control and Panasonic's face detection technology, which helps set autofocus and exposure when taking portraits. |
And for those of you who are curious about such things, here's my pick for the best digital SLR of 2007.
Digital SLR Buyer's Guide
Thinking about buying a new digital SLR? Get a complete introduction to all the latest cameras with the Digital SLR Buyer's Guide!
Links
The following collection of links will help to keep you posted about what's new at the Guide and in the world of digital SLR cameras.
Recent Updates to the Digital SLR Guide
- The Best Canon Digital SLR
- The Best Nikon Digital SLR
- The Best Olympus Digital SLR
- The Best Sony Digital SLR
- The Best Digital SLR of 2007
Other Photography Sites
- Betterphoto.com - a wealth of photography learning opportunities
- Photojojo - a great site with tons of photography do-it-yourself (DIY) projects
- Flickr - THE social media site for photographers
- Strobist - everything you ever wanted to know about lighting with external flash
- Photo.net - lots of learning resources and plenty of examples of exceptional photography
In Conclusion
Here's hoping that the holiday elves bring you that brand new digital SLR camera you've been pining for, or - if you've managed to find the perfect camera already - a nice accessory that will make your SLR photography even more enjoyable.Next month, the newsletter will reflect what's gone on in the world of digital SLR cameras this year, with a look ahead at 2008 to see what will be coming up in the new year.
As always, thanks for reading and happy picture-taking!
--Chris Roberts, Your Digital SLR Guide