| Back to Back Issues Page |
 |
|
Digital SLR Guide Newsletter - Catching the Action October 23, 2011 |
Having trouble viewing this newsletter? Read the latest issue online at
https://www.digital-slr-guide.com/dslr-news.html or read back issues If someone you know has forwarded you this newsletter and you've enjoyed it, subscribe now to receive the next issue when it's published.
DSLR News - October 2011
The Missing September Issue
For those of you keeping track, the September issue of this newsletter never arrived. This is due to a variety of reasons: vacation, a head cold and the fact that the completed issue was wiped out by a technical glitch before I had time to send it.
I am also in the process of making some adjustments to the newsletter delivery schedule and content.
Instead of sending the newsletter at the end of each month, I will now send it closer to the beginning. I'm also going to cut back on the volume of content in the newsletter since the previous issues were a LOT to read.
In This Issue
 The focus of this month's issue is on action photography.
Action photography actually covers a wider range of subjects than you might think. When you first hear the term "action photography" you might think that it only applies to those who photograph professional sports that go really fast (drag racing anyone?).
However, I think that the principles of action photography can be applied to a variety of subjects (and not just those engaged in a sport).
For example, anyone who has ever tried to take a picture of a small child or a pet is engaged in action photography: even though you're capturing a "portrait" it's an action shot since your subject is unwilling to sit still.
If you tend to take photos in dim light, then you'll also need to be aware of some techniques used by action photographers if you want photos that are sharp.
Stay Updated!Controlling Shutter Speed
When it comes to action photography, the main camera setting to pay attention to is shutter speed.
Shutter speed is the amount of time the sensor inside your camera is exposed to light. The longer the shutter stays open, the greater the chance that your photo will look blurry.
Therefore, your main goal as an action photographer is to maximize shutter speed for the amount of available light.
There are three ways you can increase your shutter speed:
The first one is straightforward: the dimmer the light, the slower the shutter speed. When the light is dim, the shutter needs to stay open longer so that the sensor inside the camera has enough time to absorb light to create an image.
 Aperture: f/4.5 Shutter: 1/400 The ideal natural light conditions for action photography is a bright sunny day, since this will provide you with very fast shutter speeds.
As the available light decreases, you can compensate with the lens aperture setting.
The more you open the aperture, the more light passes through the lens. When a lot of light passes through the lens, the sensor is once again able to absorb enough for an image in less time (faster shutter speeds).
The width of the lens opening is indicated by a number called an f-stop. The smaller the f-stop number, the wider the opening in the lens.
An aperture of f/3.5 is wider than an aperture of f/5.6 which is wider than an aperture of f/8.
At some point you won't be able to open your lens any wider — this is called the maximum aperture of the lens. Not all lenses have the same maximum aperture: yours may be f/4 while someone else may get f/2.8.
The last camera setting you can use to adjust shutter speed is ISO - this controls the speed at which the sensor can absorb light. The higher the ISO, the faster the sensor absorbs light, the faster the shutter speed.
The only drawback of high ISO settings is increased image noise, but digital SLRs released since 2009 control high ISO noise so well that this is less of an issue.
Technique: Getting the "Right" Shutter Speed
The "right" shutter speed for your action photography needs will depend entirely on the subject you are trying to photograph.
For example, if you are trying to freeze the motion of a dirt bike race, this is a lot different than trying to freeze the motion of kids playing soccer.
Since the dirt bike can move much faster than the kids, you'll need a faster shutter speed to prevent your image from looking blurry.
Preventing image blur is the primary goal in action photography. While some action photos do benefit from a little blur to create a sense of motion, the more common "ideal" shot is one that is sharp and clear.
So which shutter speed is the right one for your subject? You have to experiment a bit to figure that out.
Here are the steps to follow:
With this knowledge in hand, let's take a look at some examples of how to apply this to different subjects under different types of light.
 Beginner Digital SLR Lessons
In Practice: Action Photo Scenarios
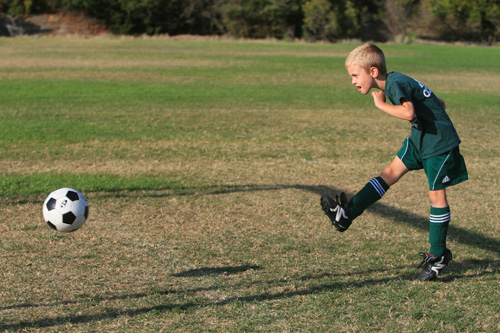
SCENARIO 1 — Soccer Game in Sunlight
For this first scenario, you can leverage the available light and your lens aperture to get a reasonable shutter speed.
If the shutter speed is 1/500 or faster, this should be sufficiently fast to freeze the motion of the soccer players, but a kicked ball might still show some blur.
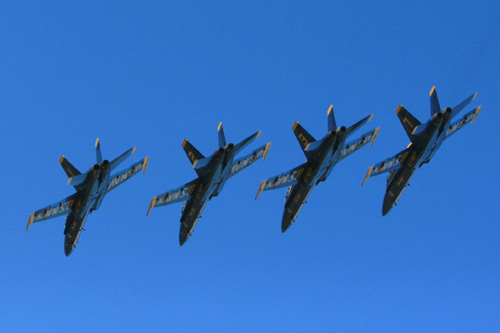
 Aperture: f/4 ISO: 200 Shutter: 1/2000 SCENARIO 2 — Airplanes (or other speedy things) in Sunlight
For this scenario, follow the exact same steps as above, but be prepared to increase ISO as necessary.
Since the planes move faster than the soccer players, you'll need a faster base shutter speed (say 1/1000) to ensure sharp photos.
If you've opened the lens aperture to its max and you're still not getting 1/1000, then increase ISO as necessary to hit this mark.
 Aperture: f/3.5 ISO: 200 Shutter: 1/4000 SCENARIO 3 — Indoor/Low Light Sports
The minute you head inside (or have a game at night) the challenge of capturing sharp images increases dramatically.
Since you've cut off the main source of fast shutter speeds (bright available light) your only options are to use aperture and ISO.
Indoors, select the max aperture of your lens - you'll need every bit of light the lens will allow through.
Also increase your ISO. Don't be worried about going above ISO 1600 — you may have to do this to get your shutter speed even above 1/125 (still to slow to freeze a fast-moving player).
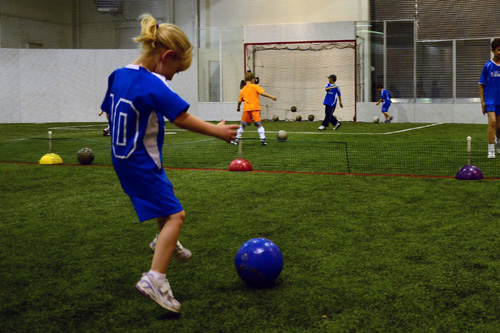 Aperture: f/3.5 ISO: 1600 Shutter: 1/160 If you've maxxed out both your lens aperture AND your ISO and you're still getting a shutter speed of 1/60 and every photo is blurry then - sadly - there's not much more you can do.
At this point it comes down to technique, and there are 2 you can try:
The end result of this second technique should be a blurry background, but a subject that is nice and sharp. This definitely takes practice, and you still will get plenty of shots where everything is blurry. But at least that's better than no shots at all, right?
 Intermediate Digital SLR Lessons
Photo Links
Photo Contests
Other Photography Sites
Great Photo Blogs
In Conclusion
No time for chit-chat here at the end — I've got to get started on next month's issue so that I can send it sooner and get on my new schedule.
Until next month, happy picture-taking!
--Chris Roberts, Your Digital SLR Guide |
| Back to Back Issues Page |
