
July 31, 2007
Having trouble viewing this newsletter? Read the latest issue online at
/dslr-news.html
If someone you know has forwarded you this newsletter and you've enjoyed it, subscribe now to receive the next issue when it's published.
DSLR News - July 2007Since we're right smack in the middle of Summer - at least for all the Northern Hemisphere readers - I thought it would be a good time to devote an introduction to the best time of day for taking pictures.What's Summer got to do with it? Glad you asked. During the summertime (regardless of when it occurs for you) there is plenty of available (or "natural") light from early in the morning until late in the evening. If I so desired - and if I had the time - I could be out taking pictures right now from about 6:30am to 8:00pm. That's a nice wide timeframe to play with, which is what brings up the question: is it better to photograph at certain times of day? While this does depend a lot on your subject matter, the answer is usually yes. When you've got many daylight hours to be out taking pictures, the "ideal" times of day to work are in the early morning and late afternoon. Put another way, direct sunlight at high noon WILL NOT flatter very many subjects whether they are animate or inanimate. In the morning and evening, light is diffuse and not quite so harsh. There are also more shaded areas available at these times to provide a screen for sunlight. This type of light will yield portraits with more tone and better dimension, and it's especially useful for bringing landscape photos to life. Colors are more vibrant at these times of day (instead of washed out) and the low angle of the sun creates more interesting textures and patterns to photograph. Having said all this, it might seem like I'm suggesting that you just pack your camera in a bag in the middle of the day and only take it out in the morning and evening. Like many other aspects of photography, the morning/evening "sweet spot" is a guideline and not a hard and fast rule. It is certainly possible to get interesting photos when there's a blazing sun directly overhead, but you have to get a LOT more creative about what you photograph. For instance, subjects in direct shade are still going to turn out well because they're not being exposed to the high contrast of direct sun. If you'd like to capture some portraits at this time of day, just place your subject right at the EDGE of the shade. This technique provides plenty of light to work with, but screens out the sun so that you get a more appealing portrait. In a sense, you're creating the exact same lighting conditions that exist in the late afternoon. Of course, the best way to find out what works is to experiment on your own and practice, practice, practice. As time goes on, you'll improve your ability to "see light" even without your camera in hand, and you'll begin to recognize those times of day (or nice shady spots) when the light is truly flattering for your subject.
|
In This Issue
Latest SLR Guides
Olympus E-510
Nikon D80
Canon Rebel xTi
Nikon D40
Sony ALPHA A100
Digital SLR Terms
Megapixels
Anti-Shake
ISO / Image Noise
Sensor Dust
Crop Factor
RAW vs. JPG
Continuous Photos
Autofocus Points
Aspect Ratio
Lens Terms
Focal Length
Prime vs. Zoom
Maximum Aperture
First vs. Third Party
SLR Lens Features
Canon Lens Glossary
Nikon Lens Glossary
|
Digital SLR Lessons
- Learn digital SLR camera jargon
- Take manual control of your camera
- Improve the quality of the photos you take
Digital SLR Q & A
Question: How can I take better photos of indoor sports?
Answer
Before you even enter the gymnasium, you're going to need the right lens for the job: a telephoto zoom lens with a wide maximum aperture.By telephoto zoom I mean any zoom lens that has a focal length in betweeen 70mm and 300mm. The zoom will gives you the flexibility to capture wide-angle shots as well as close-ups of the action - even if you're sitting in the bleachers.
The maximum aperture of any lens is the upper limit on how wide it can open and how much light it can let in. Here's what the aperture scale looks like (where a smaller number is actually a WIDER aperture):
| 1.4 | 2.0 | 2.8 | 4.0 | 5.6 | 8.0 | 11 | 16 | 22 | 32 |
For each change in aperture number, the lens lets in either double or half the amount of light. For example, if you have two lenses and one has a maximum aperture of f/2.8 while the other's is f/4, the f/2.8 lens can let in TWICE the amount of light as the f/4.
Since the interior of most gyms is pretty dark, you're going to need to let in all the light you can get, which is why a WIDE maximum aperture for your lens is so important.
So you've got your fancy zoom lens attached to your camera, and you're all ready to take some great shots of the game.
Here are the camera settings that you'll want to use (I'll explain why in just a moment):
| Anti-shake | Off |
| Camera Mode | Aperture Priority |
| ISO | 800 or 1600 |
| Autofocus | Continuous |
| Shooting Mode | Continuous |
| White Balance | Tungsten or Fluorescent |
Before I get into the details of the camera settings, let's talk about the goal here: you want to use the FASTEST SHUTTER SPEED you can get with the amount of available light. Only a fast shutter speed is going to freeze the motion of the athletes - in this case any form of anti-shake isn't going to help you one bit (which is why you can just turn it off).
In order to get a fast shutter speed in dim light, the lens has to be open as wide as it will go, and the camera's sensor has to be absorbing as much light as it can. Set your camera to aperture priority mode, then select the widest aperture the lens will allow. The high ISO setting of 800 or 1600 will increase the light-gathering capacity of the sensor.
Since your subjects are going to be moving all over the place, one-shot autofocus isn't going to cut it. Instead, use continuous autofocus so that the camera constantly adjusts the focus point as your subject moves through the viewfinder. Also set the shooting mode to continuous so that you can fire off bursts of shots during peak action moments rather than just one photo at a time.
Finally, you're going to have to adjust for the lighting conditions, since the available light will either be tungsten or fluorescent which can add a color tint to your photos. By setting your camera's white balance to either one of these settings, you're making sure that the color in your photos will look natural.
The best way to figure out which white balance to set (if you're not sure if the lights are tungsten or fluorescent) is to take a few shots of the gym before the game starts with different white balance settings. Check each one of your test photos on the camera's LCD, and find the one that looks the most natural. Once you've found the right white balance, leave it set that way for the remainder of the game.
Digital SLR Technique
Just joining this newsletter? Catch up on some back issues if you're finding the information in this section a bit hard to follow.Before we dig in to this month's technique, let's quickly summarize the three levels of control you have over the amount of light hitting the camera's sensor:
- Aperture - the width of the opening in the lens
- Shutter Speed - how long the camera's light-blocking sensor stays open
- ISO - how much light the sensor absorbs
All three of these settings come into play for every photo that you take. Aperture and shutter speed are the two main players, and the ISO setting acts as a light "booster" for those times when you need the sensor to be more sensitive to light (typically when there's not plenty of natural light to work with).
This month I'm going to talk about the bane of every digital SLR camera - contrast.
In fact, a lot of contrast has always been a problem for ANY type of photography whether it's film or digital, point-and-shoot or SLR. The real term that we're going to get into here is called dynamic range.
Imagine that you're standing on a city street and it's a bright sunny day. The buildings on the left side of the street are in direct sunlight, while the buildings on the right are in shadow.
Your eyeballs - exceptional image capturing devices that they are - can see ALL of the detail in the scene in front of you. You can make out the texture of the stucco on the surface of the buildings in sunlight, and you can also - at the same time - read the addresses of the buildings that are in shadow. This is because your eyes have incredible dynamic range.
Sadly, your digital SLR does not.
Faced with a scene of such extreme contrast, your camera is going to do the best job it can to get a balanced exposure, but typically one of two things is going to happen:
- The camera's light meter exposes for the shadows and the buildings in sunlight are massively over-exposed (toward pure white)
- The camera's light meter exposes for the highlights and the buildings in shadow are maxxively under-exposed (toward pure black)
The end result of either one of these decisions is a photo that has lost some detail - either in the highlights or in the shadows.
This may not be a real problem if there's nothing interesting to look at either in the highlights or the shadows, but chances are that there IS something there - that's what compelled you to take the photo in the first place, right?
We now come to the part where you must exert some control over your digital SLR camera if you want it to make the RIGHT choice.
And let me make this clear: you ARE going to have to choose one over the other when it comes to highlights vs. shadows. Despite what your eyes are able to see, no amount of fiddling with your camera settings is going to get properly exposed highlights AND properly exposed shadows when there's a lot of contrast in the scene.
First, set your camera to "P" mode (also called "Program" mode). Program mode selects aperture and shutter speeds for you, but allows you to make changes to other camera settings like ISO and metering mode.
The feature that we're interested in changing here is the metering mode.
The default metering mode on all digital SLR cameras is called "area" metering. This means that the camera's light meter takes into account the ENTIRE scene that you see through the viewfinder.
Let's say the scene in the viewfinder is split 50/50: half of what you see is in sunlight and the other half is in shadow. With area metering activated, the camera evaluates ALL of this light and makes a "best guess" about what the aperture and shutter speed settings should be.
Sometimes it will guess that the light area should be properly exposed and sometimes it will correctly expose the dark.
The way to tell your camera which area YOU want it to expose correctly is by switching the metering mode to "spot" or "center weighted" (not all digital SLR cameras have spot meters).
The spot meter only evaluates the light that is dead center in the viewfinder. All you have to do is point the camera straight at the area that you'd like it to expose correctly. Let's get back to our street example: if you'd like to expose for highlights (making the shadows dark) then point your camera at the sunny buildings. If you'd like to expose for shadows (making the highlights white) then point your camera at the buildings in shade.
Once you press down halfway on the camera's shutter release button, it will take a reading from either shadow or highlight (depending upon what you're pointing at) and will then set the aperture and shutter speed to get a proper exposure.
|
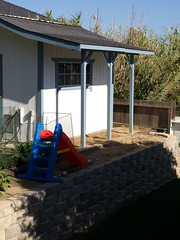
PHOTO SAMPLE #1 This first photo was taken in program mode (P) with area metering selected. Note how the camera has tried to strike the best balance possible in between the bright highlights and the dark shadows. |
 |
|
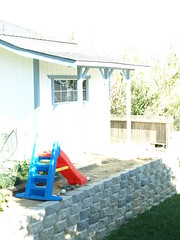
PHOTO SAMPLE #2 The second image was also taken in program mode, but this time I set the metering to spot and forced the camera to expose for the shadow section of the yard. In this case, you can clearly see the wall and the grass, but the building is now massively over-exposed. |
 |
|
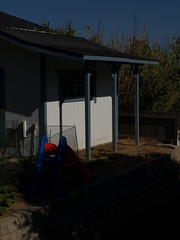
PHOTO SAMPLE #3 The final image is still in program mode, with spot metering selected. The only difference is that I pointed the camera at the white wall of the building to get an exposure reading. The white wall of the building is correctly exposed, but everything else in the image is now almost black. |
 |
Learning Resource
July's learning resource comes to us from the online version of Popular Photography magazine.It's called PopPhoto Flash, and it's a group weblog from several of the magazine's editors.
Tips, tricks and suggestions are plentiful here, with a lot of good ideas about how to take photos, interesting new developments in the world of photography, camera and software reviews, and what to do when disaster strikes.
I'm especially taken with their simple solution for when you drop your ultra-expensive camera into the lake.
You can either check the PopPhoto Flash web site on a regular basis for new information, or just subscribe to their RSS feed and get the latest news when it's posted.
How and When

I've been talking a lot lately about the fact that your camera set to auto mode doesn't always get exposure right. At some level, this would be asking quite a lot.
When you're not adjusting exposure for certain types of lighting conditions, the camera is doing the best job that it can to evaluate the volume and intensity of the light striking the digital sensor.
Given the virtually limitless variety of lighting conditions that exist in the natural world, it would be quite impressive if a camera could accurately judge exposure every single time, regardless of the available light.
However, it's quite easy for you to tell how much available light there is - your eyes and brain process this information in an instant.
So how do you achieve a synthesis between what your eyes see and what the camera sees? The answer is deceptively simple: just find a common language.
As it turns out, this common language has a name: it's called a histogram. A histogram is a fast and accurate way for you to tell whether or not your photos are correctly exposed and whether you'll have to make some manual adjustments to exposure to get it right.
Unfortunately, reading a histogram is not exactly easy to do if you've never seen one before.
I've got you covered - for all of you who want to get your exposures right when you TAKE the photo (vs. correcting later in a computer program) I've put together an article that will teach you how to read a histogram.
Request a Tip
If you're not sure how or when to use a feature on your digital camera, go ahead and ask me. I'll include the answer in a future issue of the newsletter.
Cameras and Accessories
Latest Digital SLR

Rather than increasing the number, this camera is just called the Pentax K100D Super.
It includes all of the features that were available on the Pentax K100D, with the addition of a dust control system. The Pentax K100D Super is also notable because it is compatible with EVERY lens ever made by Pentax - although some lenses will require a special adaptor.
The K100D Super will be available this August.
Digital SLR Camera of the Month

If you're in the market for a new digital SLR camera and aren't already loaded down with a lot of film SLR lenses, the Olympus E-510 is really worth your consideration.
Right now, I think that it's the best camera for anyone making the transition from compact point-and-shoot to digital SLR.
Its live view LCD display is rare on digital SLR cameras, and helps you take photos without always looking through the viewfinder. Its dust control system keeps the sensor clean no matter how much you change lenses, and the built-in image stabilization keeps your low-light photos looking clear.
All the whiz-bang features of this camera would not matter too much if the image quality that it produced was sub-standard, but that's certainly not the case. The E-510 captures photos that are clear and colorful, and introduces very little digital noise even at high ISO settings.
It also has plenty of advanced features, providing plenty of growing room for intermediate photographers looking to expand their skills in the future.
Read the complete Olympus E-510 Guide.
Digital SLR Buyer's Guide
Thinking about buying a new digital SLR camera? Get a complete introduction to all the latest technology and cameras with the Digital SLR Buyer's Guide!
Links
The following collection of links will help to keep you posted about what's new at the Guide and in the world of digital SLR cameras.
Recent Updates to the Digital SLR Guide
Let's get the big news out of the way first - I've put together two new pages of digital SLR lenses based on the subject material you'd like to photograph. These lens guides not only help you learn more about what features to look for in a lens, they provide you with recommended lenses in each category.In order to select the lenses, I simply imagined that I was going shopping myself. I performed hours of research, I read all the online reviews and I compared each lens to its competitors. My final recommendations are a balance between lens performance and value (the highest quality lens for the lowest price).
I've also updated a lot of the site this month to keep the information current:
- Canon Digital SLR Cameras
- Nikon Digital SLR Cameras
- Olympus Digital SLR Cameras
- Pentax Digital SLR Cameras
- Sony Digital SLR Cameras
- Inexpensive Digital SLR
Other Great Photography Sites
In Conclusion
Speaking of Summer...I hope that you've been able to enjoy some vacation time while the weather is warm (again, depending on where you live) and that you've had the opportunity to take advantage of the additional daylight hours to get out there and take some photos - with or without your new digital SLR camera in hand.Thanks for reading and happy picture-taking!
--Chris Roberts, Your Digital SLR Guide