
January 31, 2010
Having trouble viewing this newsletter? Read the latest issue online at
https://www.digital-slr-guide.com/dslr-news.html or read back issues
If someone you know has forwarded you this newsletter and you've enjoyed it, subscribe now to receive the next issue when it's published.
DSLR News - January 2010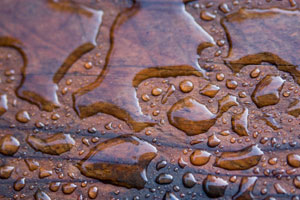 Hello Winter. It's been raining steadily where I live (at sea level), and dropping snow by the truckload in the higher northern regions. Weather like this presents some unique challenges for photographers who don't want to spend the next three months curled up inside next to the fire. Let's just say that the delicate electronics inside your digital SLR and moisture are not a really great combination. In fact, any moisture at all (even light condensation) that gets inside the camera body can result in a quick trip to the repair shop. So what's the dedicated outdoor photographer to do? Just be aware that your camera - unless it has some special waterproofing or weather sealing - needs some extra care and attention when the weather turns foul. If you're just dealing with rain - like me - then feel free to head outside with your camera, so long as the entire body and lens is in some type of plastic enclosure. You can purchased special weather bags that fit over your camera and lens or you can fashion one yourself. Don't worry if a few drops of water get on the camera, just don't carry it around for 30 minutes in the rain. For cold weather photographers, the temperature is more of an issue than moisture. While very cold temps won't exactly harm your camera, they will definitely reduce your battery life. When the camera is not in use, keep it close to your body so that the battery stays warm. The second thing to be careful of is quick transitions from cold to warm. When a camera is very cold and is moved quickly to a warm environment, condensation can build up inside the body which can cause technical problems. Two solutions: 1) transition to a intermediate environment to gradually change the temperature of the camera and 2) wait awhile after a quick temperature transition before you start shooting pictures to let any condensation evaporate. |
In This Issue
Latest SLR Guides
Canon Rebel T1i
Nikon D5000
Nikon D90
Nikon D60
Canon Rebel XSi
Pentax K20D
Canon 40D
Olympus E-510
Nikon D80
Canon Rebel xTi
Nikon D40
Digital SLR Terms
Megapixels
Stabilization
ISO / Image Noise
Sensor Dust
Crop Factor
RAW vs. JPG
Continuous Photos
Autofocus Points
Aspect Ratio
Lens Terms
Focal Length
Prime vs. Zoom
Maximum Aperture
First vs. Third Party
SLR Lens Features
Canon Lens Glossary
Nikon Lens Glossary
|
Stay Updated!
Lens Options
So you've got a DSLR camera. Maybe it's brand new, maybe you've been using it with the kit lens for awhile.You get the sneaking suspicion that your camera is capable of...something more.
And it is - provided you attach the right lens to the front of it. Getting a new lens for your DSLR can open your eyes to all sorts of new photographic opportunities.
Whether you're finally able to capture all the scenery that your eyes take in, or can focus on minute details that you'd otherwise miss, different types of lenses are good for different needs.
But what if you don't have a specific need, but a more general one: you're just looking for a good all-around-take-anywhere lens that you can stick on your camera 80% of the time.
The following list should help. It's a selection of lenses that I consider to be good upgrades/complements to the standard 18-55mm kit lens for each manufacturer.
If you don't feel comfortable dropping several hundred dollars on a new lens without being sure that it will meet your needs, then try renting first. BorrowLenses.com offers a wide selection of lenses for Canon and Nikon that you can rent for a fraction of the cost of buying the lens new.
Olympus, Pentax or Sony owners will have to look elsewhere for lens guidance.
One lens review site that I use a lot is fredmiranda.com. Photographers who have used a lens can write a review on this site and provide guidance and insight about the construction and clarity of the lens.
It's a great way to learn about the limitations of a lens before you spend a lot of money on it.
CANON
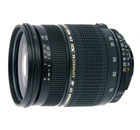
One lens I often recommend for Canon DSLR users is the Tamron 28-75mm f/2.8 XR Di LD, especially since I've been using one myself for many years.
What I like most about this lens is the wide constant maximum aperture of f/2.8. This lets in a lot of light and helps when shooting hand-held in dim available light.
Since I shoot indoors a lot, having an f/2.8 max aperture has come in handy many times to help me capture shots that would not be possible with smaller aperture lenses.
The zoom range on this lens is also great for portrait work and those are the types of photos I most often take these days.
NIKON
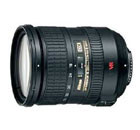
If I had a Nikon DSLR, one lens that would be high on my list is the Nikon 18-200mm f/3.5-5.6 VR.
What's great about this lens is the superb zoom range from wide angle to telephoto. In multiplier terms, this is an 11x zoom (most kit lenses are 3x zooms).
Mega-zoom lenses like this one are often not able to maintain image quality throughout the zoom range, but Nikon did a good job keeping image quality consistent.
Vibration Reduction (VR) helps to ensure that your shots are clear, even at the 200mm telephoto setting (which magnifies camera shake and can result in blurry images).
OLYMPUS
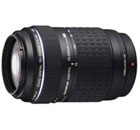
When you want to capture closeups of things that are really far away, look no further than the Olympus 70-300mm f/4-5.6 ED.
With the 2x crop factor on every Olympus digital SLR, this lens winds up with a focal length equivalent of 140-600mm.
If you've got one of the Olympus DSLRs with built-in image stabilization - like the E-520, E-620 and E30 - then what you get with this lens is a STABILIZED 600mm focal length, a setup that would cost thousands from other manufacturers.
PENTAX

Landscape and interior photographers should consider the Pentax 16-45mm f/4 SMC PDA ED.
The wide constant f/4 maximum aperture ensures that plenty of light makes it into the lens, and the starting focal length of 16mm is nice and wide to capture all the scenery in front of you.
SONY
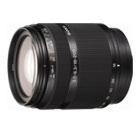
Like Nikon, Sony's got their own 11x zoom: it's the Sony DT 18-200mm f/3.5-6.3 ED.
The Sony lens doesn't include stabilization, but it doesn't need to: all Sony DSLRs have stabilization built into the camera body.
This makes the 18-200mm a great all-purpose lens, letting you capture everything from landscapes to closeups without having to swap lenses all the time.
Beginner Digital SLR Lessons
- Dramatically improve the photos you take
- Master the controls of any digital SLR
- Learn at your own pace
- Download each lesson to your computer
- Print the lessons for offline reference
- Ask me questions
What's New
The big news here at the Digital SLR Guide is that I've just launched a new blog called Digital SLRs for Starters.It's a companion to the Digital SLR Guide, and a place where I can post more frequent updates that don't really have a place on the main site.
This is also the place where I'll share interesting sites, techniques and contests that relate to digital photography.
The new blog is linked to my Twitter account, so any updates to the blog will also get posted there. To keep updated on the posts to the blog you can either subscribe for updates (via RSS) or follow on Twitter.
I'm also making good progress on the next set of Digital SLR Lessons, and am still on target to complete those by March of this year.
Quick Photo Tip
This month's quick photo tip: how to take pictures at night.
Taking pictures at night involves several hurdles that you need to overcome:
- Preventing image blur
- Minimizing image noise
- Capturing colors
- Using autofocus
PREVENTING IMAGE BLUR
Image blur becomes a problem when you take pictures at night because your camera will use very slow shutter speeds. The camera's shutter must be open for a long period of time (1 or more seconds) to ensure that a visible image is captured by the sensor.
When you use a very slow shutter speed, it's also called a long exposure.
If the camera moves a micron during a long exposure, you're going to wind up with a photo that's blurry. If the camera moves more than a micron, then your photo will be VERY blurry.
There are three solutions to this problem:
- Use a tripod and remote trigger - a tripod provides a stable base for the camera to rest on, while the remote trigger ensures that you're not touching the camera at all during the exposure
- Use an image stabilized lens or camera - a camera or lens with image stabilization will help you take photos in very dim light to a point: if it's very dark, then even an IS system won't prevent blur if you're holding the camera in your hands
- Use a wide aperture lens and high ISO - to solve the slow shutter speed problem, use a lens with a wide maximum aperture (like f/1.8 or f/2.8) and boost the ISO on your camera to 400 or higher: this can (depending on the available light) give you a shutter speed that's fast enough to prevent image blur even if the camera is in your hands
MINIMIZING NOISE
Once you've overcome image blur, you're going to have to deal with noise. Long exposures introduce more image noise than photos taken at 1/500th of a second.
Many digital SLR cameras have a special setting for "long exposure noise reduction". Sometimes this is enabled by default. If it isn't, you'll need to activate it to reduce noise when you take pictures at night.
CAPTURING COLORS
Since there is no sunlight to illuminate your subjects, their colors turn out quite different than you might expect.
If you're taking photos in a city, then many subjects will be lit by tungsten light, which adds an orange tone to all colors. This is often a problem when you're taking pictures in JPG mode, with the white balance set to AUTO.
The first thing you can do to compensate for odd colors here is to manually set your white balance to tungsten - this should eliminate the orange tint.
However, if you REALLY want to manage the color of your night photos, then take photos as RAW files instead of JPG. RAW files don't store color information the same way JPG files do, which allows you to manipulate the color to your heart's content later on using software like Adobe Elements (or any other RAW editing program).
USING AUTOFOCUS
This is the most challenging aspect of night photography: depending on your location and subject matter, it may be impossible for your autofocus system to lock on to anything.
Digital SLR autofocus works best when there is contrast in the scene. At night, all subjects are gray/black which makes using autofocus challenging.
There are a limited number of solutions to this problem. The first - and most obvious - is to just focus manually, but this can also be quite difficult since it's very hard to tell by looking through the viewfinder if your subject is in focus.
A second method is to find something - anything - that is bright: stop lights, lights in houses, the moon, etc. Use that to help your autofocus system get a lock, then re-compose your photo as you like.
I request tip ideas every month on the Digital SLR Guide's Facebook page - if you'd like to suggest ideas for this newsletter, then become a fan.
Picture Stories
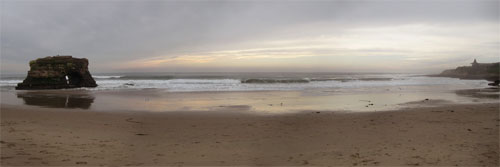
While there's no special photo technique at work here (besides the stitching of several images together to create the panorama) it is a good example of recognizing the limits of what your camera can capture.
I was sitting on the beach (in a heavy coat, I'll confess) enjoying the play of light on the water and realized that a real photo opportunity was presenting itself.
The problem is that my camera was only going to capture one small part of the scenery - either the large rock formation to the left, or the interesting tones in the sky on the right.
After spending some time studying the scene, I realized that the only way to capture it properly (and get both the rock and the sky in the same image) was to create a panorama.
While I could have gone back much further to capture the entire scene, I opted instead to stay where I was and take multiple images (as I panned the camera from left to right) that I would later combine into the image above.
I used Adobe Elements to stitch the three different photos together, which included balancing the exposure for each one and lining them up correctly to create one seamless image.
I'm happy about how the final image turned out, since it really captures the ENTIRE moment as I experienced it.
Photo Links
Other Photography Sites
- Betterphoto - a wealth of photography learning opportunities
- Flickr - share your photos with friends and others
- Photo.net - plenty of learning resources and examples of exceptional photography
- Borrowlenses - rent lenses to use on your digital SLR before you spend tons of money on one
- Photojojo - tons of photography do-it-yourself (DIY) projects
- Viewpoints.com - read product reviews from other consumers like yourself
Great Photo Blogs
- Digital Photography School - hundreds of photo tips and techniques
- Strobist - everything you ever wanted to know about lighting with external flash
- Joe McNally - get the "behind-the-scenes" thought process from a professional photographer
Recommended Digital SLR Retailers
(These are the three online stores that I use to purchase all of my digital SLR photography gear)In Conclusion
The big photo show of the year - PMA - kicks off in February in Anaheim, California.There are always new cameras announced just prior to the show, and plenty of prototypes appear under glass on the conference floor that are sometimes released later in the year.
I'll cover any DSLR-related news and announcements on the Digital SLR for Starters blog, and will also include a summary of events in the next couple of newsletters.
Until then, happy picture taking!
--Chris Roberts, Your Digital SLR Guide