
March 28, 2010
Having trouble viewing this newsletter? Read the latest issue online at
https://www.digital-slr-guide.com/dslr-news.html or read back issues
If someone you know has forwarded you this newsletter and you've enjoyed it, subscribe now to receive the next issue when it's published.
DSLR News - March 2010 While this might not seem like all that long in terms of actual years, for digital SLR technology it's a lifetime. I've seen cameras morph from relatively straightforward film SLR replicas to complex technical devices that share features with high-end video cameras. It's been fascinating to see the technological advancements but from the standpoint of a new DSLR buyer it's only made things more confusing. Several people have written in with questions asking about good cameras released in the past year WITHOUT the video option...and I realize when I answer that there are less and less of those. The super-simple basic point-and-shoot DSLRs don't have video, but at the same time they also lack some other potentially attractive features like fast autofocus or low noise at high ISO. So if you're shopping for a new DSLR today, you're in a bit of a bind:
I'd say that there are really two main features that you should not compromise on, and both are dependent on how you intend to use the camera. One feature is continuous shot speed: the camera's ability to take multiple consecutive photos. If you want to use your SLR for action photography of any kind, higher continuous speeds are a real benefit. However, if you prefer landscapes, static nature shots or portraits then having a high continuous speed is not at all necessary. The second feature to pay attention to is high ISO noise. The benefit of a camera that keeps noise to a minimum is that you can take hand-held pictures in all sorts of light, even very dim light. For example, if you want to take lots of pictures indoors without flash, then you're going to need a camera that handles high ISO noise well. For this feature, more recent cameras are better than the older models. The manufacturers just get better and better about reducing noise - at some point, ISO noise may be non-existent regardless of how high you set it. The bottom line here is that you may have to get a camera with some features you won't use (live view, face-detect autofocus, video, etc.) in order to take advantage of OTHER advancements in camera technology. |
In This Issue
Latest SLR Guides
Canon Rebel T1i
Nikon D5000
Nikon D90
Nikon D60
Canon Rebel XSi
Pentax K20D
Canon 40D
Olympus E-510
Nikon D80
Canon Rebel xTi
Nikon D40
Digital SLR Terms
Megapixels
Stabilization
ISO / Image Noise
Sensor Dust
Crop Factor
RAW vs. JPG
Continuous Photos
Autofocus Points
Aspect Ratio
Lens Terms
Focal Length
Prime vs. Zoom
Maximum Aperture
First vs. Third Party
SLR Lens Features
Canon Lens Glossary
Nikon Lens Glossary
|
Stay Updated!
Digital SLR Prices - An Overview

A recent question to the Digital SLR Guide got me thinking more about the nuances of digital SLR camera prices.
That question was: "What's the best time of year to buy a digital SLR camera?"
My first instinct was to reply with the common answer: January. In the new year once the mad holiday rush has ended, merchants are often eager to rid themselves of old merchandise in favor of the new.
But this rule does not necessarily apply to digital SLR cameras, since they are released throughout the year.
For example, if a new DSLR finds its way onto camera shop shelves in November, then don't expect to see any deep discounts on that camera come January. Two months is not enough time for a camera to exhaust its initial rush of sales.
This brings us to an important point about digital SLR camera prices: with some notable exceptions, the price of a digital SLR drops month after month the OLDER a camera gets.
Just like computers and cars, DSLRs start losing value the moment you buy them.
The decline is not a fast one: during the first several months of a camera's release, the price may fall by about $100 USD from the initial release price. The speed of the price adjustment depends a lot on the popularity of a particular model: if no one's buying it, the manufacturer may drop to the price to spur sales.
More severe price drops often occur when a camera is replaced with an upgraded model.
So the answer to the "when should I buy?" question is a bit of a balancing act between the price of a camera and your level of interest in the latest and greatest features.
Let's say that you've made up your mind to buy camera model D125 and that you're waiting for the price to fall within your budget. Eventually model D125 is replaced with model D130.
Now the price of the D125 is within your budget...but you find the new features of the D130 enticing.
If you're a careful budgeter then ultimately the price will be more important than the new features and the D125 will now be a bargain relative to when it was first released.
But if you're more compulsive, the lure of a camera with the latest and greatest features can throw off all of your patience and planning.
Beginner Digital SLR Lessons
- Dramatically improve the photos you take
- Master the controls of any digital SLR
- Learn at your own pace
- All lessons available as PDF files
- Print the lessons for offline reference
- Ask me questions
Reader Opinion: Is DSLR Video Useful?
I recently posted a question to the Digital SLR Guide Facebook page to get to the bottom of a question that's been nagging at me.The question is: "Is the video feature on DSLRs merely a gimmick to sell cameras or a genuinely useful feature?"
I had expected that the opinion on this would be split somewhat down the middle but I was surprised by the lopsided-ness of the replies. The unanimous feedback was that video is a gimmicky feature that only a handful of people really use.
I am inclined to agree, and a lot of the reason why I think video falls into the "novelty" category is because of how it is implemented.
The video features that I have used on digital SLR cameras thus far come with a variety of limitations: some disable the autofocus (although this is becoming less common) and the first round of DSLRs with video limited the length of the movies you could capture.
Yes, you could change your lenses to create film-like results...which probably explains why the vast majority of videos I've seen taken with digital SLRs are done by people who have experience shooting short feature films. I've also seen video DSLRs used by photojournalists covering stories to blend both video and still images into multimedia montages.
But what if you're not a budding indie film-maker or news reporter? And what if you already have a dedicated video camera that you've been using quite happily for years?
In these cases, the video option becomes less of a need-to-have feature and more of a party trick: "look - this still camera grabs video too!"
I'll be curious to see if manufacturers pick up on this idea in 2010 and release cameras without the video feature that instead focus on the quality of the still image.
Quick Photo Tip
The request from readers this month was for more information about "speedlights".
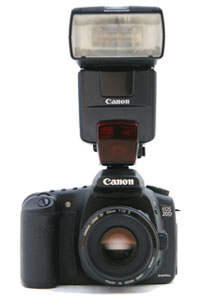
No, speedlighting is not some sort of contest to see how quickly you can turn on all the lights in a house. Instead, speedlight is another term used to refer to the large flash units that you can attach to the top of your DSLR.
To be specific, "speedlight" is a term that Nikon uses for their flash units, while Canon calls their flashes "speedlites".
Another more generic name for these flashes is "external" flash, as opposed to the "built-in" flash that comes with many cameras.
While it's often difficult to talk about lighting technique without also going into all the gear that's available, I will keep the focus of this photo tip on how to use your flash, not what kind of a flash you should get.
External Flash Tip #1: learn how to use flash exposure compensation.
When you are using either your camera's built-in flash or an external flash, the only way for you to control the exposure in your photos is to use flash exposure compensation.
For example, let's say that you're using your flash to add just a hint of light to a scene that is otherwise OK. With zero flash exposure compensation, you realize that your subject is too bright (over exposed).
Just dial in a negative setting for flash exposure compensation and this will reduce the light output from the flash resulting in a more balanced image.
| No Flash Exposure Compensation | Negative Flash Exposure Compensation |
|---|---|
 |
 |
Example #2: instead of using the light from your bare flash, you diffuse it (spread it out) by using a semi-transparent white material (pillow case, sheet of typing paper, etc.) Since the diffuser is cutting the light output from your flash, you notice that your subject is under exposed.
Dial in a positive flash exposure compensation setting so that the flash puts out more light.
External Flash Tip #2: diffuse or reflect the light from your flash.
I have heard from many people who say "I never use flash because I hate the way it makes my photos look". I agree with this - the light from direct flash is harsh and bright. It creates dark shadows that distract from the primary subject in your photo. This is also called "hard" light.
There are two things that you can do to make the light from your flash prettier: diffuse it or reflect it.

Diffusion is when the light from your flash passes through a semi-transparent material before it hits your subject. The material dramatically increases the size of the light, and larger light sources create illumination that is less harsh and that wraps around the subject. This is also called "soft" light.
You get the same results when the light from the flash is reflected off another nearby surface onto your subject.
In this case, the reflective surface becomes the light source. If your reflective surface is a wall, it is clearly much larger than your flash, and the light that it reflects will be very soft.
It's significantly easier to reflect the light from an external flash than a built-in flash, because the flash head can be rotated and tilted - a feature that is called "swivel and bounce". Using this feature means that you can point the flash head in just about any direction you like (even straight down) to bounce light off of nearby surfaces.
Just one important thing to note if you get into diffusion and reflection: if the diffuser or the reflective surface are not white or near-white, you will see a color tint in your image.
The two sample photos below use reflected light. The first image shows what happened when I bounced the light off of a redwood cabinet - it adds a strong orange tint to the colors in the photo. Realizing this would not work, I grabbed a white plate out of the same cabinet and reflected light off that instead.
| Red Reflecting Surface | White Reflecting Surface |
|---|---|
 |
 |
ADDITIONAL READING
I request tip ideas on the Digital SLR Guide's Facebook page - if you'd like to suggest ideas for this newsletter, then become a fan.
Picture Stories

This image wasn't captured in some exotic location, nor did it require any sort of extensive setup.
One day after getting home from work, I just decided that the light in my front yard was quite nice and took my camera out for a few shots.
Of the many images that I captured before the sunlight disappeared completely, this one is my favorite due to the soft quality of the light and the warm tone on the rock behind the flower.
This just goes to show that sometimes you don't have to travel far to capture a good image - that image might be waiting for you right outside your doorstep.
Photo Links
Other Photography Sites
- Betterphoto - a wealth of photography learning opportunities
- Flickr - share your photos with friends and others
- Photo.net - plenty of learning resources and examples of exceptional photography
- Borrowlenses - rent lenses to use on your digital SLR before you spend tons of money on one
- Photojojo - tons of photography do-it-yourself (DIY) projects
- Viewpoints.com - read product reviews from other consumers like yourself
Great Photo Blogs
- Digital Photography School - hundreds of photo tips and techniques
- Strobist - everything you ever wanted to know about lighting with external flash
- Joe McNally - get the "behind-the-scenes" thought process from a professional photographer
Recommended Digital SLR Retailers
(These are the three online stores that I use to purchase all of my digital SLR photography gear)In Conclusion
Well, it's clear that since you're receiving this newsletter and there's no big announcement about new lessons, I'm not quite done yet.I had planned to have the lessons available by the end of March, but a long bout of illness last month impacted my schedule.
I have made a LOT of progress and am on the verge of completing them - thanks in large part to my wife who has been kind enough to watch the kids on weekends while I type madly at the computer.
The second series of digital SLR lessons will definitely be available in early April, and I'll post more information about them in next month's newsletter.
Until then, happy picture-taking!
--Chris Roberts, Your Digital SLR Guide