
May 31, 2009
Having trouble viewing this newsletter? Read the latest issue online at
https://www.digital-slr-guide.com/dslr-news.html or read back issues
If someone you know has forwarded you this newsletter and you've enjoyed it, subscribe now to receive the next issue when it's published.
DSLR News - May 2009I'd like to take a moment here to talk about photography in the "real world".If the rest of this section sounds like idle chatter to you, here's the important point that I'd like you to remember: don't get too hung up in the technical aspects of digital SLR photography. This might sound awfully strange coming from the Digital SLR Guide newsletter, but give me a moment and I'll explain what I mean. A lot of web sites devoted to digital photography - including my own - spend a lot of time talking about settings like aperture, shutter speed, ISO, white balance, color saturation and contrast. There are hundreds of tips and techniques for dealing with a variety of different lighting conditions and instructions about how to leverage the features of your camera to achieve maximum picture quality. After reading some of these, you get the impression that there is this "checklist" of settings you have to go through every time you take a picture: what's my ISO set to? Is my shutter speed fast enough? Does my white balance match the available light? Here's the thing: you certainly could think carefully about each one of these settings and adjust each one...if you had all the time in the world to take your picture. But often, the real world isn't that willing to wait.  On a recent trip to Yosemite with my two kids, this became abundantly clear. When you have two tired, hot and hungry children in tow you probably have all of about 2 minutes to snap whatever pictures you can before the meltdowns begin. Rather than carefully evaluating the available light and making adjustments to color and white balance settings, I pretty much just took out my camera, fired away as fast as I could and then returned it to the bag. In the end, I did capture several images that I was really happy with - but a lot of this has to do with my familiarity with my SLR. I have used it steadily for 3 years, so I'm quite familiar with each and every one of its controls. I can change settings within a matter of seconds, often making minor adjustments to optimize for a certain subject or type of light. If you are not quite so familiar with your camera yet, I do encourage you - when you have plenty of time - to explore each and every one of its settings to find out what it does. This will help you make adjustments when you're shooting from the hip. However, if you've not yet learned all the nuances of ISO, metering and autofocus point selection and are presented with an exceptional photo opportunity...don't worry so much about the technical details. Instead, just focus on capturing that perfect moment that you see before your eyes. |
In This Issue
Latest SLR Guides
Nikon D90
Nikon D60
Canon Rebel XSi
Pentax K20D
Canon 40D
Olympus E-510
Nikon D80
Canon Rebel xTi
Nikon D40
Digital SLR Terms
Megapixels
Stabilization
ISO / Image Noise
Sensor Dust
Crop Factor
RAW vs. JPG
Continuous Photos
Autofocus Points
Aspect Ratio
Lens Terms
Focal Length
Prime vs. Zoom
Maximum Aperture
First vs. Third Party
SLR Lens Features
Canon Lens Glossary
Nikon Lens Glossary
|
Featured Article
This month's article explains the difference between the new Nikon D5000 and the older Nikon D60.Both cameras fall into Nikon's entry-level (beginner) line of digital SLRs that include the D40, D40x, D60 and now the D5000.
While the D40, D40x and D60 were all pretty similar to each other, the D5000 represents a rather substantial jump in features and functionality.
For new digital SLR buyers, the D5000 offers a lot of features that are easily accessible by both experienced and newbie photographers.
For existing Nikon D40 or D40x owners, there are some features on the D5000 that make it worthy of an upgrade. If you already own a more advanced Nikon DSLR like the D80, D90, D200 or D300, the D5000 might make a nice backup camera (since it is smaller and more portable).
The direct competitor to the D5000 is the new Canon EOS Rebel T1i (500D) - a camera that I will take a look at right after I complete my D5000 guide (which is in progress as you read this).
New Digital SLRs
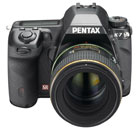
The K-7 is compatible with a huge number of current and older Pentax lenses and it's the first Pentax DSLR to include a video capture mode: widescreen 720p to be exact.
In addition to video capture the K-7 also includes an 11-point autofocus, 5.2 photo per second continuous speed, built-in image stabilization, dust control and a 3 inch live view LCD screen.
Some "bonus" features that piqued my interest include an HDR (High Dynamic Range) image capture mode (the camera snaps three images and blends them together) and a digital level that will help keep horizon lines nice and flat.
As if that weren't all, the K-7 is weather resistant and is also capable of functioning in extremely cold temperatures.
The Pentax K-7 will be available in July 2009 with a kit price (lens included) of $1,300 USD.
Turning things over to Sony now, prepare yourself for not one, but THREE new digital SLRs aimed squarely at the consumer/beginner market.
The new cameras from Sony include the DSLR-A230, the DSLR-A330 and the DSLR-A380.
From a features standpoint, these cameras are relatively hard to tell apart. One notable difference is that the A330 and A380 have LCDs that flip out from the camera body while the A230 does not.
All three have dust control and built-in image stabilization. Both the A230 and A330 include 10 megapixel sensor, while the A380 packs in a 14 megapixel sensor.
The difference between these cameras and older Sony digital SLRs is that they are smaller and lighter than older models like the A300 and A350 - this makes them more portable and better for photographers on the go.
These 3 cameras will be available in July. The A230 will retail for $550 USD, the A330 will go for $650 and you can get the A380 for $850. All three will be available in two different kits with either one or two lenses.
Take the Camera Guide Poll - tell me which camera you'd like to see reviewed next!
Beginner Tutorial - Shutter Speed
In the last issue of the newsletter, I introduced the concept of shutter speed.The shutter speed is the amount of time that the light-blocking curtains that sit in front of the sensor are open.
Like aperture numbers, shutter speeds follow a specific numerical scale.
There are two ways to take manual control of the shutter speed on your digital SLR:
- Set the camera to Shutter Priority mode (noted on the main mode dial as "Tv" or "S")
- Set the camera to Manual mode (noted on the main mode dial as "M")
Shutter Priority mode lets you change the shutter speed, and the camera automatically determines the right aperture to use to get a correct exposure.
In Manual mode, you're responsible for selecting BOTH shutter speed and aperture to ensure that the exposure is correct.
Once you've selected either one of these modes, you're able to step through the various shutter speed options by spinning a control wheel that is placed either under your index finger or under your thumb.
The control wheel will "click" - allowing you to step through each and every shutter speed your camera can handle.
- The slowest shutter speed on many digital SLR cameras is 30 seconds
- The fastest shutter speed on most digital SLRs is 1/4000th of a second
So why do you need access to all these different shutter speeds?
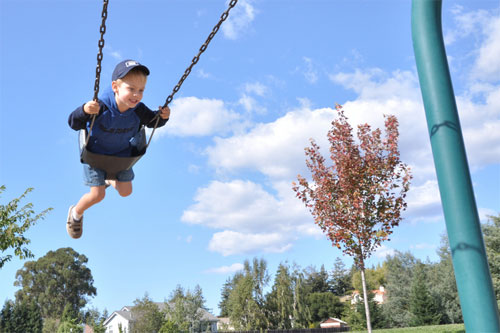
- Fast shutter speeds freeze motion
- Slow shutter speeds blur motion
This is the most basic description of shutter speed - the reality is a bit more nuanced and complicated.
But for this month, we'll just stick with this description, and I'll provide some examples to illustrate the point.

Beginner Digital SLR Lessons
- Master the controls of any digital SLR
- Dramatically improve the photos you take
- Learn at your own pace
- Download each lesson as a PDF
- Ask me questions
Intermediate Tutorial
Since I just covered the most basic elements of shutter speed in the Beginner Tutorial, I'll continue the theme here in the Intermediate section.Today, we'll be talking about the impact that the ISO setting can have on your shutter speed (and how ISO lets you take pictures in very dim light).
For the sake of the examples in this section, I will assume that you are using an 18-55mm f/3.5-5.6 zoom (the most common type of kit lens).
Let's start out with a picture on a bright sunny day.
With the ISO set to 100, you have a wide range of shutter speeds you can choose from since there is plenty of available light. Your subjects appear sharp and clear, especially if you use a wide lens aperture to increase the shutter speed.
For example, shutter speeds that are faster than 1/500th of a second should freeze all but the fastest-moving subjects.
Now you take your camera inside - there is still plenty of daylight coming in through the windows so you're not working in total darkness, but the available light is pretty dim.
You want to take some portraits of a spouse/friend/child/pet, and since there's not a lot of light, you set the lens to its widest aperture: if the lens focal length is 18mm (wide angle) then that aperture is f/3.5 and if the focal length is 55mm (telephoto) then the aperture is f/5.6.
For the sake of our example, let's say that you're using the 55mm focal length with a maximum aperture of f/5.6.
You point the camera at your subject, and press down halfway on the shutter release to engage the autofocus and take a meter reading to see what shutter speed you're going to get. The answer: a very slow 1/15th of a second.
No problem, you think - I've got an image-stabilized lens (or camera). I can take pictures all the way down to 1/10th of a second without having to worry about image blur.
But not so fast - if your subject doesn't stay perfectly still, motion blur WILL be apparent in your photo. The background will appear perfectly clear (thanks to the image stabilization) but your subject will not.
At this point, you've got the lens set to its maximum aperture - there's nothing you can do to let in more light that way.
But you can increase the ISO setting - making the camera's sensor absorb light faster, and consequently increasing the shutter speed you're able to use.
Since increasing the ISO setting will also increase the amount of digital noise apparent in your photo (which does affect the image quality) you only want to increase the ISO enough to get a shutter speed that will make your subject nice and sharp.
This means that you shouldn't just set the ISO all the way up to 1600 unless you have no other choice. Instead, gradually increase the ISO, and keep taking meter readings (by pressing down halfway on the shutter release) until you get a shutter speed that's acceptably fast.



Photo Links
Photo Contests
Other Photography Sites
- Viewpoints.com - read product reviews from other consumers like yourself
- Betterphoto.com - a wealth of photography learning opportunities
- Photojojo - tons of photography do-it-yourself (DIY) projects
- Flickr - share your photos with friends and others
- Strobist - everything you ever wanted to know about lighting with external flash
- Photo.net - plenty of learning resources and examples of exceptional photography
Recommended Digital SLR Retailers
(These are the three online stores that I use to purchase all of my digital SLR photography gear)In Conclusion
After a long dry spell, I'm getting back into taking pictures again.This is a good thing - I've mentioned before in this newsletter that one of the easiest ways to improve the look of your photos is to just take more pictures.
Like any skill, the more you practice the better you get.
Also like other skills, if you don't practice for an extended period of time you get old and stale and you lose a bit of the creative spark that you need to make good images.
So it's good to be taking pictures again - I hope to find an easy way to share my photos to inspire you to get out there with your camera and grab some images of your own.
--Chris Roberts, Your Digital SLR Guide