
May 30, 2010
Having trouble viewing this newsletter? Read the latest issue online at
https://www.digital-slr-guide.com/dslr-news.html or read back issues
If someone you know has forwarded you this newsletter and you've enjoyed it, subscribe now to receive the next issue when it's published.
DSLR News - May 2010Where are all the shiny new cameras?The answer - for now at least - is an unhelpful "I have no idea." The first four months of 2010 have yielded very little in terms of new DSLR camera development. Only ONE new camera has launched in this time - the Canon Rebel T2i 550D. And announcements of new cameras from other manufacturers have been sparse. Given the flurry of new cameras released in 2009, I'm not all that surprised that the manufacturers are taking some time to collect themselves. Big new features last year included the addition of video capture and flexible LCD screens, but neither one of these provides a lot of room for growth (unlike the megapixel race which lasted for years). My guess then is that the manufacturers are doing one of two things:
It's also possible that they are doing both. Digital SLR cameras still sell pretty well, but there's a lot of competition from the compact digital camera market. In order to keep buyers interested in their higher-end products, the manufacturers need to find new ways to make them appealing to average photographers. I've got one idea for them - simplify the feature set and drop the price. Rather than packing a camera with all of the latest digital technology, why not create a simple, efficient and low-cost DSLR camera? At about $600 USD, a DSLR is still an expensive investment for many people. If that price could be reduced to $300 to $400 USD, it would provide an entry point for some people who are put off by DSLR prices. A newcomer to the DSLR market could use this simple camera as a starting point, with the potential to upgrade to a camera with more bells and whistles later on. Only time will tell what the manufacturers are up to and why they are being so quiet this year. Of course, if there are any new camera announcements I'll be sure to report on them in this newsletter. |
In This Issue
Latest SLR Guides
Canon Rebel T1i
Nikon D5000
Nikon D90
Nikon D60
Canon Rebel XSi
Pentax K20D
Canon 40D
Olympus E-510
Nikon D80
Canon Rebel xTi
Nikon D40
Digital SLR Terms
Megapixels
Stabilization
ISO / Image Noise
Sensor Dust
Crop Factor
RAW vs. JPG
Continuous Photos
Autofocus Points
Aspect Ratio
Lens Terms
Focal Length
Prime vs. Zoom
Maximum Aperture
First vs. Third Party
SLR Lens Features
Canon Lens Glossary
Nikon Lens Glossary
|
Stay Updated!
Beginner Photo Tip: Aperture and Motion Blur
This month's beginner photo tip is all about aperture and motion blur.Now, aperture itself does not create or prevent motion blur in your photos - that is the result of a changing shutter speed.
But changing the aperture will also result in a change to shutter speed, so it is possible to control the amount of visible motion blur just by changing the aperture.
Let's break it down:
- Aperture is an indication of the width of the opening in your lens
- The size of the opening is indicated by a number called an f-stop
- Narrow apertures (large f numbers) result in slower shutter speeds
- Wider apertures (small f numbers) result in faster shutter speeds
- Slow shutter speeds create more motion blur
- Faster shutter speeds eliminate motion blur
The relationship between aperture and shutter speed is synergistic: these two variables combine to create a photo with a balanced exposure (neither too bright nor too dark).
Imagine that your camera's sensor is a sponge, and that - in order to produce a photograph - it needs to absorb a certain amount of light. If it absorbs too little light, your photo turns out dark, and if it absorbs too much then your photo looks too bright.
Your camera's aperture is equivalent to the size of the opening in an imaginary faucet positioned above the sensor "sponge".
You turn on the water and let it flow. If the opening in the faucet is very narrow, it takes a long time for the sponge to absorb the correct amount of light (slow shutter speed). Now imagine you start over with a new sponge, but this time the faucet is open very wide. It will take less time for that sponge to absorb the same volume of water (fast shutter speed).
 |
 |
Aperture: f/9 Shutter Speed: 1/15 |
Aperture: f/2.8 Shutter Speed: 1/320 |
Let's take a look at a more concrete example to help this sink in.
- You're taking photos in the shade in the afternoon of a sunny day
- Your subject is moving all over the place (it's harder to create motion blur with non-moving subjects)
- Set your camera to Aperture Priority mode (the A or Av on the main mode dial)
- First, create motion blur: select a narrow aperture, represented by a small number like f/11 or f/16
- Take some photos and pay attention to your shutter speed - the slower the shutter speed the GREATER the amount of motion blur
- Now widen your aperture to something like f/3.5 or f/5.6
- Notice how the change in aperture results in a FASTER shutter speed, and that the faster shutter speed eliminates motion blur
Play with this relationship in all kinds of light.
You'll find that it's quite hard to create motion blur when there is plenty of available light (i.e. at high noon on a sunny day). In very bright light, even if you set your aperture as narrow as possible, you may still not get the shutter speed slow enough to create motion blur.
On the flip side, creating motion blur in dim light is quite easy, even with relatively wide apertures like f/4 and f/5.6 - it's PREVENTING motion blur that's the challenge. If you want to prevent motion blur in dim light, set your aperture as WIDE as it will go and just hope that your shutter speed is fast enough to make your subjects look sharp.
I request tip ideas on the Digital SLR Guide's Facebook page - if you'd like to suggest ideas for this newsletter, then become a fan.

Beginner Digital SLR Lessons
- Dramatically improve the photos you take
- Take manual control of aperture, shutter speed and ISO
- Get exposure right, even in challenging light
- Learn at your own pace
- Download lessons as PDF files
- Ask me questions
Intermediate Photo Tip: Off-Camera Flash Gear
This month's intermediate photo tip is about gear, since the gear is necessary to implement the tips that will follow in later newsletters.The gear that I'll be talking about here is what you need to use your external flash off-camera.
The trick to off-camera flash is that most of the gear required to do it is manufacturer-specific - if you don't want to spend a ton of money. If you are willing to spend the cash on pro equipment, then it will be compatible with any DSLR you use.
First, let's talk about the easiest way to get your flash off-camera: use a cord.
The cords in question have one end that attaches to your camera's hot shoe and the other that attaches to the external flash. As far as your flash is concerned, it will think that it's still sitting right on top of your camera.
This means that the flash will work in full auto mode, if that's how you want to use it.
Here are some flash extension cords from different manufacturers:
- Canon: OC-E3
- Nikon: SC-29
- Pentax: Hot Shoe Adapter + Extension Cord
- Olympus: FL-CB05
- Sony: FA-CC1AM
Using a flash extension cord is a great way to get the light from your flash off the camera, but it comes with two pretty big limitations: 1) you need a free hand to hold the flash and 2) the distance that you can move the flash off-camera is limited by the length of the cord.
If you don't want to hold the flash in your hand all the time then you can get another accessory: a flash bracket.
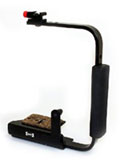
A flash bracket attaches to the hot shoe of your camera and includes a bar that extends away from the camera where you can attach your flash. This frees up the hand that's not holding the camera, but limits the directions that you can point the flash.
If you don't want to deal with a single cord or bracket just to use your off-camera flash, then there is another option: wireless.
In a wireless flash system, you eliminate the cord and your camera fires remote flashes by using either a wireless trigger or a on-camera flash that acts as a trigger.

Use a wireless trigger if you don't want the camera to be a light source (the wireless flash doesn't emit light, just a triggering signal). Examples of wireless triggers include the Canon STE2 and the Nikon SU-800.
If you're not worried about light coming from the camera OR you want to have multiple light sources, then use a wireless system where the trigger is itself a flash.
In this case, every time the flash on your camera goes off, so do any remote off-camera flashes.
You can get this to work with just about any camera system if you purchase more than one external flash unit. For example, if you purchase a Canon 580EX II flash with a Canon 430EX II flash, the 580EX can act as a trigger for the 430EX. An Olympus FL-50R can trigger an Olympus FL-36R.
A handful of DSLRs let you use the built-in flash as a wireless trigger: one example is the Nikon D90.
Wireless flash systems like this work great if the remote flashes are relatively close to the camera and within line-of-sight (they need to "see" the trigger in order to fire).
If you really want to take wireless flash to the extreme and remove all limitations, then you need a set of dedicated wireless flash units.
One example of such units are the PocketWizard Plus II Transceivers.
You'll need one unit to attach to the top of your camera and one unit attached to a hot shoe for your remote flash.
NEW Intermediate Digital SLR Lessons: Playing With Light

- What types of light are best for photography
- How to see and manipulate natural light
- What all the settings on your flash mean
- How to improve the quality of light from flash
- When to blend natural light with flash
- How to use off-camera flash
Back To Basics: Focus
Now that everyone has a handle on focal length - if you don't, just click on the link to the right - we're going to talk about how your lens focuses.
While this sounds like an extremely basic thing to explain, there are some nuances that you need to be aware of before we discuss any other camera settings.
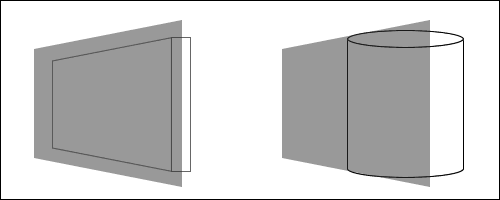
Here's the first one: when you focus on a subject, you're not focusing on a POINT in space, but a PLANE. The best way to see this is to take a picture of a textured wall (i.e. brick).
If any part of the wall is in focus then the ENTIRE wall will be in focus - that's because all other points along the wall fall within the plane of focus.
However, if you take a picture of a cylinder and you focus on the center then the sides may not be in focus, since they are behind the plane of focus.
To bring a plane into focus, you've got two main options: you can focus the lens manually (by twisting a ring on the front of the lens) or you can leverage the autofocus system in your camera/lens.
If you go with autofocus, you're really working with TWO mechanisms: the one in the lens and the one in the camera.
The SPEED of an autofocus (AF) system is the result of a partnership between camera and lens. For example, if you stick a lens with a slow AF on a fast camera, the performance of the AF will be reduced. Conversely, if you stick a lens with a fast AF on a moderately fast camera, the AF performance will increase.
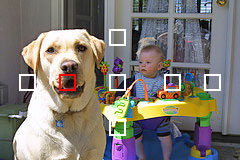
A camera's autofocus system is made up of a group of individual autofocus points: any one autofocus point can be used by the camera to bring the image into focus.
In the good old days of film SLR cameras, many only had one AF point that sat in the center of the viewfinder. Today's modern DSLRs can include 3, 5, 9, even 11 separate AF points.
What are all these AF points for? They serve two main purposes:
- They let you focus on off-center subjects
- They track moving subjects across the viewfinder
Imagine you're taking a picture of a friend in front of a fountain and your friend is standing off to the left side when you look through your camera's viewfinder. If ONE autofocus point is over your friend, this is the reference point the camera will use to set the plane of focus.
Now imagine that your friend is walking in front of the fountain from left to right. As your friend passes under each AF point, the camera will re-adjust the plane of focus depending on the active AF point.
NOTE: While all of the AF points in your DSLR can be used to focus on a subject, the CENTER point is often the most sensitive and the most accurate. If you're having a problem with autofocus (see below) try selecting only the center point to see if this helps.
Common Focusing Problems
While useful in many situations, multiple AF points can sometimes pose a problem, especially with subjects that are small relative to the background. When you're trying to focus on an off-center bug on a flower, the AF system may decide to focus on the background instead.
For times like these, you have the option to MANUALLY select the AF point you want your camera to use. If the bug is sitting under the rightmost AF point, then manually select this AF point as the active one so that your camera doesn't use the others.
In addition to focusing on the background, there are times when your camera won't focus at all.
This typically happens when you're below the minimum focusing distance that your lens is capable of. The minimum focusing distance varies from lens to lens. It is measured as the distance from your camera's sensor to your subject (since the lens is trying to bring images into focus right where the sensor is located).
Special lenses called macro lenses have VERY small minimum focusing distances, allowing you to place the lens right up close to your subject for maximum magnification.
There are other times when minimum focusing distance is not an issue, but your camera STILL can't lock focus. This happens most frequently under two conditions:
- Low Light - in very dim light, EVERY autofocus system will have a hard time locking on to a subject, even with the most sophisticated DSLRs. AF systems need light to work, and when light is lacking, AF has a tough time
- Low Contrast - when your subject doesn't have a lot of contrast, the AF system becomes "blind". For example, if you try to take a picture of a clear blue sky, the AF system won't know what it should bring into focus. If you point your camera at a CLOUD, then the AF will lock onto the cloud because there is contrast between the cloud and sky
Live View Focusing
If your DSLR has a live view mode, you'll find that autofocus works one of two ways:- Fast AF With Blackout - in this case, the live image on the LCD goes black while the camera uses its multiple AF points to lock focus (which it can do fairly fast). Once the focus is locked, the image on the LCD re-appears.
- Slow AF No Blackout - with some live view systems you can continue to see the image on the LCD while you autofocus, but AF performance is significantly reduced. This is because instead of using the multi-point AF system, your camera resorts to what's called "contrast detection autofocus" - this is the same system used by all compact digital cameras and is quite slow when compared with DSLR autofocus.
Some cameras even let you choose which type of AF you use in live view mode. The AF mode you select depends on your subject.
If your subject is not moving, then you can use the slow AF mode so that you can always see an image on the camera's LCD. If your subject is moving, then you'll need to leverage the speed of the multi-point AF.
Exercise
- For starters, disable the autofocus on your lens
- Pick a focal length for your lens and look through the viewfinder
- Manually adjust the plane of focus by twisting the ring on the front of the lens
- Now, activate the AF on the lens
- Point your camera at different subjects that are near and far and press down halfway on the shutter release button to engage the AF system
- Take manual control of the AF points and practice selecting different individual points while focusing of off-center subjects
- Get right up close to a subject to see what happens when you're within the minimum focusing distance of your lens
- Point your camera at a low-contrast object (painted walls, pieces of white paper, etc.) to see how the AF struggles
Photo Links
Photo Contests
Other Photography Sites
- Betterphoto - a wealth of photography learning opportunities
- Flickr - share your photos with friends and others
- Photo.net - plenty of learning resources and examples of exceptional photography
- Borrowlenses - rent lenses to use on your digital SLR before you spend tons of money on one
- Photojojo - tons of photography do-it-yourself (DIY) projects
- Viewpoints.com - read product reviews from other consumers like yourself
Great Photo Blogs
- Digital Photography School - hundreds of photo tips and techniques
- Strobist - everything you ever wanted to know about lighting with external flash
- Joe McNally - get the "behind-the-scenes" thought process from a professional photographer
Recommended Digital SLR Retailers
(These are the three online stores that I use to purchase all of my digital SLR photography gear)In Conclusion
That's about all for this month.The lack of new DSLR cameras to keep track of has actually been a benefit, providing me with time to consider what new content I want to add to the site and which existing pages are woefully out-of-date.
I hope to spend the month of June updating some of the older content and making sure that the site is ready and waiting for any new camera announcements. The manufacturers can't possibly go an entire year without releasing something new, so I'm expecting that there will be a rush of new camera news in the Fall.
Until next month, happy picture-taking!
--Chris Roberts, Your Digital SLR Guide