
January 05, 2011
Having trouble viewing this newsletter? Read the latest issue online at
https://www.digital-slr-guide.com/dslr-news.html or read back issues
If someone you know has forwarded you this newsletter and you've enjoyed it, subscribe now to receive the next issue when it's published.
DSLR News - December 2010Happy New Year everyone!This newsletter is coming to you just a FEW days late thanks in large part to the holiday season and also because there's several new articles that I've been adding to the site. The first - and probably something that I should have done a LONG time ago - is a summary of all the new digital SLR cameras of 2010. While I have summarized many of the new cameras released toward the end of this year in past newsletters, I didn't have one page of the site dedicated to providing information on all of them. Another recently added page explains all the technical jargon associated with HDSLR cameras: those that are capable of capturing both High Definition (HD) video and stills (SLR). All but two of the new SLRs of 2010 are HDSLRs, so it seemed like a good time to explain some of the insider terminology. I've had one of these new cameras in my hands for the past two weeks and am busy working on a detailed guide for it (I'll let you speculate about which one it might be for now). I plan on trying out a few more of them early in 2011 to help you decide if one is the right camera for you. To condense all of the above into a simple sentence: I've been REALLY busy lately. I did take some time during the holidays to post some quick photo tips to the Digital SLR Guide Facebook page. One tip explains how to take pictures of indoor performances from a distance, and the other tells you how to get creative images with holiday lights. Those types of tips are fairly easy for me to post, so look for more of those in the future. If you want to be notified when new tips are posted, just click the "Like" button at the top of this page. What's the plan for 2011? More of the same, really. More DSLR tips, more how-to guides and more updates about new cameras that have just been released and any rumored ones that are out on the horizon. OK, enough chit-chat. I've got to get back to work here. 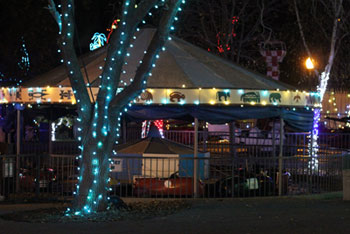 |
In This Issue
Latest SLR Guides
Canon Rebel T1i
Nikon D5000
Nikon D90
Nikon D60
Canon Rebel XSi
Pentax K20D
Canon 40D
Olympus E-510
Nikon D80
Canon Rebel xTi
Nikon D40
Digital SLR Terms
Megapixels
Stabilization
ISO / Image Noise
Sensor Dust
Crop Factor
RAW vs. JPG
Continuous Photos
Autofocus Points
Aspect Ratio
Lens Terms
Focal Length
Prime vs. Zoom
Maximum Aperture
First vs. Third Party
SLR Lens Features
Canon Lens Glossary
Nikon Lens Glossary
|
Stay Updated!
A Tour of Your Digital SLR
This newsletter is written with two types of people in mind: those who JUST received a new DSLR as a holiday gift, and those who have been wondering for the longest time what that little red button on the back of the camera is for.In the paragraphs that follow, I'm going to take you on a complete tour of the outside of your digital SLR camera and I'll explain what each one of those little buttons is good for.
Some will be quite obvious...others, not so much.
One big disclaimer before we get into this: not every digital SLR is going to have ALL of the buttons and controls that I'm about to describe. Also, some manufacturers may choose to label their buttons differently.
For the most part you should be able to follow along with this guide (and your camera in hand) to get a better understanding of what will happen when you press one of the many buttons on your new (or not-so-new) camera.
MAIN MODE DIAL
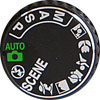
This rotating dial sits atop every digital SLR, and it lets you choose - at a high level - how the camera is going to behave.
There are two main sections of each mode dial:
- Standard Modes — the standard modes are what ex-film SLR users are most familiar with, since those cameras didn't have "scene" modes. The standard modes include full auto (usually a green square), Program (P), Shutter Priority (T, S or Tv), Aperture Priority (A or Av) and full Manual (M).
- Scene Modes — scene modes are fully automatic, but they tailor the camera settings for different subjects like portraits, landscapes, action/sports, macro, night portrait, snow, etc.
The number of scene modes vary from camera to camera: some only include a few, while others seem to go overboard with the number of different options — like "two children playing on a sunset beach".
I don't typically use scene modes, since scene modes choose the camera settings for you. They are sometimes useful, but I find it's actually much easier just to manually control the camera to achieve a certain effect (like a nice blurred background for a portrait).
That's why I'm MUCH more familiar with the standard modes, which I'll explain now:
- Full AUTO — the name pretty much says it all: in full auto mode the camera is calling ALL the shots and making decisions to figure out how to make the pictures you take look their best.
- Program — I like to recommend this mode for beginners because you can control SOME camera settings (unlike AUTO where those settings are disabled) but the camera is still doing a lot of work for you. If you ever want to play around with a setting like ISO without learning a lot of other camera control, give Program mode a try.
- Shutter Priority — there are two variables that control the exposure (how bright or dark your photo looks): the shutter speed and the lens aperture. Shutter speed is a measurement for how long the shutter stays open, and it's measured in fractions of a second. In Shutter Priority mode, you can manually pick the shutter speed you'd like to use, and the camera will automatically pick an aperture to go with it so the exposure turns out correct.
- Aperture Priority — this mode is the reverse of Shutter Priority. In Aperture Priority, you manually select a lens aperture (the width of the opening in the lens) and the camera automatically picks a good matching shutter speed.
- Full Manual — this mode is for anyone who's well-versed in manually selecting BOTH aperture and shutter speed along with every other setting your camera provides. Many people who have taken the beginner digital SLR lessons have expressed amazement at how easy it is to use (once you know how it works).
Some of the new DSLRs of 2010 will include more standard modes that this: a new one that I've seen lately is called "Creative AUTO" which is a LOT like Program mode: you have some camera control, but most of the settings are still being handled by the camera. Another mode that you might come across is "ISO Priority". In this mode, you manually select an ISO value (which I'll explain in just a moment) and the camera automatically picks both a shutter speed and lens aperture to go with it.
With that high-level introduction to the main mode dial out of the way, let's talk about the other buttons you'll find on the sides and back of your camera.
MAIN CONTROL DIAL
The main control dial is probably the next most important item on your DSLR besides the main mode dial.The main control dial is either placed on the front right side of the camera or it's located on the back right side of the camera at the very top. When it's on the front, you can spin it using your index finger and when it's on the back you can rotate it with your thumb.
The main control dial has multiple functions: its main use is to change camera settings when you're using one of the standard modes. For example, in Shutter Priority mode, spinning the main control dial changes the camera's shutter speed.
The main control dial can be used to cycle through just about any setting on the camera: shutter speed, aperture, ISO, white balance, color modes, etc.
The dial can also be used to move through images in playback mode, it can be used to select specific autofocus points and it helps when scrolling through your camera's menus.
All in all, a very versatile part of your DSLR.
POP-UP FLASH
This small button is typically located on the front left side of the camera toward the top, and has a small lightning symbol next to it.Pressing this button will pop up the built-in flash. Now, in full AUTO mode, the built-in flash will pop up on its own when the camera detects that there isn't enough light.
However, in any of the other standard modes (and even in the scene modes) the built-in flash will stay down. To activate it yourself, just press the button.
ISO

On very old DSLRs, the only way to change ISO was to access the camera's menu system.
DSLR manufacturers got smart, and realized that there were many photographers out there who wanted to manually control the ISO setting, and were constantly changing it.
Pretty soon, dedicated ISO buttons appeared on all DSLR camera models.
For those new to the ISO setting, it controls how fast the sensor absorbs light. Low ISO settings (100 - 200) are used when there is a lot of available light, and high ISO settings (1600 - 3200) are used when the ambient light is dim.
When you use a high ISO setting your shutter speed increases so that you're able to capture clear photos without motion blur. When you pair a high ISO with a wide lens aperture, you can take pictures hand-holding the camera even when there's not a ton of light (for example: inside a museum where you can't use flash).
One press of the ISO button provides you access to this setting. You can then use the main control dial to pick the ISO you want to use.
LIVE VIEW / VIDEO RECORD
With the proliferation of HDSLR cameras, many manufacturers had to re-configure the position of the buttons to add a new one: a live view switch / video record button.You can often tell which button this is because it either has a red dot in it or next to it (since the red dot is a universal symbol for recording video).
On some cameras like the Canon T2i 550D this button switches the display from viewfinder to live view mode when you have the camera set to a still image mode. Once you select the movie mode on the main control dial, then this button starts and stops video recording.
On other cameras like the Nikon D3100 the button is set to start recording video instantly, regardless of the mode you have selected on the main dial.
However it's used, this button is a useful addition to any DSLR that also captures video.
PLAYBACK / INFO / TRASH

The playback button is pretty straightforward: it lets you see the pictures and movies stored on the video card that's inside in the camera.
After you press the playback button, you can step through each photo/video using a separate directional controller on the camera (these types of controllers come in all shapes and sizes). You can also often use the main control dial to step through each photo or video.
Any playback button will let you see images one-by-one and many (you'll have to use a different camera setting) will show you multiple images at the same time.
A handful of cameras have a calendar mode for playback, which shows you a calendar and then lets you see the photos and videos you took on specific days. Others have a built-in slideshow mode, which is useful if you connect the camera to a larger display like a high definition television to show relatives snaps from your latest trip.
Just about every DSLR has an INFO button. You can use the INFO button when you are playing back images to show a variety of information about each photo. If you press the INFO button more than once, you can cycle through a variety of different displays. Some will show a limited about of info about the shot, and others will display all the gory details.

If you're not happy with a particular image or video, clear it off the memory card right then and there using the trash button.
For a long time, I never used the trash button on my camera.
I just copied every picture I took over to my computer and then did my editing there - it seemed like a much faster way to delete pictures I didn't like.
However, the trash button does come in handy if you're on a longer trip and don't have immediate access to a computer. If you want to make sure you don't run out of memory space on your card, just playback your photos and videos and delete the ones you don't like.
A word of caution: some trash buttons let you delete ALL the pictures on the card, and there's no easy way to get them back if you accidentally remove them all.
MENU

A constant on many DSLRs, the menu button provides access to ALL of the camera's settings.
If you're working with a brand new DSLR, chances are that you're not going to need the menu button any time soon. As you can tell from the previous paragraphs, camera manufacturers have placed many of the most common camera controls at your fingertips.
With any DSLR released in 2009 or later, the menu button really just gets you into the "guts" of the camera if you really want to customize your camera controls.
Don't feel at all like you're missing anything special if you don't access the camera's menu system for some time. Get comfortable with your camera first, then see what sorts of settings are in the menus that you can't readily access from another button somewhere on the camera body.
QUICK MENU / GUIDE
To supplement the menu button, many entry-level cameras now have a button for the quick/easy menu or "guide" mode.A press of this button provides you with quick access to a group of common camera settings: shutter speed, aperture, ISO, white balance, color control, drive mode, metering mode and autofocus mode.
The guide modes are user friendly and provide short descriptions about what each one of the features is used for.
For example, let's say you want to take a portrait with a nice blurry background. The guide mode will advise you to adjust your aperture setting so that the lens is wide open. Wide open apertures help to blur the background in your photos.
OK or SET
This button is typically located on the back right side of the camera in the middle of the body.It is used to make selections when you are using the camera's menus and it's also used to make selections when you're changing certain camera settings.
For example, let's say you're changing ISO:
- First, you press the ISO button
- Next, you rotate the main command dial to highlight the ISO you want
- Third, you press the OK or SET button to select the ISO value
ZOOM
There might be two zoom buttons on the back of your camera: one to zoom in (with the plus symbol) and one to zoom out (minus symbol).These two buttons are used in playback mode so you can take a closer look at your photos.
Let's say that you're playing back an image of a group photo and it's a bit hard to tell on the small LCD screen if everyone's face is in focus. Just press the zoom in button to make the image larger on the LCD. Check each face for accurate focus.
When you're done, you can zoom back out again to display the photos at 100% size (no zoom) on the LCD.
EXPOSURE CONTROL

The exposure control button typically appears as a box with a plus and minus symbol inside. It's also sometimes labeled the AV button.
This button serves two purposes:
- Exposure Compensation — in Program, Shutter Priority and Aperture Priority modes, you can adjust your camera to intentionally over or under expose every shot you take. This is called exposure compensation. To make your photos either brighter or darker, press and HOLD the exposure control button, then spin the main control dial to adjust your exposure.
- Shutter or Aperture — in Manual mode, spinning the main control dial with change either the shutter speed or the aperture. But in Manual mode, you have to control BOTH of them on your own. They way to change the other setting is to press and HOLD the exposure control button while you turn the main control dial.
SUMMARY
And there you have it - a tour of some of the most common buttons and dials you'll find on the body of your DSLR camera.Some cameras will have a few more, some a few less. A lot depends on whether the camera is entry-level or more advanced. The more advanced the camera, the more controls are immediately accessible from the camera body.
Entry-level cameras are designed with beginning photographers in mind, so they keep the number of buttons and knobs to a bare minimum so you don't feel overwhelmed.
Regardless of the type of camera you have, hopefully this introduction to its buttons will get you feeling more comfortable and less worried that pressing a button will forever alter your camera settings.

Beginner Digital SLR Lessons
- Dramatically improve the photos you take
- Take manual control of aperture, shutters speed and ISO
- Get exposure right, even in challenging light
- Learn at your own pace
- Download lessons as PDF files
- Ask me questions
Quick Photo Tip: Creative Lights
This is an example of one of the quick photo tips that I hope to continue to post to the Digital SLR Guide's Facebook page.Here's something fun to do if you've got some time, a DSLR camera and lots of small lights.
The trick to getting nice abstract patterns from lights is to use a very slow shutter speed.
You can achieve slow shutter speeds by using two settings: ISO and aperture.
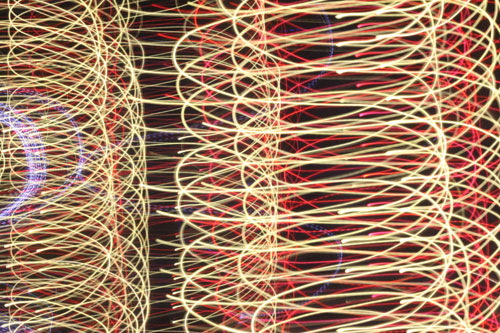
STEP 1
Set your camera to Aperture Priority mode and spin the main control dial to select a very narrow aperture (which will appear in the viewfinder and on the LCD as numbers like 16 and 22).STEP 2
Manually select an ISO of 100. If you leave the ISO setting on AUTO, the camera may increase it since you will be taking pictures in very dim light.STEP 3
Dim all other lights except for the ones you want to use for your pattern. You can also take pictures outdoors where it's otherwise dark except for the lights. Point your camera in the direction of the lights and press the shutter release halfway to lock the focus on the lights (your camera may have a tough time with this - if it can't focus in such dim light, switch to manual focus). With focus locked, press the shutter release all the way to take a picture. While the shutter is open (it will take some time to close again) gently move the camera around either horizontally or vertically. You don't have to shake the camera vigorously - just a gentle motion up and down or side to side will do the trick.Keep taking pictures and moving the camera around, checking your photos on the LCD until you see one that you like.
Intermediate Digital SLR Lessons: Playing With Light
- What types of light are best for photography
- How to see and manipulate natural light
- What all the settings on your flash mean
- How to improve the quality of light from flash
- When to blend natural light with flash
- How to use off-camera flash
Photo Links
Photo Contests
Other Photography Sites
- Mirrorless DSLR Guide - learn about mirrorless cameras from Panasonic, Olympus, Samsung and Sony
- Betterphoto - a wealth of photography learning opportunities
- Flickr - share your photos with friends and others
- Smugmug - create attractive online galleries of your images
- Photo.net - plenty of learning resources and examples of exceptional photography
- Borrowlenses - rent lenses to use on your digital SLR before you spend tons of money on one
- Photojojo - tons of photography do-it-yourself (DIY) projects
- Viewpoints.com - read product reviews from other consumers like yourself
Great Photo Blogs
- Digital Photography School - hundreds of photo tips and techniques
- Strobist - everything you ever wanted to know about lighting with external flash
- Joe McNally - get the "behind-the-scenes" thought process from a professional photographer
Recommended Digital SLR Retailers
(These are the three online stores that I use to purchase all of my digital SLR photography gear)In Conclusion
Not much to say here at the end, except that I hope that you're able to find the time in 2011 to enjoy your new - or old - DSLR and that you have plenty of opportunities to take some great shots.Until next time....happy picture-taking!
--Chris Roberts, Your Digital SLR Guide