
August 28, 2007
Having trouble viewing this newsletter? Read the latest issue online at
/dslr-news.html
If someone you know has forwarded you this newsletter and you've enjoyed it, subscribe now to receive the next issue when it's published.
DSLR News - August 2007Hello, and welcome to the August newsletter from the Digital SLR Guide!The third quarter of this year is shaping up to be a busy one: Canon and Nikon just announced the release of new digital SLR cameras (see below), and the Internet rumor mill is buzzing about soon-to-be cameras from Olympus (a follow-up to the E-1) and Sony (two new cameras added to the ALPHA line). As if all the new cameras right around the corner weren't enough to keep me busy, I've also got some important announcements for those of you who have taken my digital SLR lessons (and those of you who haven't, but would like to learn more about how your SLR works). I've just put the finishing touches on a complete re-write of both lesson one and two. The information in both lessons needed to be brought up-to-date, and I realized that there just weren't enough sample photos to illustrate all the theory. That problem has been solved. The lessons also now include a lot of additional text that is designed to answer questions posed by those who have taken the lessons. After several people asked the same question, it became clear that more specific details needed to be added. I'm right in the middle of re-writing lessons three through five, and those will be complete in September. If you've already registered for the lessons, then I encourage you to take a look at them again - you might just find that there's some new information there to add to your digital photography bag of tricks. And for those of you who have yet to sign up for the lessons - what better time than now?
|
In This Issue
Latest SLR Guides
Olympus E-510
Nikon D80
Canon Rebel xTi
Nikon D40
Sony ALPHA A100
Digital SLR Terms
Megapixels
Anti-Shake
ISO / Image Noise
Sensor Dust
Crop Factor
RAW vs. JPG
Continuous Photos
Autofocus Points
Aspect Ratio
Lens Terms
Focal Length
Prime vs. Zoom
Maximum Aperture
First vs. Third Party
SLR Lens Features
Canon Lens Glossary
Nikon Lens Glossary
|
Digital SLR Lessons
- Learn digital SLR camera jargon
- Take manual control of your camera
- Improve the quality of the photos you take
Digital SLR Q & A
Question: What's the difference between a regular digital SLR and a camera that's billed as a "pro-sumer" model?
Answer
Cameras aimed at consumers try to bridge the gap between point-and-shoot compact cameras and digital SLRs.Yes, they are more sophisticated than your run-of-the-mill compact digital camera, but they don't have all the bells and whistles that are available on more high-end cameras. They tend to have less shooting modes, less autofocus points, less megapixels, and they operate quite well in AUTO mode - no knowledge of SLR photography is required to use them right out of the box.
The advantage of consumer SLRs is that they are easy to use, and are the least expensive SLR cameras you can buy: prices range from $500 to $700.
Some consumer SLRs include the Canon Rebel XT, Nikon D40, Pentax K100D Super, Olympus E-410 and the Sony ALPHA A100.
The next step up the camera feature ladder are cameras billed as high-end consumer: they tend to be faster and offer more customization than their consumer counterparts. Because of their advanced features (and more megapixels) the price of these cameras jumps up from the regular consumer models: prices range from $800 to $1,000.
Cameras in this category include the Canon Rebel xTi, Nikon D80, Pentax K10D and the Olympus E-510. Rumor has it that Sony will soon be adding a new model to their ALPHA lineup that will fall into this high-end consumer category.
Pro-sumer cameras are aimed at two groups: average consumers who have money to burn and want nothing but the best, and working professional photographers who don't require cameras with gobs of megapixels and blazing-fast speeds.
Pro-sumer cameras are priced just a tad bit higher than the high-end consumer models, and the most significant advantage that they offer is speed: they have faster continuous photography rates (measured in the number of photos per second, also called frames per second or FPS) and faster autofocus systems that are able to zero in quickly on moving subjects.
Yet another price jump takes place. Pro-sumer cameras are priced from $1,200 to $1,500.
Cameras that fall into this category include the Canon 30D, the brand new 40D and the Nikon D200. The word on the street is that Olympus and Sony will also soon be releasing their own pro-sumer models, giving professionals and advanced amateurs more cameras to choose from.
Finally, there are the pro cameras, which I don't talk about a lot on the Digital SLR Guide since the site is geared toward non-professional photographers. Professional cameras are used by those who spend their days and nights working with cameras and whose work will be printed in magazines, newspapers and other notable publications.
These cameras cost upwards of $3,000 for the camera body alone, which prices them well out of the range of people who want to take photos of their kids.
Cameras in this league are exclusively the domain of Canon and Nikon, including the new Canon EOS 1Ds Mark III, and the Nikon D2Xs.
Digital SLR Technique
A warning to all you perfectionists: this month's technique is going to result in a LOT of blurry photos.Over the course of this year, we've delved into a lot of technique in this newsletter (back issues), including how to leverage aperture, shutter speed and ISO to capture photos even when the light is less than perfect.
In the next couple of issues, we'll begin to apply some of the things that we've learned, and in some cases we'll be "bending the rules" to achieve a desired effect - and that's exactly what we're about to do.
But first, a quick review: fast shutter speeds capture clear photos.
The less time the shutter remains open, the less opportunity there is for either the subject or the camera to move while it's open. Even if you have a subject leaping all over the room, a shutter speed of 1/500 is going to freeze the action in place.
When your subject isn't moving, you just have to make sure that the shutter speed stays fast enough to prevent blur from camera shake. The correct shutter speed in this instance is related to the focal length of your lens. If your shutter speed falls below 1/focal length, then you're running the risk of blurring your entire photo.
For example, with a lens with a focal length of 50mm, you need to keep your shutter speed at 1/60th of a second to ensure clear shots (1/60 is faster than 1/50). With a 200mm lens, you need to increase the shutter speed to 1/250 to keep your photos crystal clear.
This focal length rule can be bent a bit if you have some form of image stabilization (either in the camera or in the lens).
In this case, you can get away with shutter speeds that are slower than 1/focal length, but only if your subject is NOT moving. If your subject is moving fast, the IS system will ensure that the background is clear, but your subject will be a big blur (since the only thing that freezes subject motion is fast shutter speeds).
That's the background information - now let's talk about intentionally adding blur to your photos.
Including some form of motion blur in your photos can create images that are more dynamic and interesting. While it can be fun to freeze a child in mid-leap, or a drop of water as it splashes into a pool, sometimes you want to show the viewer just how fast your subject is moving.
There are two approaches to this technique: one leverages image stabilization and the other does not.
I'll start out by talking about the non-IS approach, since this technique can be used by everyone - readers with built-in stabilization systems can turn it off to create this effect.
The first step is to find a subject in motion. Examples include: cars, trains, people on bikes and children running. Notice a pattern here? All of these subjects are moving horizontally.
If you wanted to freeze the motion of these subjects, you'd have to use shutter speeds that are faster than 1/500th of a second. In this case, we're going to go the opposite direction. Set your camera to shutter priority mode ("S" or "Tv" on the main control dial) and then select a shutter speed between 1/60th and 1/125th of a second.
If you hold the camera steady and use slow shutter speeds like this with moving subjects, it's guaranteed that your subjects will turn out blurry. The trick then is to add camera motion to the mix.
As your subject zips past you, press down on the shutter release button and PAN the camera with the subject as it goes past.
If you are able to move the camera at the exact same speed as your subject - I warned you this was not a precise technique - then your subject will appear nice and clear in your image while the background will be a blur. This creates a strong sense of motion without making your entire photo a blurry mess.
I will say this - it takes a LOT of practice to get right, and even once you have it down, you STILL might wind up with a lot of completely blurry photos. The nice part about digital is that you can just keep on shooting until you get that one image that's a keeper.
The shutter speed in the photo below is a relatively fast 1/250th of a second, but panning quickly with the moving dog resulted in a blurred background. In order to capture a perfectly clear image, I would have had to use a shutter speed closer to 1/1000th of a second.

This second technique for intentional blur is for those of you with image stabilization lenses or with IS built into the camera body.
First, activate the IS system. Most IS systems come with two modes: one for static subjects and one for subjects moving horizontally. In this case, we're going to use the mode for static subjects. (NOTE: you can use the technique I just described with your second IS mode, which helps to keep the camera sensor steady as you pan with a moving subject).
Find a situation where your background is static, but your subject is in motion. Examples of this include any type of falling water (rivers, waterfalls, fountains) or situations where you have a lot of people milling around (parks, plazas, etc.).
Set your camera to shutter priority mode ("S" or "Tv") and select a nice slow shutter speed: something in between 1/8 and 1/15th of a second should do.
Compose your photo and take a few shots. You'll notice something interesting happening in the resulting images. The static background will appear sharp and clear (you can thank the IS system for that) but any moving subjects will appear blurry (it's especially apparent when you have large crowds of people moving around).
This is another great way to give your photos a sense of motion, and is somewhat less error-prone than the panning technique.
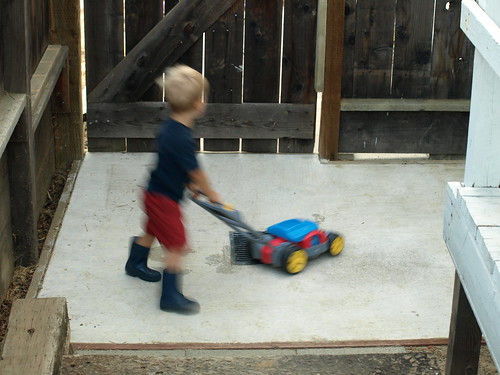
This image above shows a clear background with a blurred subject. Shutter speed is a slow 1/20th of a second which would have blurred the ENTIRE photo (due to camera shake) if I hadn't been using a camera with image stabilization.
Learning Resource
 Pentax recently announced the launch of pentaxphotogallery.com, a virtual photography gallery where you can browse through a variety of photos taken by photogs using Pentax digital SLR cameras.
There's a wide range of material here: over 2,500 images taken by photographers in over 40 different countries.
Due to the range, this is first and foremost a great place to go browse to get the creative juices flowing.
You'll no doubt be inspired by some of the images that you see, and one of the best ways to learn both photography as well as how your camera works is to de-construct the work of others. Figure out what type of lens they used, how they approached the composition, and what the light source is (whether artificial or natural).
But there's a second use for this Pentax gallery, even if you're not yet the owner of a digital SLR camera.
The majority of the photos on the site have been tagged with both the camera and lens that the photographer used to capture the shot. The site search is coupled with this information so you can quickly find sample photos taken with a Pentax K10D or a Pentax K100D.
You can also search by lens type, so if you're in the market for a new lens for your Pentax DSLR but aren't quite sure what to get, just browse the gallery by lens type and see the difference in between photos taken with the SMCP-DA 16-45mm f/4 ED-AL vs. the completely unique SMCP-DA 70mm f/2.4 ED pancake lens.
Only one word of warning: since the site is display a lot of high-resolution photos, it does take some time to load - best viewed when you have access to a nice fast Internet connection (like at work - but you NEVER research digital SLR cameras at WORK, right?)
How and When

Your digital SLR camera can capture images in two primary formats: RAW and JPG.
RAW files are unprocessed image data, while JPGs are not only processed, they're also compressed. Let me explain what I mean when I talk about processing and compression.
There are several different "effects" that your camera can apply to your photos every time you take a shot. These include: color tone and saturation (the intensity of color), white balance (which also affects color), sharpness and contrast.
When you capture an image as a RAW file, none of this processing is applied to your image. You get to decide after the fact whether you need to increase or decrease the exposure, balance the colors, or remove the colors entirely to create a black and white image.
With a JPG file, all of these changes are applied to your photo BEFORE it's saved to the memory card. While you can make adjustments to them later using an image editing program, the scope of the editing that you can do is limited.
Furthermore, a JPG file is compressed before it's saved - this means that the camera evaluates the photo, and finds ways to eliminate non-essential image data to reduce the overall size the JPG file takes up on the memory card. The bottom line: a JPG file has "lost" some of the qualities of the original image.
All of this would seem to indicate that we should all be capturing our digital photos as RAW files.
There are several reasons not to do so: RAW files take up a HUGE amount of space on both your memory card and your computer's hard drive AND they require special software to view and edit. They're also not easy to e-mail to friends or upload to photo galleries.
But for those who want complete control over their photos, RAW is definitely the format to use. The following paragraphs will serve as an introduction to some of the tools that you can use to view and process RAW images, along with some tips about how to save RAW files so that you can share them with others.
Let's start with the software options available to you. There are a wide variety of programs out there that will let you edit your RAW files. Some are just pure RAW editors, while others provide you with other tools to help you sort and organize your digital images. The programs also vary between those designed for consumers who want to use the RAW format, and professional photographers.
I'm not going to get into the pros and cons of each one of these software solutions - I'm just going to list them all out so you can get a sense of the RAW software that's currently available.
For consumers, the RAW software options include: Phase One's Capture One LE ($80), BreezeBrowser Pro ($70), Bibble 4.9 Lite ($70), and Adobe Elements ($65).
For professionals (or professional wannabees) there's Capture One Pro ($400), Bibble 4.9 Pro ($130), Adobe Lightroom ($297), Apple Aperture ($270) - for Macintosh users only - and Nikon Capture NX ($120) - only for Nikon digital SLR cameras.
Once you've got your RAW software installed, set your camera's image quality mode to RAW and take a few shots.
A note about file names: every manufacturer's RAW format is proprietary, so each one uses a different file extension. Canon captures CRW and CR2 files (as in IMG_9900.CRW), Nikon's is called NEF, Olympus is ORF, Pentax is PTX or PEF and Sony is ARW or SRF. The programs I listed above are able to open RAW files with any one of these extensions, with the exception of Nikon Capture NX.
Once you've got a RAW file on your camera's memory card, transfer it over to your computer for editing. When you open the file with your editing software, you'll see a screen similar to this one (screenshot taken from Adobe Elements):

This screen allows you to make fine-tuned adjustments to the look of your photograph. You can alter the color temperature and tint, correct exposure, lighten shadows, increase brightness, and enhance contrast, sharpness and color saturation . You can also preserve the color image or convert it to black and white.
What you're doing here is "developing" your RAW file - which is essentially a "digital negative" (to use a film reference). This developing process is what happens automatically in the camera when you have it set to JPG mode.
Now that you've got your RAW file developed, and the image looks just how you want it to, what should you do with it?
Well, that depends on what you want to do with your photograph. When you've edited a RAW file, there are several different ways that you can save the developed image. The two most common options are TIFF files and JPG files.
- Save your photo as a TIFF when you want to print - TIFF files don't compress image data so this is the highest quality you can get for your digital photo
- Save your photo as a JPG when you want to share - whether you're uploading to a photo sharing site like Flickr or Smugmug, or just e-mailing a photo to friends, JPG is the right choice. It's a universal format that any computer (regardless of software) can open. It also compresses the image, which reduces the overall file size which makes it easier to upload and e-mail.
Request a Tip
If you're not sure how or when to use a feature on your digital camera, go ahead and ask me. I'll include the answer in a future issue of the newsletter.
Cameras and Accessories
Latest Canon Digital SLR
The 40D is the follow-up to the immensly popular 30D, and includes some notable improvements over its predecessor.
First and foremost is the sheer speed of the camera, which makes it one of the fastest consumer digital SLR you can buy. The 40D can take 6.5 photos per second and won't slow down until it's captured 75 high quality JPG or 17 RAW images.
For the math inclined, this means that you could capture 36 exposures (what used to be a standard roll of film) in about 5 seconds.
This snappy shutter speed is paired with a revamped wide area 9-point autofocus system that Canon claims is significantly faster and more accurate than the one that's available in the 30D (and that one was very responsive).
Other enhancements include a new 10.1 megapixel sensor that is specifically designed to eliminate noise (even at high ISO settings like 3200), a 3 inch live view LCD screen (much like what's available on many Olympus digital SLRs), Canon's dust control system, and compatability with a new wireless transmitter that allows you to transfer images to a computer without having to plug the camera in.
The one big feature missing from both Canon and Nikon cameras has been built-in image stabilization (IS). This makes perfect sense, since both Canon and Nikon invested a lot of effort in the development of their image stabilized lenses. Why put IS in the camera when you already offer an expensive lens that's got it?
But many other manufacturers now include built-in IS systems, which is an attractive feature to many consumers because the IS works with ANY lens that you attach to the camera (no special IS lenses required).
Canon has solved this problem with the 40D somewhat by offering it with a kit lens that has IS. This way, the camera covers the most popular triad of modern digital SLR camera features: image stabilization, dust control and a live view LCD.
The 40D will be available in September for $1,300 without a lens or for $1,500 with the IS lens.
Latest Nikon Digital SLR

The D300 is the follow-up to the top rated D200, and is packed with so many features that there's barely enough room here to include them all.
Here's the high-level summary: 12.3 megapixels, 6 photos per second (with the standard battery) or 8 photos per second (with the optional battery grip), maximum of 100 consecutive high-quality photos, a 51-point autofocus system with 15 crosshair sensors, a new dust control system, dual live view modes (one for when the camera's on a tripod and one for hand-held shots), a 3 inch LCD, weather sealed joints and gaskets, and compatibility with a wireless transmitter.
One real standout feature that gets buried in all the hype is something that - if it works well - will be a major step forward in digital SLR camera technology.
The problem here is that all film and digital SLR cameras have what's called limited dynamic range. When you're taking photos on a sunny day, there is a great deal of contrast variation between the highlights and the shadows, and a digital SLR camera can't capture what your eyes can see. For more in-depth information on dynamic range, see the July issue of this newsletter.
The Nikon D80 has a feature called D-lighting. This lets you edit the photos that you've got stored on the memory card, and it "boosts" detail in shadow areas while preserving the details in the highlights. While this was a nice feature to have, it really wasn't too much different from making the same type of edit using computer software - the D-lighting effet can be easily replicated with a program like Adobe Elements.
But the trick with the Nikon D300 is that it will have real-time D-lighting: meaning that this camera - unlike every other digital and film SLR that came before it - will actually be able to capture greater dynamic range as you take the photo, producing images that are more accurate representation of how your eyes see the world around you.
The D300 will be available in November and has a retail price of $1,800 without a lens.
- Specification Overview
- Information on Nikon's web site
- Press Release
- Sample photos of the D300 camera with lens
Digital SLR Buyer's Guide
Thinking about buying a new digital SLR camera? Get a complete introduction to all the latest technology and cameras with the Digital SLR Buyer's Guide!
Links
The following collection of links will help to keep you posted about what's new at the Guide and in the world of digital SLR cameras.
Recent Updates to the Digital SLR Guide
The announcements by Canon and Nikon have kept me busy updating and re-arranging pages of the site to keep up-to-date. Here's what's changed recently:
- Canon Digital SLR Cameras
- Nikon Digital SLR Cameras
- 10 megapixel digital SLRs
- Dust control digital SLRs
- Live view digital SLRs
Other Photography Sites
- Betterphoto.com - a wealth of photography learning opportunities
- Photojojo - a great site with tons of photography do-it-yourself (DIY) projects
- Flickr - THE social media site for photographers
- Strobist - everything you ever wanted to know about lighting with external flash
- Photo.net - lots of learning resources and plenty of examples of exceptional photography
In Conclusion
I hope that everyone had a great Summer and that you were able to stay out late taking lots of photos with your digital SLR camera.And for all you folks who don't yet own a camera - it looks like there will be plenty more to choose from in the next couple of months, and the features available on these cameras just keep getting better and better.
Thanks for reading and happy picture-taking!
--Chris Roberts, Your Digital SLR Guide