| Back to Back Issues Page | ||
 |
||
|
Digital SLR Guide Newsletter - New DSLRs, How to Meter and More May 01, 2011 |
||
Having trouble viewing this newsletter? Read the latest issue online at If someone you know has forwarded you this newsletter and you've enjoyed it, subscribe now to receive the next issue when it's published.
Stay Updated!New Camera Guide: Canon 60D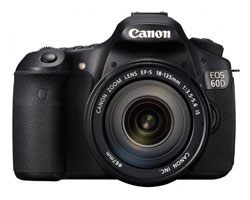 I've just posted a new camera guide for the Canon 60D. This guide has been a long time coming. I actually used the camera way back in December and have been swamped with other things. This guide sat on a virtual shelf gathering dust. Now I've finally had the chance to get it down, dust it off, put the finishing touches in place and publish it. Good thing too - based on the results of some recent polls it sounds like there are plenty more cameras that are in need of guides. Hopefully those won't take months to complete! New Camera: Nikon D5100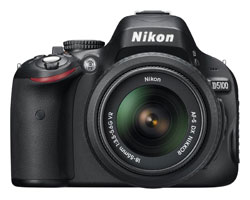 Not to be left out of the new camera announcement category, Nikon has now leapt into the pool with the release of the new Nikon D5100. It's about time: the predecessor to this camera - the Nikon D5000 - was originally released in 2009, and two years is quite a long time to go without an update (at least in the world of DSLR cameras). So, the first question that pops to mind is: "how does the D5100 improve upon the D5000?" It does so in several ways:
Besides this, the D5100 includes an 11-point autofocus system (quite standard on Nikon DSLRs), 4 photo per second continuous speed and a 16.2 megapixel sensor. The camera is compatible with regular SD, SDHC and SDXC memory cards. Available in April 2011, the D5100 has a suggested retail price of $900 USD with an 18-55mm Vibration Reduction (VR) lens. Beginner Tip: How to Pick the Right MeteringEvery single time your camera takes a picture, it's trying to get the light "just right".What do I mean by this? I mean that your camera - perfectionist that it is - REALLY doesn't want your photo to look too bright or too dark. It wants the scene that it captures to appear a lot like what your eyes saw when you used the camera to snap the shot. If your photo turns out really dark then it is "under exposed" and if it looks too bright then it is "over exposed". The harmonic state between these two is called a "balanced" or "correct" exposure. Now you are a pretty good judge of when it's bright or dark (it's not tough for you to figure out) - but how in the world does your camera know how bright it is? After all, it doesn't have eyes and a brain like you to figure such things out. Your digital SLR determines how much light will fall on the sensor by using a device called a light meter. The light meter pays attention to the volume of light passing through the lens and (in AUTO mode) it adjusts two main camera settings - aperture (the width of the opening in the lens) and shutter speed - to ensure that all your photos are correctly exposed. Without a built-in light meter, you would have to randomly select an aperture and shutter speed and then adjust these settings while taking test shots to get your exposure right. Most people are happy to leave the light meter alone and let it do its thing — but there is a way that you can control the surface area that the light meter monitors. This setting is called the metering mode. AREA OR EVALUATIVE METERING This is the most common mode of metering, and this simply means that the light meter monitors the ENTIRE viewfinder for light. Let's say you take a photo where exactly half of what you see in the viewfinder is in shade and half is in sunlight. The light meter is aware that half of the scene is bright and half is dark and it will do its best to "balance" the two so that your photo looks natural. Now imagine that you're taking a picture of a sunset: the overall scene is dark, except for the sun which you have placed in the top left corner of your photo. Since the meter is paying attention to all the light in the viewfinder, it knows that there's a bright source of light off in the corner and will adjust its exposure settings accordingly. Simply put: when you're using area/evaluative metering, 100% of what you see in the viewfinder is being used by the light meter to get a balanced exposure. 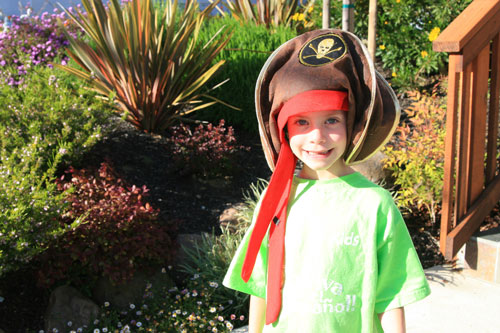
This image is an example of area metering - the background is evenly exposed, but this causes over exposure on the portrait subject in the foreground.
CENTER-WEIGHTED METERING Imagine that you're taking a portrait of a friend outdoors. Let's say that you want to be 100% sure that your friend's face is correctly exposed, but you don't care all that much about what happens to the background (it can either be really bright or really dark). Since your friend's head doesn't fill up the entire viewfinder, you can use center-weighted metering. In this case, the light meter only uses a circular area in the center of the viewfinder to judge exposure. If there is some bright spotlight or deep shadow in the corner of the frame, the camera will be blissfully unaware of this when it adjusts its settings. You can use center-weighted metering when you have a moderately large subject that you want exposed correctly and when you're less concerned about what happens around the edges of your subject. 
The only change made for this image was a switch to center-weighted metering. Since the metering is more focused on the portrait subject, he is better exposed and the background is under exposed.
SPOT METERING Let me say this first: not all digital SLR cameras have spot meters. It's a feature that often only appears on the intermediate and advanced models but is left off the basic entry-level cameras. When you switch to spot metering, your camera's light meter is zeroed in on a tiny area right around the center focus point in your viewfinder. Using spot metering is a tricky business, and you'll really only ever need to use it when you have a small subject that you want correctly exposed and where the exposure for everything else doesn't matter. For example: you're taking another portrait, but your friend is standing some distance away. It's a sunny day and there's a lot of contrast and you want to be sure your friend's face is properly exposed. To do this, you change to spot metering mode, and point the center focus point of the camera straight at your friend's face. The spot meter should take a reading ONLY on that small area and it will ignore all the light (and dark) that falls outside of it. The most common use of sport metering that I know of is in portrait work, where it's essential to get faces correctly exposed. However, you could also apply spot metering to ANY subject that doesn't fill the entire frame of the viewfinder. Let's say that you're taking a picture of a lone tree in a field and that tree is illuminated by sunlight while the surrounding area is in shadow. To ensure that the tree is correctly exposed, you spot meter it and fire away. Spot metering may yield some unexpected results: for example, the overall exposure of your images when you spot meter may look WAY off - either too bright or too dark. This is because ONLY the one thing under the spot meter is correctly exposed - everything else is ignored by the light meter. 
For this image, I spot metered only the face. You can still see color in the face which means it's not over exposed, but the background is getting quite dark.
 Beginner Digital SLR Lessons
Intermediate Tip: Tweaking Clarity, Contrast and ColorThis tip is for anyone who captures images as JPG files instead of RAW.If you work exclusively with RAW files, then any color correction or image manipulation can be done using software - the settings of your camera at the moment you take a picture are irrelevant. However, if you don't want to spend a lot of additional time working with RAW files and just want the camera to handle the image processing, then you've got a LOT of options to play with. Just about every digital SLR lets you manipulate the look of your JPG images - even the less expensive models. Of course, the more expensive the camera the greater the number of settings you can control. Digital SLRs come with a pre-set group of image settings that go by a variety of names. For example, Canon calls them "Picture Styles". Regardless of name, these settings do the same thing: they adjust the clarity, contrast and color of your digital photos. The pre-set options go by names that make it obvious what they're used for: "Neutral", "Portrait", "Landscape", "Vivid", "Natural", and "Faithful" are all common names. They are a good introduction for those just starting to customize the "look" of their photos. 
An image taken with a "neutral" setting shows limited sharpness, contrast and color saturation.
However, we're going to take it a step further. You have the ability to manually change the settings on any one of the pre-set image settings that come built in to your camera. You also - depending on camera model - have the ability to create brand new image settings from scratch that aren't based on any pre-set model. Whatever you choose to do, you'll be manipulating these four image parameters:
Your camera will typically have between 5 and 9 levels of control over each one of these settings, and each one can be set independently from the others. For example, if you like your images to look razor-sharp but don't want to change the colors, then you can just increase the Sharpness setting to its highest level and leave all the others alone. If you want to take landscape pictures with very bright greens and blues, then increase the Saturation setting on its own without touching the other settings. However, if you really want to get some interesting images, then adjust multiple settings at the same time: decrease Sharpness, increase Contrast, increase Saturation and fiddle around with Color Tone/Hue and you can produce some pretty unique images without every going near a computer or software program. 
This image shows what you can get when you adjust sharpness, contrast and color all at the same time.
Intermediate Digital SLR Lessons: Playing With Light Learn all about light in this new series of lessons from the Digital SLR Guide. These lessons explain:
Photo LinksPhoto ContestsOther Photography Sites
Great Photo Blogs
Recommended Digital SLR Retailers(These are the three online stores that I use to purchase all of my digital SLR photography gear)In ConclusionThe results are in!Thanks to everyone who submitted their request for the next digital SLR camera guide. Two cameras rose above the rest of the pack: the Canon T3i 600D and the Nikon D7000. It looks like I've got my work cut out for me. I'll get my hands on both of these cameras as soon as I can and will try to have those guides available within the next couple of months. Of course, I'll announce when each new guide is available in this newsletter. Until then, happy picture-taking! --Chris Roberts, Your Digital SLR Guide |
||
| Back to Back Issues Page |