How to Focus a Digital SLR
Learning about the focus setting your your DSLR may sound at first like a totally simple subject, but there are some nuances that you need to undertand in order to leverage focus to its fullest potential.
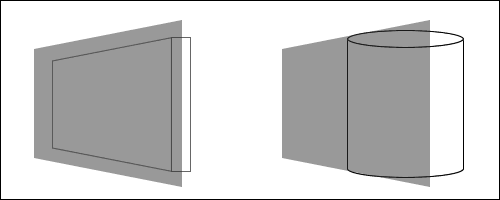
Here's the first one: when you focus on a subject, you're not focusing on a POINT in space, but a PLANE. The best way to see this is to take a picture of a textured wall (i.e. brick).
If any part of the wall is in focus then the ENTIRE wall will be in focus - that's because all other points along the wall fall within the plane of focus.
However, if you take a picture of a cylinder and you focus on the center then the sides may not be in focus, since they are behind the plane of focus.
To bring a plane into focus, you've got two main options: you can focus the lens manually (by twisting a ring on the front of the lens) or you can leverage the autofocus system in your camera/lens.
If you go with autofocus, you're really working with TWO mechanisms: the one in the lens and the one in the camera.
The SPEED of an autofocus (AF) system is the result of a partnership between camera and lens. For example, if you stick a lens with a slow AF on a fast camera, the performance of the AF will be reduced. Conversely, if you stick a lens with a fast AF on a moderately fast camera, the AF performance will increase.
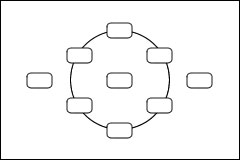
A camera's autofocus system is made up of a group of invidual autofocus points: any one autofocus point can be used by the camera to bring the image into focus.
In the good old days of film SLR cameras, many only had one AF point that sat in the center of the viewfinder. Today's modern DSLRs can include 3, 5, 9, even 11 separate AF points.
What are all these AF points for? They serve two main purposes:
- They let you focus on off-center subjects
- They track moving subjects across the viewfinder
Imagine you're taking a picture of a friend in front of a fountain and your friend is standing off to the left side when you look through your camera's viewfinder. If ONE autofocus point is over your friend, this is the reference point the camera will use to set the plane of focus.
Now imagine that your friend is walking in front of the fountain from left to right. As your friend passes under each AF point, the camera will re-adjust the plane of focus depending on the active AF point.
NOTE: While all of the AF points in your DSLR can be used to focus on a subject, the CENTER point is often the most sensitive and the most accurate. If you're having a problem with autofocus (see below) try selecting only the center point to see if this helps.
Common Focusing Problems
While useful in many situations, multiple AF points can sometimes pose a problem, especially with subjects that are small relative to the background. When you're trying to focus on an off-center bug on a flower, the AF system may decide to focus on the background instead.
For times like these, you have the option to MANUALLY select the AF point you want your camera to use. If the bug is sitting under the rightmost AF point, then manually select this AF point as the active one so that your camera doesn't use the others.
In addition to focusing on the background, there are times when your camera won't focus at all.
This typically happens when you're below the minimum focusing distance that your lens is capable of. The minimum focusing distance varies from lens to lens. It is measured as the distance from your camera's sensor to your subject (since the lens is trying to bring images into focus right where the sensor is located).
Special lenses called macro lenses have VERY small minimum focusing distances, allowing you to place the lens right up close to your subject for maximum magnification.
There are other times when minimum focusing distance is not an issue, but your camera STILL can't lock focus. This happens most frequently under two conditions:
- Low Light - in very dim light, EVERY autofocus system will have a hard time locking on to a subject, even with the most sophisticated DSLRs. AF systems need light to work, and when light is lacking, AF has a tough time
- Low Contrast - when your subject doesn't have a lot of contrast, the AF system becomes "blind". For example, if you try to take a picture of a clear blue sky, the AF system won't know what it should bring into focus. If you point your camera at a CLOUD, then the AF will lock onto the cloud because there is contrast between the cloud and sky
Live View Focusing
If your DSLR has a live view mode, you'll find that autofocus works one of two ways:
- Fast AF With Blackout - in this case, the live image on the LCD goes black while the camera uses its multiple AF points to lock focus (which it can do fairly fast). Once the focus is locked, the image on the LCD re-appears.
- Slow AF No Blackout - with some live view systems you can continue to see the image on the LCD while you autofocus, but AF performance is significantly reduced. This is because instead of using the multi-point AF system, your camera resorts to what's called "contrast detection autofocus" - this is the same system used by all compact digital cameras and is quite slow when compared with DSLR autofocus.
Some cameras even let you c hoose which type of AF you use in live view mode. The AF mode you select depends on your subject.
If your subject is not moving, then you can use the slow AF mode so that you can always see an image on the camera's LCD. If your subject is moving, then you'll need to leverage the speed of the multi-point AF.
Exercise
- For starters, disable the autofocus on your lens
- Pick a focal length for your lens and look through the viewfinder
- Manually adjust the plane of focus by twisting the ring on the front of the lens
- Now, activate the AF on the lens
- Point your camera at different subjects that are near and far and press down halfway on the shutter release button to engage the AF system
- Take manual control of the AF points and practice selecting different individual points while focusing of off-center subjects
- Get right up close to a subject to see what happens when you're within the minimum focusing distance of your lens
- Point your camera at a low-contrast object (painted walls, pieces of white paper, etc.) to see how the AF struggles