How to Read a Histogram
Before I tell you how to read a histogram, it's probably a good idea to first tell you what it is and why it's so useful.
The simple definition is this: a histogram is a visual representation of the light and dark elements in your photograph. It helps you instantly determine whether your photos are being correctly exposed.
This brings up two immediate questions: 1) Doesn't my super-expensive digital SLR camera get the exposure correct every time? and 2) Since I can see the photo that I just took on the LCD, can't I use that to judge if its correctly exposed?
Unfortunately, the answer to both of these questions is no, which is why the histogram is such a useful tool.
In the pagraphs that follow, I'll provide more in-depth answers to these two questions, delve into the details of how to read a histogram, and help you get perfect exposures from your camera with every photo that you take.
Why Exposure Isn't Always Correct
Despite having a massive amount of processing power built into its compact frame, your digital SLR camera still has its faults.
One common one - no matter how advanced your camera - is its ability to automatically judge exposure settings.
First, let's quickly review the ways in which a photo can be exposed:
- Under-exposed - the overall tone of the image is dark, shadows are dark and colors are muted
- Correctly exposed - the colors and tones in the photo are balanced and the image appears as it did to your eyes
- Over-exposed - colors and tones are too bright, and highlight areas of the image are washed out
If you leave your digital SLR camera in AUTO mode, you're letting it decide how much light is going to strike the sensor.
The camera does this using something called a light meter.
The light meter takes a reading of the scene that you are about to photograph, then it adjusts the aperture of the lens (how wide it opens) and the duration of the shutter speed (how long it stays open) to expose the digital sensor to just the right amount of light.
If the light meter makes an incorrect judgment about the amount of available light, you wind up with a photo that is over or under-exposed.
Don't get me wrong - modern light meters are very sophisticated and are able to judge the exposure accurately quite often.
But there are times when they get "fooled" into thinking that there is more or less available light.
For example, if a portion of your photo is predominantly white, the camera will think that it has to reduce amount of light striking the sensor. End result: your photo is under-exposed.
On the flip side, you could have a subject in sunlight surrounded by shade. In this case the camera detects all of the shadows and winds up over-exposing the subject in the sun.
Judging Exposure on the LCD
One of the primary reasons that I enjoy using digital cameras is because you can immediately see the photo that you just took.
If someone's eyes are closed or the composition is poor, you can get that immediate feedback and take another photo to get it right.
While making these types of judgement calls by checking photos on the LCD is fine, I don't recommend that you try to evaluate either the exposure OR the color just by using the LCD.
Part of the problem is size: even though manufacturers are constantly increasing the size of the LCD screens, they are also reducing the size of the cameras.
At some point, the LCD simply can't get any larger.
Since you can't see your photo at a large size, it's hard to tell if the exposure is balanced.
Another issue is the brightness setting of your camera's LCD. If you set the LCD to maximum brightness so that you can easily read the menus, this may wash out your photos when you review them.
It will appear to you that all of your photos are over-exposed, when they really aren't.
This is why the only way to be 100% sure that you're getting a correct exposure is by checking the photo's histogram.
The Bell Curve
To understand how to read a histogram, it helps if you're familiar with the traditional bell curve display.
Instead of a digital image, let's imagine that you're measuring the height of 100 different people and plotting each person's height on a chart.
Some of the people will be very short and some will be exceptionally tall, but the large majority will fall somewhere in the middle.
If we set the X axis of the chart to the number of people and the Y axis to the different heights, we wind up with the following bell curve:
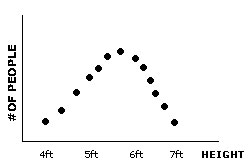
Now, instead of counting people of different heights, let's plot the number of light and dark pixels (the component elements of a digital photo) in an image:

What do you know? They look pretty similar, don't they?
This is because the vast majority of photos that you take have midtones that are neither very bright nor very dark.
But every so often you take a photo where the histogram doesn't look like a perfect bell curve - this is not a bad thing, but it's important to understand what the histogram is telling you.
How to Read a Histogram
A histogram display is set up so that dark pixels are on the left and light pixels are on the right.
Peaks in the histogram show you whether the digital photo is predominantly dark, light or somewhere in the middle.
For example, if your photo includes a lot of shadows and dark areas, the peak of the histogram will be on the left side of the chart.
If your photo includes a lot of bright areas, the peak will be toward the right side.
If your photo is fairly evenly balanced (there are no hotspots or dark shadows) then the histogram will look like a standard bell curve, with the peak right in the middle.
But let's get back to talking about exposure, since checking a histogram is one of the best ways to ensure that your photo is correctly exposed.
This first example shows you an image that is correctly exposed. Note that there is not a lot of contrast in the photo - we'll talk more about high-contrast images in just a moment. Since the image is correctly exposed, the matching histogram is a bell curve, with the peak right in the middle.

In the second example, we have the same subject and the same light, but in this case I've intentionally under-exposed the image. Now you can see that the peak of the histogram has shifted to the left, toward the dark side of the scale.

In this final example, I've intentionally over-exposed. Now the peak has shifted to the right, toward the light side of the scale.

Dynamic Range and Loss of Detail
Your eyes can see an enormous range of detail from shadow to highlight. Even if you're standing on a forest path crisscrossed with bright rays of sunlight, you can still see the pine needles in the shadows under the trees and the veins of the leaves in bright sunlight.
Unfortunately, your digital SLR can't.
All digital SLR cameras (and film cameras for that matter) have what's called a limited dynamic range.
This means that in a scene with immense contrast, the camera will either render the shadows as pure black (with no detail) or the highlights as pure white.
The good news is that you can clearly see this in the histogram display, and make exposure adjustments to compensate as necessary.
Any time that the peak of the histogram is piled up against the side of the chart, you're losing some detail in your photo.
This first example shows a scene with strong contrast and very dark shadows. In this case, the shadows are SO dark that there is no detail in them - they appear as pure black. You can see this on the histogram because the peak on the far left (green circle) is cut off on the left side of the chart.

Here's another scene with strong contrast, except this time the loss of detail is in the highlights. They appear in the photo as pure white, which is also called "blown out" highlights. You can see this represented in the histogram because the peak on the far left (green circle) is cut off on the right side of the chart.

Histogram Variation
Please don't assume that if you're histogram isn't a perfect bell curve that your image is incorrectly exposed - that's not the case.
There is a LOT of variation when it comes to histogram displays, since there is a lot of variation in the intensity of light striking the camera's sensor.
Many histograms will display peaks and valleys which represent areas of shadow and highlight in your photo.

The trick from an exposure standpoint is making sure that the bulk of the histogram falls in between the two endpoints. If the bulk of the histogram is over to the left your photo is under-exposed, and if it's too far over to the right your photo is probably over-exposed.

Seeing the Histogram on Your LCD
Now that you know HOW to read a histogram, you can set up your camera to show you one every time you take a photo.
Your LCD should already be set to display every photo you take right after you snap the shutter.
Now, you just have to modify the display so that it also shows you a histogram at the same time. Some camera manufacturers overlay the histogram right on top of the image while others place it off to the side.
Regardless of how the histogram displays on your digital SLR camera, the valuable information that it provides to you is the same.
You'll now be able to instantly tell when:
- Your entire photo is over-exposed
- Your entire photo is under-exposed
- A portion of your photo has shadows that are pure black
- A portion of your photo has highlights that are pure white
You can use this information to make adjustments to your camera settings so that you get a perfect exposure when you TAKE the photo - ensuring that you won't have to spend a lot of time later fixing your photos with a software program.
Would you like to learn more about your digital SLR camera and dramatically improve the photos you take with it? Register for the digital SLR lessons

|
