How to Take Photos at Night
Taking photos at night is like swimming underwater while holding your breath — it can be done, but it's not entirely natural.
The main component of most photographic images is light, but at night-time you won't have a lot of it, if any at all. The lack of light poses some unique challenges and you'll need special tools and techniques to overcome them.
On the plus side, you can capture some exceptionally creative images at night that are not possible when the sun is out.
The Gear
First, some good news: any digital SLR camera - old or new - can take photos at night.
No special camera type is needed, and you won't need to upgrade your first-generation digital SLR with the latest model.
However, regardless of the camera model you currently own, there are two extra accessories that are required for night photography:
- A tripod, like the Dolica AX620B100
- A remote release
When considering a tripod for night photography, you need to decide WHERE you're going to take pictures at night.
If you'd like to haul camera and tripod out into the middle of the desert/mountains/prairie to capture the stars, then you'll want a tripod that is light and portable.
If - like me - you only walk a few feet from your car to take photos at night then weight is not an issue. Just seek out a tripod with three legs to create a stable platform for your camera.
The remote shutter release will let you take photos without laying a hand on your camera, and I'll explain why this is so important in just a moment.
There are two main types of remote releases for digital SLRs: cabled and wireless. Either one will work.
If you are on a strict budget and can't afford any extra accessories for your night photography needs, just set your camera to timer mode so that you're not touching it when it snaps a photo.
The Challenge
Clearly the biggest challenge associated with taking photos at night is the lack of ambient light.
After all, your camera thrives on light. For many styles of photography, the more light you can get into the camera the better.
There are two things that will happen with your camera when sunlight disappears:
- Shutter speeds will slow substantially
- Image blur will increase dramatically
When faced with a lack of ambient light, the ONLY way that your digital camera can create a photo that isn't pure black is to leave the shutter (which blocks the sensor from ambient light) open for a very long time.
Since most photos are captured within a fraction of a second, a "very long time" in photo-speak means that the shutter is open for a second or more.
You can determine the slowest shutter speed your camera is capable of in the following manner:
- Set the main mode dial to "Shutter Priority" mode
- Turn the main control dial to adjust the shutter speed
As you turn the main control dial, you'll see the shutter speed number changing in the viewfinder, on the top display panel (if your camera has one) and on the camera's LCD screen.
Short shutter speeds are represented by a single number even though they are actually fractions: 1/500th of a second is 500, 1/30th of a second is 30 and 1/2 a second is 2.
Long shutter speeds display with an addtional mark (often a ") so that you don't confuse them with the fractions. In this case, 2" is actually 2 seconds.
To determine the slowest shutter speed your camera can achieve, just keep turning the control dial until the shutter speed number stops changing.
Now that you know how to select a reallly slow shutter speed, you should also be aware of what happens when you do. Slow shutter speeds create motion blur.
Motion blur occurs either because the subject moves at the time of exposure or because the camera moves. Since you want your night photos to appear sharp, you'll have to ensure that the camera does not move a millimeter during the exposure. This is why a tripod (or other completely stable base of support) is essential.
It's also why you should not even touch the camera when taking pictures at night: the pressure of your finger on the shutter release button can move the camera just enough to blur your entire photo.
The Technique
Ready to take some photos at night? Let's dive in to the specific camera settings you'll use:
- Manual exposure mode
- Manual focus
- Lens aperture between f/5.6 and f/8
- ISO from 100 to 400
- A shutter speed that is slow enough for a good exposure
The reason you need to set your camera to Manual mode is that AUTO simply won't be able to figure out what to do with the lack of light.
All of the circuits inside your DSLR are designed to recognize the contrast that you get when there is plenty of available light. Take away that light, and the camera gets terribly confused.
So the first step is to take full manual control of your camera (it's not that bad, really) so you can adjust all the settings yourself.
In addition to the main mode, you also want to set the autofocus to manual, otherwise you'll get pretty frustrated. DSLRs need light for the autofocus to work and without it, they scan back and forth endlessly looking for anything to lock onto.
Getting your subject in focus manually will definitely take some practice:
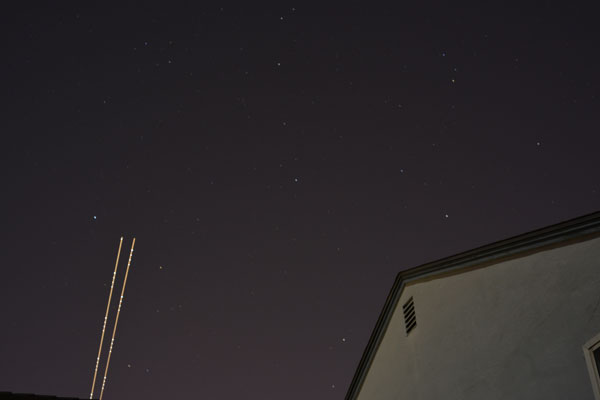
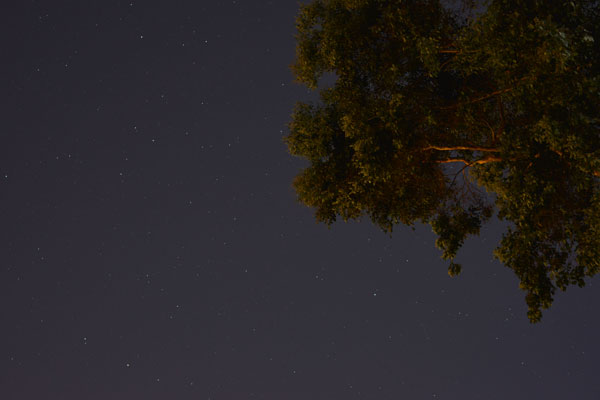
- If you're taking pictures of stars, set the focus on your lens to infinity
- If you're taking pictures of ground and sky, you can set a bright object (flashlight) on the ground, focus on that first and then remove it from the scene
The size of the lens opening - the aperture - is not an essential setting at night because you're not trying to use fast shutter speeds. Pick a setting between f/5.6 and f/8 to begin with.
In a similar sense the ISO setting - how fast the sensor absorbs light - can be anywhere from 100 to 400. ISO 100 will create less noise in your image but ISO 400 will make the stars more obvious.
Finally we come to the last and perhaps most important setting for night photography: the shutter speed.
Once you've manually selected a lens aperture and an ISO, you'll have to slow down the shutter speed until you can capture an image that's not 100% black.
If you are near a city where there is a lot of light or if there is a full moon, you can start out with shutter speeds between 1 and 2 seconds. If you're in the middle of nowhere with no moon in sight then shutter speeds of 5 seconds or longer will be required.

|